Now Reading: How to Adjust Springs on Garage Door: A Step-by-Step Guide
- 01
How to Adjust Springs on Garage Door: A Step-by-Step Guide

If you’ve ever struggled with a garage door that won’t open easily, closes too fast, or seems unbalanced, the problem may be with the garage door springs. These small but powerful components play a huge role in how your garage door works. Adjusting garage door springs isn’t just about making things run smoother—it’s also about safety and protecting your investment. Many homeowners feel nervous about handling springs, and with good reason: they’re under a lot of tension. But with the right steps, tools, and precautions, you can learn how to adjust springs on a garage door confidently and safely.
This guide will take you through everything you need to know, from understanding how garage door springs work, to the tools you’ll need, to a step-by-step walkthrough for both torsion and extension springs. Along the way, you’ll find tables that compare different spring types, practical tips most people miss, and answers to the most common questions. Whether you’re a do-it-yourself enthusiast or just want to understand what your garage door technician is doing, you’ll find clear, practical advice here.
Understanding Garage Door Springs
Garage door springs are the muscle behind the movement of your door. There are two main types:
- Torsion springs: These are mounted horizontally above the door opening. They use torque (twisting force) to lift the door. Most modern garage doors have this type.
- Extension springs: These are mounted above the upper tracks on both sides of the door. They stretch and contract to open and close the door.
Both types do the heavy lifting, making the door light enough for you (or your opener) to move. Without properly adjusted springs, the door can become hard to open, fall quickly, or even damage the opener.
Why Adjusting Springs Matters
Springs weaken and lose tension over time. If you ignore them, you may notice:
- The door feels heavier or is hard to lift
- The door doesn’t stay open or slams shut
- The opener strains or fails to work
- The door looks crooked or unbalanced
A properly adjusted spring keeps your door running smoothly and safely. In fact, a well-balanced garage door should stay in place when opened halfway by hand.
Safety Precautions Before You Start
Adjusting garage door springs can be dangerous. Springs are under high tension and can cause serious injury if handled incorrectly. Here are key safety steps you must follow before starting:
- Never adjust springs with the door open. Always work with the door fully closed.
- Disconnect the automatic opener. Unplug it or turn off power at the breaker.
- Wear safety glasses and gloves. Protect your eyes and hands from flying parts or debris.
- Use the right tools. Only use sturdy winding bars for torsion springs (never screwdrivers or makeshift bars).
- Clear the area. Keep children, pets, and anyone not involved away from the workspace.
- Work slowly and carefully. If you feel unsure at any point, stop and call a professional.
Pro Tip: Many homeowners overlook the importance of checking for worn or damaged parts before adjusting. Inspect cables, pulleys, and brackets for wear or rust—they can snap during adjustments.
Tools And Materials You’ll Need
Having the right tools makes the job safer and easier. Here’s what you’ll need for both torsion and extension springs:
- Sturdy step ladder
- Winding bars (for torsion springs, typically 18–24 inches long)
- Socket wrench set
- Adjustable wrench
- Clamps or locking pliers
- Tape measure
- Safety glasses and gloves
- Marker or chalk
- Lubricating spray (garage door rated)
For extension springs, you may also need:
- C-clamps (to hold the door in place)
- Replacement safety cables (if missing or worn)
Having all tools ready before you start saves time and reduces risk.
How To Identify Your Garage Door Spring Type
Not sure which springs your door has? Here’s how to tell:
| Feature | Torsion Springs | Extension Springs |
|---|---|---|
| Location | Above door, horizontal bar | Above tracks, both sides |
| Shape | Thick coil, few inches diameter | Long, thin, stretches when door moves |
| Movement | Twists | Stretches/Contracts |
| Safety Cables | Not required | Required inside spring |
| Common on | Newer doors | Older doors, lighter doors |
If you see a single bar with a spring above your door, it’s likely a torsion spring. If you see a spring running along each track, those are extension springs.

Step-by-step: Adjusting Torsion Springs
Torsion springs are common in newer garage doors. They’re also more dangerous to adjust than extension springs. Only proceed if you are confident with tools and follow every precaution.
Step 1: Prepare The Door And Workspace
- Close the garage door completely.
- Unplug the automatic opener.
- Place a clamp or locking pliers on the track just above one of the rollers to keep the door from moving.
- Put on safety glasses and gloves.
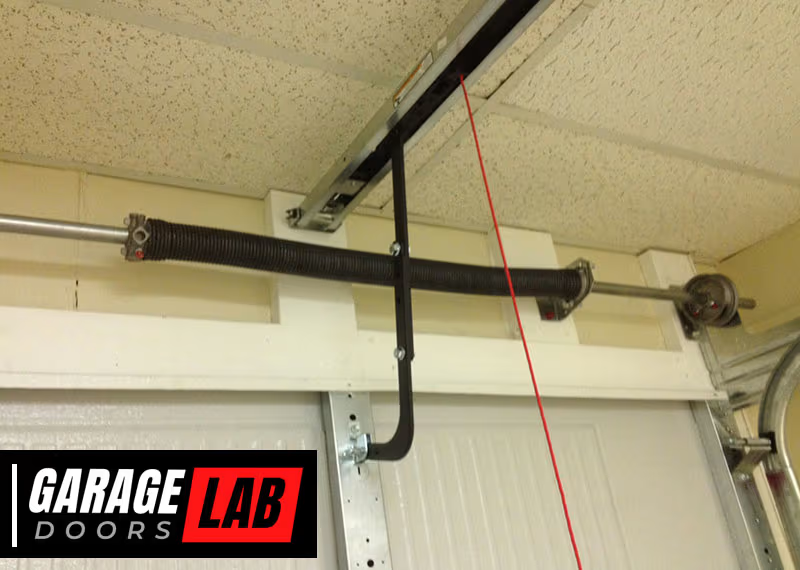
Step 2: Locate The Springs And Mark Their Position
- Find the torsion springs above the door.
- Use a marker or chalk to mark the current position of the spring and the winding cone. This helps you see how much adjustment you make.
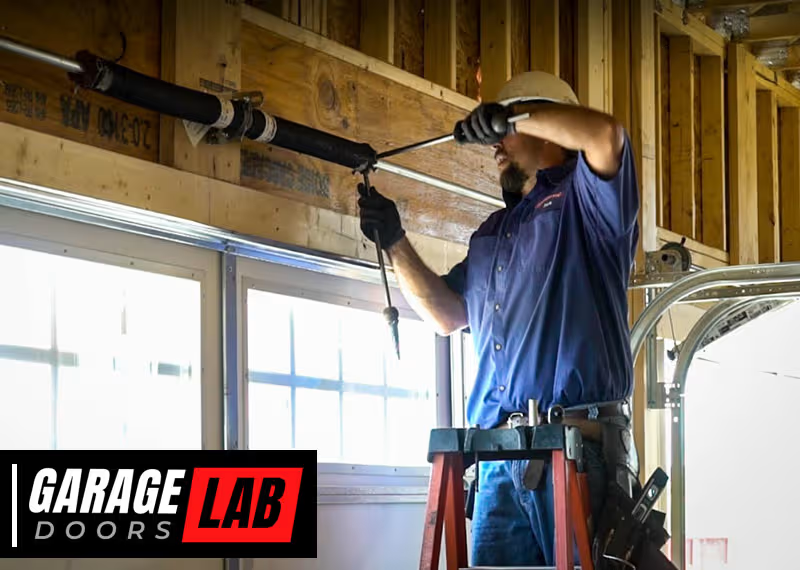
Step 3: Insert Winding Bars
- Insert a winding bar into one of the holes on the winding cone.
- Hold the bar firmly. Never let go while the spring is under tension.
Step 4: Loosen The Set Screws
- With the winding bar holding tension, use a socket wrench to carefully loosen the set screws on the winding cone. Do not remove them, just loosen enough for the spring to move.
Step 5: Adjust The Tension
- To increase tension (if the door is heavy or won’t stay open): Turn the winding cone upward (usually quarter turns at a time).
- To decrease tension (if the door won’t close or is too light): Turn the winding cone downward.
Each quarter turn adds or removes tension. Most standard springs require about one full turn per foot of door height, but always check your door’s manual.
Non-Obvious Insight: Many beginners don’t realize that adjusting one spring affects the balance of both sides. Always adjust both springs evenly to avoid uneven stress on the door.
Step 6: Tighten Set Screws And Test
- After adjustments, tighten the set screws securely.
- Remove the winding bars carefully.
- Remove any clamps from the track.
- Lift the door by hand to check balance. The door should stay in place when half open and move smoothly.
If needed, repeat the process in small adjustments. Don’t over-tighten; too much tension can break springs or damage the door.
Step 7: Reconnect Opener And Lubricate
- Plug in the opener.
- Test the door with the opener. Listen for smooth operation.
- Spray springs lightly with garage door lubricant to reduce friction and noise.
Step-by-step: Adjusting Extension Springs
Extension springs are less common on newer doors but still found in many homes. They are easier and safer to adjust but still require caution.
Step 1: Secure The Door
- Close the garage door fully.
- Unplug the opener.
- Place C-clamps or locking pliers on the tracks just above the rollers to prevent movement.
Step 2: Inspect And Prepare
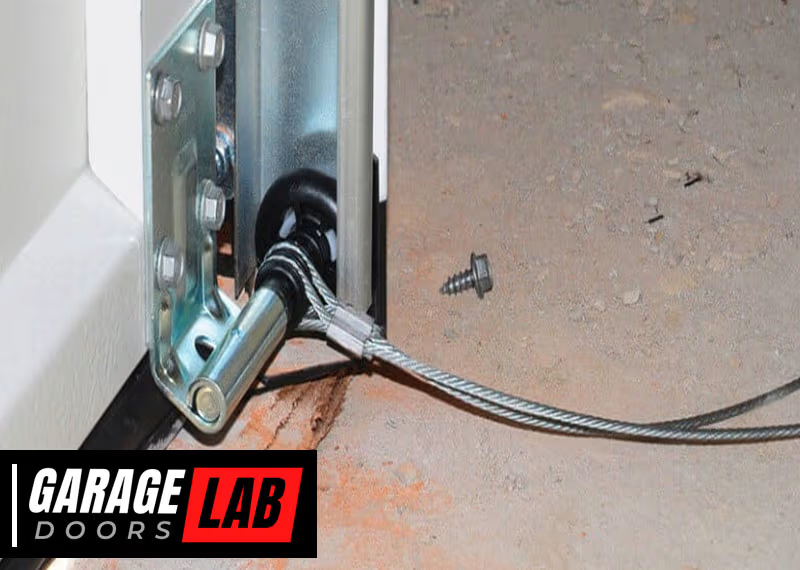
- Check for broken or stretched springs. If a spring is broken, replace both sides—never just one.
- Make sure safety cables run through each spring. If missing, install new ones before proceeding.
Step 3: Adjust The Spring Hook
- Most extension springs connect to a series of holes on the door frame or track. To adjust, move the S-hook or clip to a different hole.
- To increase tension (door is too heavy): Move the hook to a hole further from the door.
- To decrease tension (door won’t close or is too light): Move the hook closer to the door.
Step 4: Adjust Both Sides Evenly
- Always adjust both springs by the same amount. Uneven springs can cause the door to tilt or jam.
- Mark the current hook location before changing. This makes it easy to return if needed.
Pro Tip: Many people miss checking the pulleys and cables during adjustment. Worn pulleys or frayed cables can make the door feel unbalanced even if the springs are correct.
Step 5: Test And Fine-tune
- Remove clamps.
- Lift the door by hand. The door should stay put when half open.
- If the door moves up or down, repeat small adjustments until balanced.
Step 6: Lubricate And Reconnect
- Spray springs and pulleys with lubricant.
- Plug in the opener and test the door.
Signs Your Garage Door Springs Need Adjustment
It’s not always obvious when springs need attention. Here are clear signs to watch for:
- The door is hard to open by hand (feels much heavier than usual).
- The door slams shut or won’t stay up when half open.
- The opener strains or makes loud noises while lifting the door.
- The door moves unevenly or looks crooked.
- The door opens too quickly or slowly.
- You notice gaps in the springs. For torsion springs, a visible gap means a break.
- Unusual creaking or snapping sounds when the door operates.
If you see any of these issues, don’t wait—adjust the springs as soon as possible or call a professional.
How To Tell If Your Springs Are Properly Adjusted
A well-adjusted garage door spring makes the door feel “weightless.” Here’s how to check:
- Manual balance test: With the opener disconnected, lift the door halfway. It should stay in place. If it falls, springs are too loose. If it rises, they’re too tight.
- Smooth operation: The door should open and close without jerking or resistance.
- Even movement: Both sides of the door should move at the same speed and height.
| Test | Pass | Fail |
|---|---|---|
| Manual lift (half open) | Stays in place | Rises/falls by itself |
| Opener effort | Quiet, easy | Strains, noisy |
| Visual alignment | Even both sides | Tilted, uneven |
If you fail any of these tests, repeat the adjustment process or consider replacing worn parts.
Common Mistakes People Make
Adjusting garage door springs looks simple but many homeowners make costly errors. Here’s what to avoid:
- Using the wrong tools. Makeshift winding bars or pliers can slip and cause injury.
- Not securing the door. Doors can move unexpectedly, leading to accidents.
- Adjusting only one spring. Always adjust both sides evenly.
- Over-tightening springs. Too much tension can break springs or damage the door.
- Ignoring worn parts. Frayed cables or bent tracks can make adjustments useless.
- Not wearing safety gear. Eye and hand injuries are common.
- Forgetting to test after each adjustment. Small, careful changes are safer.
- Skipping lubrication. Dry springs wear out faster and work harder.
Non-Obvious Insight: Many people skip regular maintenance after adjusting springs. A little lubricant every few months keeps your system running smoothly and extends spring life.
When To Call A Professional
Not every garage door spring issue is a DIY job. Here’s when it’s safer (and smarter) to call an expert:
- The spring is broken. Replacing a broken spring is risky and requires special tools.
- The door is very heavy or commercial size. Larger doors need stronger springs and expert adjustment.
- You have multiple springs or complex systems.
- You feel unsure or unsafe at any point.
- Your adjustments don’t fix the problem.
A professional can also spot hidden issues, such as worn bearings or out-of-alignment tracks, that a DIYer might miss.

How To Maintain Garage Door Springs After Adjustment
Proper spring adjustment is just the first step. Keeping your garage door in top shape means ongoing care.
- Lubricate springs every 3–6 months. Use a garage-door-rated spray. Avoid WD-40—it’s not designed for this job.
- Inspect for rust, wear, or gaps during regular checks.
- Listen for changes. New noises or rough movement can signal problems early.
- Check balance twice a year. Repeat the manual test (door half open).
- Replace springs every 7–9 years on average, or sooner if you notice wear.
Regular maintenance prevents sudden failures and keeps your door safe.
Cost Of Professional Adjustment Vs. Diy
Wondering if you should do it yourself or hire help? Here’s a general comparison:
| Factor | DIY | Professional |
|---|---|---|
| Cost | $10–$50 (tools/materials) | $100–$200 (service call) |
| Time | 1–2 hours (if experienced) | 30–60 minutes |
| Risk | Medium–High | Low |
| Warranty | No | Usually included |
| Tools needed | Must purchase/own | All provided |
DIY is cheaper, but only if you’re comfortable with the risks and have the right tools. Many people choose professional service for peace of mind.

What To Do If A Spring Breaks
A broken garage door spring is more than just inconvenient—it can be dangerous. Here’s what to do:
- Don’t try to open the door. Lifting a door with a broken spring can damage the opener or injure you.
- Disconnect the opener. Prevent accidental operation.
- Inspect springs. Look for visible gaps or separation.
- Call a professional. Replacement is not a DIY job for most homeowners.
Important: Do not use the opener with a broken spring. It can overheat or burn out the motor.
Extension Vs. Torsion Springs: Which Is Better?
If you’re considering upgrading or replacing springs, it helps to know the pros and cons.
Torsion springs:
- Last longer (15,000–20,000 cycles vs. 10,000 for extension)
- Quieter operation
- Smoother movement
- More expensive upfront
- Safer if they break (usually stay on the shaft)
Extension springs:
- Cheaper initial cost
- Easier DIY replacement
- More parts to maintain (pulleys, cables)
- More dangerous if a safety cable is missing
Most modern garage doors use torsion springs due to their safety and durability. If your door has extension springs and you’re upgrading, consider switching.
For more in-depth technical information, you can visit the Wikipedia Garage Door Opener page.
Frequently Asked Questions
What Are The Dangers Of Adjusting Garage Door Springs Myself?
Garage door springs are under a lot of tension. If a winding bar slips or a part fails, the spring can snap back and cause serious injury—especially with torsion springs. Always wear safety gear, use the right tools, and don’t hesitate to call a pro if you’re unsure.
How Often Should I Adjust Or Check My Garage Door Springs?
Check your springs every 6–12 months, or whenever you notice the door moving differently. Most springs last 7–9 years with average use, but heavy use or poor maintenance can shorten their life.
Can I Replace Just One Spring, Or Do I Need To Replace Both?
Always replace both springs at the same time. If one is worn or broken, the other is close behind. Matching tension is crucial for even, safe operation.
Is It Normal For Garage Door Springs To Make Noise?
A little noise is normal, but loud bangs or persistent squeaking means something is wrong. Lubricate springs every few months. If noise continues, inspect for wear or call a technician.
What Should I Do If The Door Feels Balanced But Still Doesn’t Open Easily?
Check for other issues like worn rollers, bent tracks, or opener problems. A balanced door should move easily by hand. If not, there may be hidden mechanical problems beyond the springs.
A well-balanced garage door not only protects your investment but also keeps your family safe. By following these steps and tips, you can adjust your garage door springs with confidence—or know when it’s best to call in a professional. Regular attention to your door’s balance and springs will reward you with years of smooth, trouble-free operation.