Now Reading: How to Reattach Garage Door Cable: Step-by-Step Guide
- 01
How to Reattach Garage Door Cable: Step-by-Step Guide
When your garage door cable snaps or comes off the drum, it can feel like a big problem. The door may hang crooked, refuse to open, or even get stuck halfway. Many homeowners worry about safety and repair costs. However, with the right guidance, you can reattach a garage door cable yourself—saving both time and money. While the task requires caution and patience, it’s completely doable, especially for those who like hands-on home repairs.
This guide will take you through everything you need to know. We’ll cover how garage door cables work, why they come off, the tools you need, step-by-step instructions, and what to watch out for. You’ll also find practical tips, a parts and tools comparison, safety warnings, and answers to common questions.
By the end, you’ll have the confidence to handle this repair and keep your garage door running smoothly.
Understanding Garage Door Cables
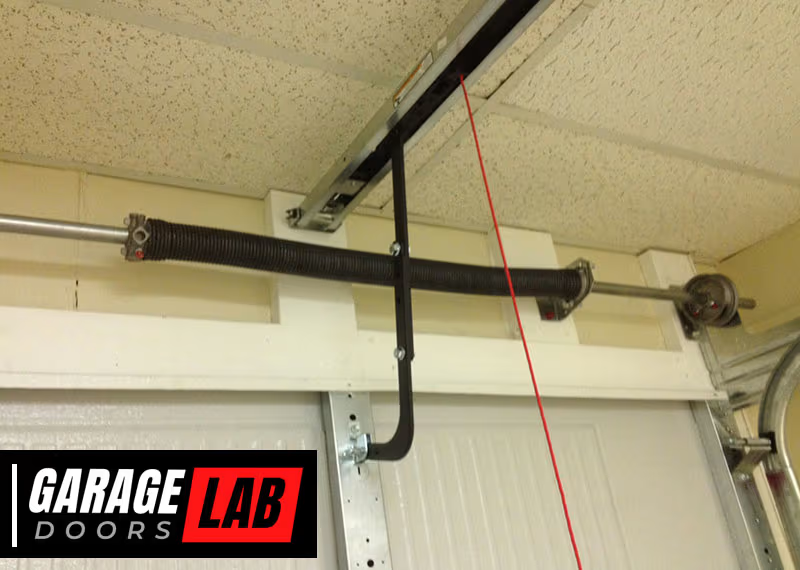
Before you start, it’s important to know what garage door cables do and why they matter. These cables are a critical part of the lifting system. Most garage doors use either extension springs (on both sides) or torsion springs (above the door). The cables work with these springs to help lift and lower the heavy door safely. If a cable comes off, the whole system can go out of balance.
Types Of Garage Door Cables
There are two main types:
- Lift cables: Used with torsion spring systems. They attach to the bottom of the door and wind around a drum as the door opens.
- Retaining cables: Used with extension spring systems. They run through the middle of the extension spring to prevent the spring from flying off if it breaks.
Both types are made of strong, flexible steel wire. However, their sizes and lengths may differ.
Why Garage Door Cables Come Off
Cables can slip off or break for several reasons:
- Normal wear and tear: Over time, cables can fray or rust, especially in damp climates.
- Improper tension: If the springs lose tension or are not balanced, the cables may loosen.
- Obstructions: Small objects or dirt in the track can make the door move unevenly, causing cables to slip.
- Accidental damage: Bumping the door with a car or tool can knock the cables off.
- Spring failure: If a spring breaks, the cable can unravel quickly.
Understanding these causes helps you avoid future problems and spot early warning signs.
Safety Warnings And What To Expect
Working with garage door cables is not risk-free. The springs store a lot of energy and can cause injury if released suddenly. Here’s what you must keep in mind:
- Always disconnect power: If you have an automatic opener, unplug it to prevent accidental activation.
- Never remove or adjust springs unless you know what you’re doing: Springs are under high tension and can snap violently.
- Use the right tools: Don’t substitute with makeshift tools. This is where accidents happen.
- Work with a partner if possible: They can hold the door steady or call for help if needed.
If you’re ever unsure, it’s safer to call a professional.
Tools And Parts You’ll Need
To reattach a garage door cable, gather these items first:
- Winding bars (for torsion spring systems)
- Adjustable wrench
- Vice grips or locking pliers
- Socket set
- Flat-head screwdriver
- Step ladder
- Safety gloves and glasses
- Replacement cable (if the old one is damaged)
- Lubricant (for moving parts)
Here’s a comparison of common tools and their purpose:
| Tool | Purpose | Safety Level |
|---|---|---|
| Winding Bars | Safely adjust spring tension | Critical |
| Vice Grips | Hold door or shaft in place | Important |
| Socket Set | Tighten cable anchors and drums | Standard |
| Safety Gloves | Protect hands from frayed cable | Essential |
If you don’t have winding bars, don’t use screwdrivers instead—they can slip easily.
How To Reattach Garage Door Cable: Step-by-step
Let’s break down the full process into easy-to-follow steps. The instructions below focus on torsion spring systems (the most common in modern homes), but key notes for extension systems are included.
1. Prepare And Secure The Area
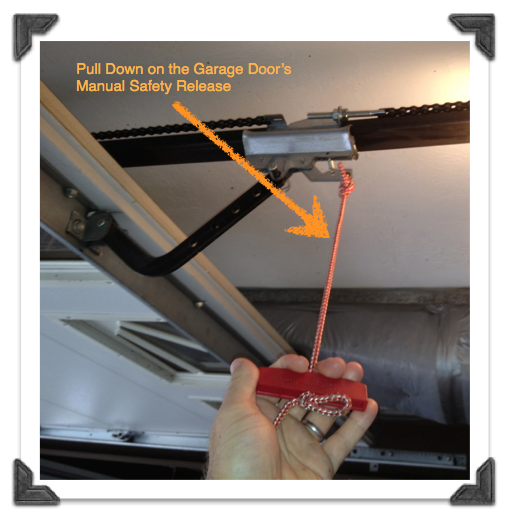
- Unplug the garage door opener to avoid accidental movement.
- Open the garage door manually if possible, then secure it in place. Use vice grips or locking pliers on the track just below the bottom roller to keep the door from falling.
- Wear safety gear—especially gloves and glasses.
2. Inspect The Problem
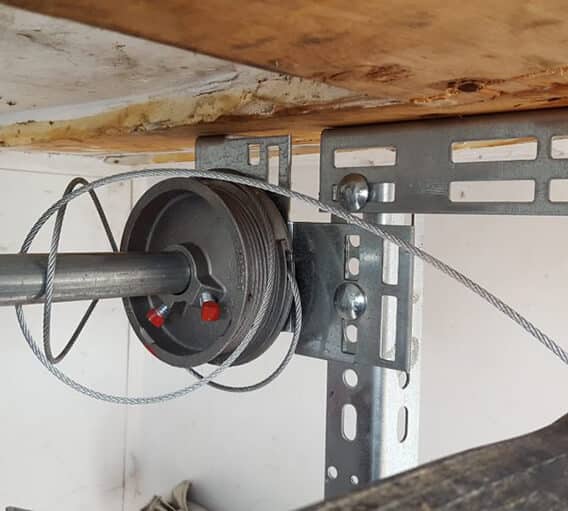
- Check both cables to see if one is off the drum, frayed, or broken.
- Inspect the drums (the grooved wheels at the top corners) for wear.
- Look at the springs for signs of damage.
- Remove any debris from the tracks and check for bent or misaligned hardware.
If the cable is only off the drum and not broken, you can usually reattach it. If it’s frayed or snapped, you’ll need to replace it.
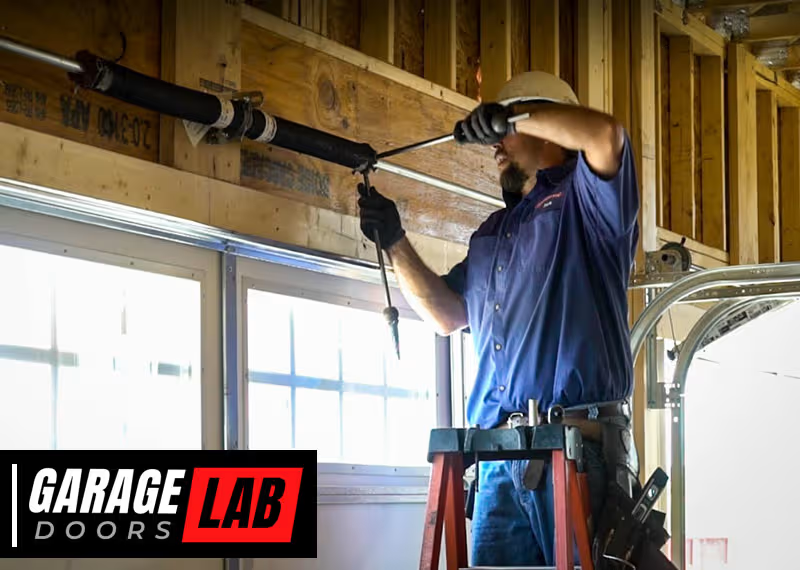
3. Release Tension From The Spring (torsion Systems)
This is a critical safety step. Only perform if you are comfortable with basic DIY mechanics.
- Insert a winding bar into one of the holes on the winding cone (at the end of the spring).
- Hold it firmly, then loosen the set screws with a wrench.
- Insert the second winding bar before removing the first, so the spring is always under control.
- Gently unwind the spring to relieve tension. Usually, you’ll need to make 3-4 quarter turns.
Caution: If you’re not sure how many turns to unwind, stop and seek professional help.
4. Remove The Old Cable (if Needed)
If the cable is broken or frayed:
- Detach it from the bottom bracket (at the bottom corner of the door).
- Pull it out of the drum and remove any leftover pieces.
- Clean around the drum and bracket to remove dirt or rust.
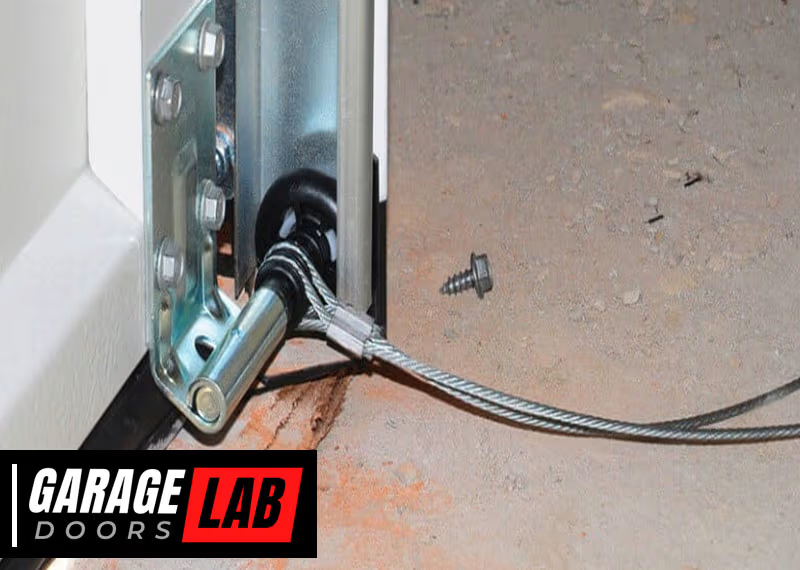
5. Attach The New Or Existing Cable
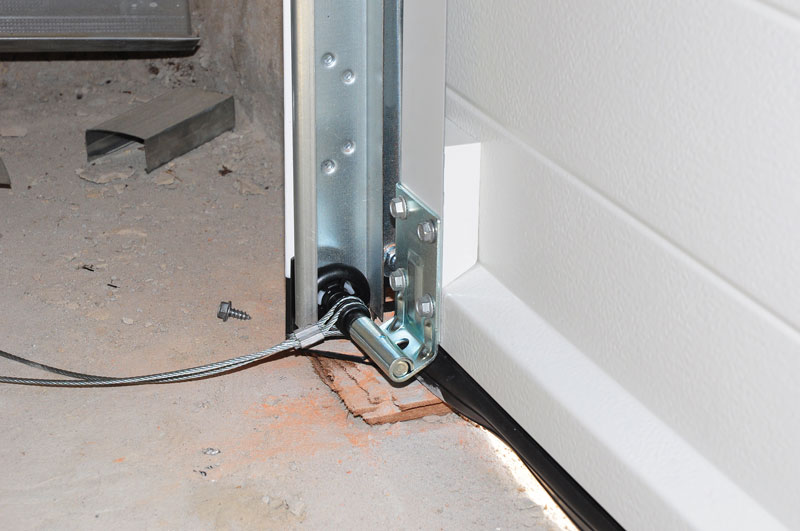
- Hook one end of the cable into the slot on the bottom bracket.
- Run the cable up the side of the door, making sure it stays behind the rollers.
- Thread the other end onto the drum, fitting it into the drum’s groove.
- Pull the cable tight so there is no slack. The cable should be taut but not overly tight.
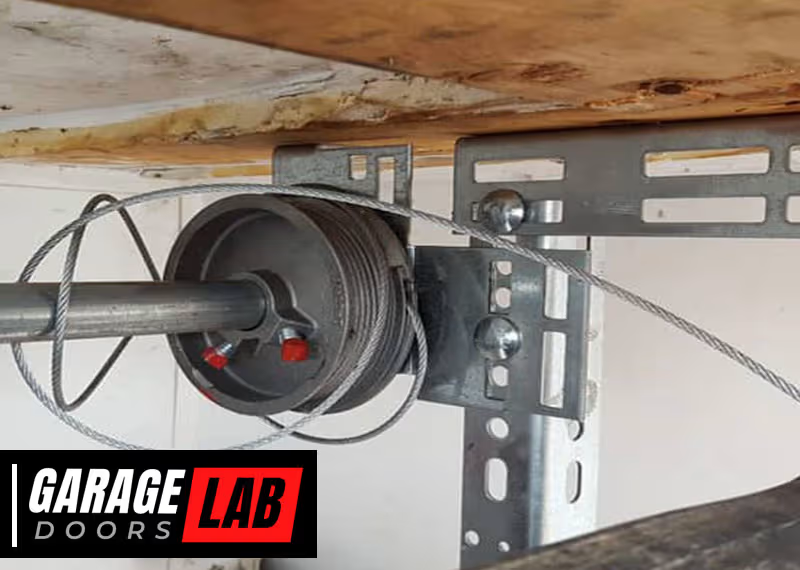
6. Wind The Cable Onto The Drum
- Rotate the drum by hand to wind the cable neatly into its grooves.
- Make sure there are no kinks or overlaps.
- Tighten the set screws on the drum so the cable stays in place.
Repeat these steps for the other side if needed.
7. Reapply Tension To The Spring
- Using winding bars, turn the spring back to its original tension. For most standard doors, each full turn equals four quarter turns. Your door may need 7-8 full turns for proper tension, but always check your manufacturer’s instructions.
- Tighten the set screws on the winding cone.
- Remove the vice grips from the track.
8. Test The Door
- Lower the door slowly and check that it moves smoothly.
- Raise it by hand. If the balance is correct, the door should stay in place when halfway up.
- Plug in the opener and test automatic operation.
- Listen for unusual noises and watch for jerky movement.
If the door is hard to lift or slams shut, you may need to adjust the tension. Always add or remove spring tension carefully, one quarter turn at a time.
9. Lubricate And Clean Up
- Spray lubricant on the springs, rollers, and hinges.
- Wipe away excess oil and clean any tools you used.
- Store extra cable safely for future repairs.
10. Special Steps For Extension Spring Systems
If you have extension springs (on the sides of the door):
- You usually don’t need winding bars, as these springs are stretched by opening the door.
- Carefully open the door fully to remove tension, then secure it.
- Replace or reattach the cable as above, making sure to thread it through the extension spring for safety.
- Double-check that safety cables are in place—they help prevent injury if the spring breaks.
Real-world Example: What Can Go Wrong
Suppose you reattach the cable, but the door still hangs unevenly. This often means:
- One cable is tighter than the other.
- The springs are not balanced.
- The drum is not locked in place.
Fixing this requires careful adjustment of both cables and springs. It may take several tries to get the door perfectly level. Many beginners overlook this and end up with a noisy or unreliable door.
Another common mistake: forgetting to tighten the set screws on the drum. If these are loose, the cable can slip off again, undoing all your hard work.
When To Call A Professional
Not every cable repair is a good DIY project. Contact a garage door technician if:
- You see broken or stretched springs.
- The cable keeps coming off after several repairs.
- The door is extremely heavy or doesn’t stay open.
- You’re not comfortable working with high-tension springs.
While many homeowners can handle simple reattachments, some situations require special tools or experience.
How To Choose Replacement Garage Door Cables
If you need to buy a new cable, you must select the right type and size. Here are the main factors:
- Length: Standard residential doors use cables between 7-10 feet long.
- Diameter: Most are 1/8” thick, but heavy or commercial doors may use thicker cables.
- Material: Galvanized steel is common for rust resistance.
Here’s a quick comparison of cable types:
| Type | Typical Length | Best For |
|---|---|---|
| Lift Cable | 7-10 feet | Torsion systems |
| Retaining Cable | Same as spring length | Extension systems |
| Heavy Duty Cable | 10+ feet | Oversized/commercial doors |
Buy cables from reputable hardware stores or door specialists. Avoid off-brand or used cables—they may not meet safety standards.
Preventing Future Cable Problems
Once your door is fixed, a few simple habits will help avoid future cable trouble:
- Inspect cables twice a year for fraying, rust, or slack.
- Lubricate moving parts every 6 months to prevent wear.
- Keep tracks clear of dirt and small objects.
- Balance your door regularly—if it doesn’t stay open halfway, call a pro.
- Replace both cables together if one fails; the other is likely worn too.
Most homeowners overlook regular inspection. Just five minutes of checking can save hours of repair and help you spot bigger problems early.
Practical Tips For Success
- Use a flashlight to see into dark corners, especially when checking the drum and bottom bracket.
- Mark the winding bars with tape so you remember how many turns you’ve made. This avoids over-tightening.
- Take a picture of the cable routing before you start, so you have a reference.
- Don’t rush. Patience is key. Hurrying can lead to mistakes or skipped steps.
A non-obvious insight: cable issues often start with small track misalignments. If you notice the door scraping or making new noises, check alignment before the cable comes off.
Cost And Time Estimates
Many homeowners wonder how long this job takes and what it might cost. Here’s a realistic breakdown:
| Task | DIY Time | Cost (USD) |
|---|---|---|
| Reattaching cable only | 30-60 minutes | $0 (if no parts needed) |
| Replacing cable | 45-90 minutes | $10-25 (per cable) |
| Professional repair | 30-60 minutes | $100-200 |
DIY saves money, but always put safety first. If you need new tools or cables, factor in their cost.
Important Safety Reminders
A few final safety points can’t be stressed enough:
- Never work on springs under full tension unless you have experience.
- Always secure the door before starting work.
- Double-check all set screws and fasteners.
- Keep children and pets out of the garage during repairs.
Many accidents happen when people skip these steps. Think ahead, and you’ll finish the job safely.
Frequently Asked Questions
What Causes Garage Door Cables To Come Off?
Cables slip off due to uneven tension, worn parts, debris in the track, or accidental impact. Sometimes a broken spring or loose drum set screw is the root cause. Regular inspection can help spot issues before they become serious.
Can I Reattach A Garage Door Cable Without Removing The Spring Tension?
For minor cable slips, you may be able to reattach without fully releasing spring tension—especially if the cable is still partly on the drum. However, for most repairs, it’s safer to release tension first. Never force the cable back if you feel strong resistance.
How Do I Know If My Garage Door Cable Needs Replacement?
Replace if you see fraying, rust, or broken strands. Cables should be smooth and free of kinks. If only one cable is damaged, replace both to keep the system balanced.
Are There Special Cables For Heavy Or Double Garage Doors?
Yes. Heavy or double doors often require thicker, stronger cables. Always check your door’s manual or ask a professional before buying new cables. Using the wrong size can cause uneven lifting or early failure.
Where Can I Find Reliable Information On Garage Door Repairs?
You can find detailed guides and safety advice from sources like the Wikipedia Garage Door page. Always use information from trusted and official websites.
Reattaching a garage door cable is a task that demands care and respect for safety, but it’s within reach for most careful homeowners. By following these detailed steps and tips, you can get your garage door working again—and avoid bigger problems down the road.