Now Reading: How to Tighten Garage Door Spring Safely: Step-by-Step Guide
- 01
How to Tighten Garage Door Spring Safely: Step-by-Step Guide
A garage door is something many people use every day, often without thinking about how it works. But when your garage door feels heavy, moves unevenly, or makes loud noises, the cause is often the garage door spring. Tightening the spring can solve many problems, but it’s not as simple as turning a bolt. In fact, working with these springs can be dangerous if you’re not careful. This guide will help you understand everything about tightening a garage door spring, from knowing when it’s needed, to doing the job safely, and even learning when you should call a professional.
Understanding Garage Door Springs
Before you try to tighten a garage door spring, you need to understand what these springs do and why they matter. Most garage doors use two main types of springs: torsion springs and extension springs.
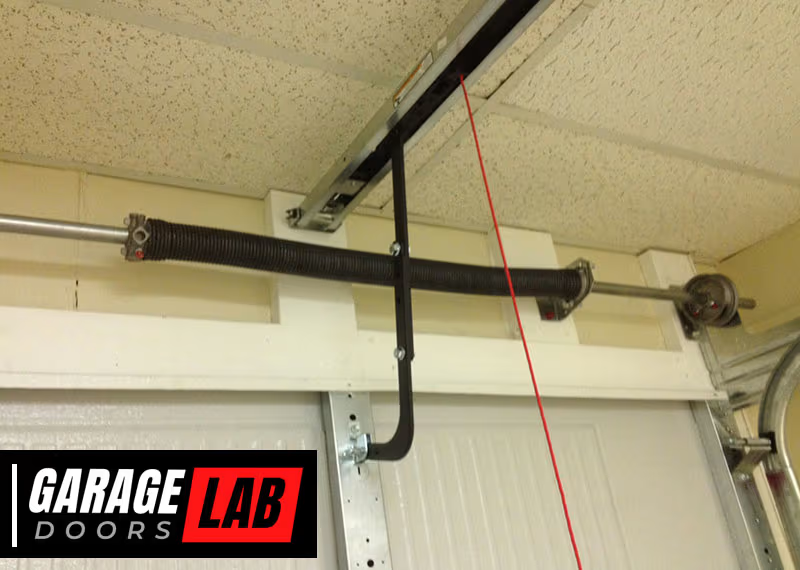
Torsion springs are mounted above the garage door opening. They store energy by winding up as the door closes and unwinding as it opens. This helps to balance the door’s weight and makes lifting easier.
Extension springs are usually found above the horizontal tracks on both sides of the door. They stretch and contract to counterbalance the door’s movement.
Each spring type has its own risks and tools. Torsion springs are more common in modern doors and are considered safer and more durable, but they still require careful handling.
How Springs Affect Door Movement
The springs are not just for making the door lighter. They also keep the door balanced. If a spring is too loose, the door may feel heavy and may not stay open. If it’s too tight, the door might not close all the way or could even fly open quickly, which is dangerous.
A garage door spring is under a lot of tension. For example, a standard residential garage door can weigh 150 to 250 pounds. The spring has to balance all of that weight. If the spring is not adjusted correctly, the opener will struggle, and the parts will wear out quickly.
Signs Your Garage Door Spring Needs Tightening
How do you know if your garage door spring needs to be tightened? Here are some clear signs:
- Door Feels Heavy – If lifting the door manually feels much harder than usual, the spring is likely too loose.
- Door Won’t Stay Open – If the door starts to close by itself after you lift it halfway, the spring isn’t providing enough counterbalance.
- Door Closes Too Fast – A fast-closing door is a serious danger sign. The spring may have lost tension or broken.
- Uneven Door Movement – If one side of the door is higher than the other, one spring could be looser than the other.
- Loud Noises – Hearing creaks, bangs, or snaps often means the spring is struggling.
- Opener Strains or Stops – If your automatic opener seems to be working harder or stops mid-way, spring tension could be the issue.
Ignoring these signs can lead to bigger problems, including complete failure of the spring. That can make the door unusable or even cause injuries.
Safety First: Why Caution Is Essential
Garage door springs are tightly wound and store a lot of energy. If they break or snap while being adjusted, they can cause serious injury. The Consumer Product Safety Commission reports thousands of garage door accidents every year, many linked to spring repairs.
Before you try anything, ask yourself these questions:
- Do you have the right tools?
- Do you know exactly what kind of spring you have?
- Are you willing to risk injury or property damage?
If your answer is “no” to any of these, it’s best to call a professional. But if you’re handy, careful, and understand the risks, you can proceed with caution.
Tools And Materials Needed
You can’t just use any tool for this job. Using the wrong tools can make the task more dangerous. Here’s what you’ll need for tightening a torsion or extension spring:
For Torsion Springs
- Winding bars (never use screwdrivers or random metal rods)
- Wrench set (usually 7/16” or 1/2”)
- Locking pliers (Vise-Grips)
- Socket set
- Safety glasses
- Sturdy gloves
- Ladder
- Tape measure
- Permanent marker or chalk (for marking spring position)
For Extension Springs
- Wrenches
- Locking pliers
- Safety glasses
- Gloves
- Stepladder
Using proper tools is critical. Never improvise, especially with winding bars. They fit tightly into the winding cone holes for torsion springs, keeping your hands safe.

Preparing For The Job
Good preparation makes the process safer and faster. Here’s how you should set up:
- Disconnect the opener – Unplug the automatic opener to prevent accidental activation.
- Open the door fully – For torsion springs, opening the door relieves most tension. Lock the door in place using C-clamps or locking pliers on the tracks.
- Wear safety gear – Always use gloves and glasses.
- Clear the area – Make sure kids, pets, and bystanders are away.
- Check the spring type – Confirm if you have torsion or extension springs.
Mark the current position of the springs with a marker. This helps you see how much you’ve adjusted.
Step-by-step: How To Tighten A Garage Door Torsion Spring
Torsion springs are the most common in newer homes. Here’s a detailed guide on how to tighten them safely.
1. Secure The Door
First, make sure the garage door is in the down (closed) position. Use locking pliers to clamp the door to the track, preventing movement. This keeps you safe from the door shifting during adjustments.
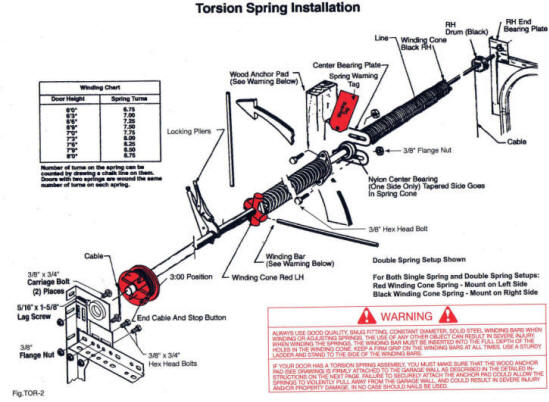
2. Locate The Springs
Look above the door opening. You’ll see a long metal shaft with the springs coiled around it. Each end of the spring has a winding cone with holes for the winding bars.
3. Mark The Spring Position
With a permanent marker, draw a line across the spring and a nearby stationary part. This will help you keep track of how much you tighten or loosen the spring.
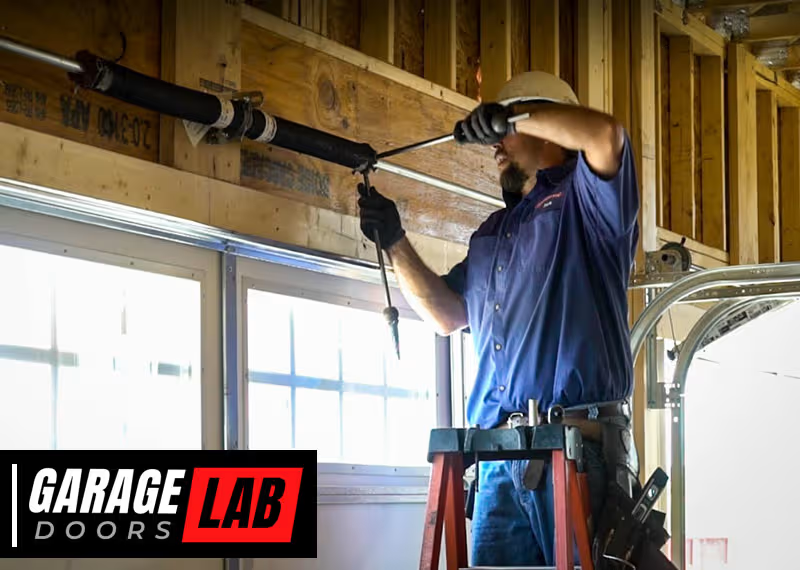
4. Insert Winding Bars
Insert one winding bar fully into the hole on the winding cone. Never use anything except a winding bar that fits snugly.
5. Loosen The Set Screws
With the winding bar held firmly, use a wrench to loosen the set screws on the winding cone. Hold tight – the spring will try to unwind if you’re not careful.
6. Add Tension
To tighten the spring (add tension), turn the winding cone upward, toward the ceiling. Insert the second winding bar into the next hole, remove the first, and repeat. One quarter-turn at a time is best.
Each full turn of the spring raises the door about 2 inches. For most doors, one or two quarter-turns is enough. Never add more than one full turn at a time before checking the door balance.
7. Tighten The Set Screws
With the winding bar still in place, re-tighten the set screws to lock the spring. Remove the winding bar only after screws are secure.
8. Test The Door
Remove the locking pliers and slowly lift the door by hand. It should move smoothly and stay open when lifted halfway. If it feels too heavy or light, repeat the process, adding or removing tension as needed.
9. Reconnect The Opener
Once you’re satisfied with the door’s balance, reconnect the automatic opener. Test the door several times to make sure it works properly.
Safety Note
Always work on one spring at a time, and never stand directly in front of the winding bars. Keep your face and body to the side in case a spring slips or breaks.
Step-by-step: How To Tighten Extension Springs
Extension springs are mounted along the tracks on both sides of the door. They’re easier to adjust but can still be dangerous.
1. Open The Door Fully
Extension springs have the least tension when the door is open. Raise the door all the way and secure it with locking pliers on the tracks.
2. Locate The Springs
Find the extension springs above the side tracks. Each spring connects to a hook or pulley system.
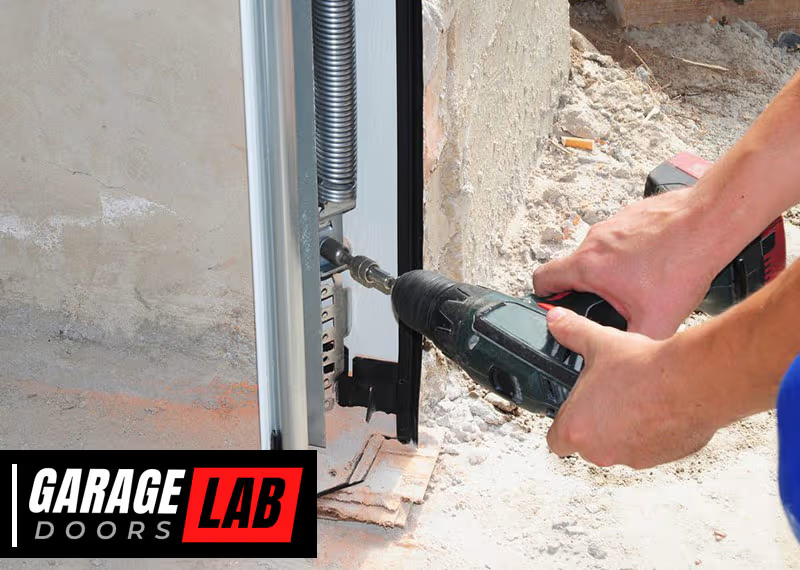
3. Adjust The Hook Position
To add tension, move the spring to the next hole farther from the door (usually there’s a series of holes in the bracket). You may need to remove the S-hook from the bracket and reattach it to a different hole.
4. Test The Door
Lower the door and check the balance. If it still feels heavy or won’t stay open halfway, repeat the process.
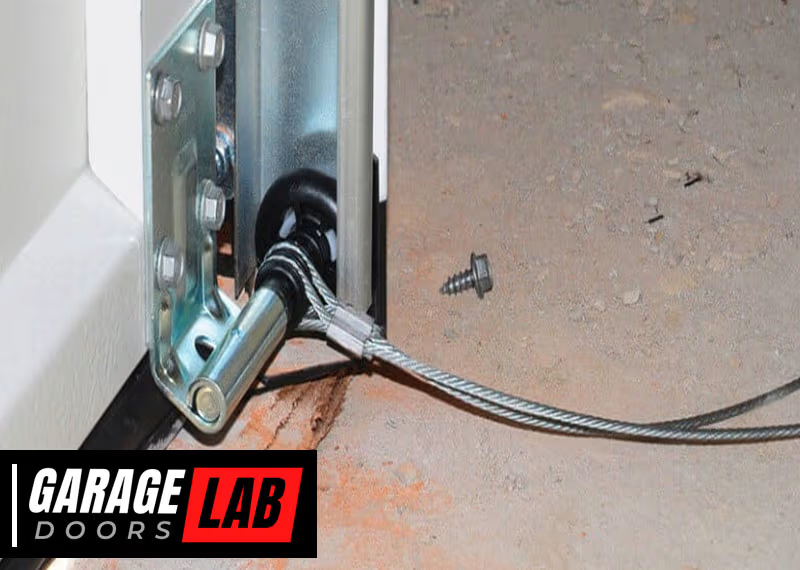
5. Check The Safety Cables
Always make sure the safety cables run through the center of the extension springs. These cables prevent the spring from flying across the room if it breaks.
Table: Torsion Vs. Extension Spring Comparison
Many homeowners don’t know which spring type they have. Here’s a quick comparison:
| Feature | Torsion Springs | Extension Springs |
|---|---|---|
| Location | Above door opening | Along side tracks |
| Safety | Safer, less likely to break suddenly | More dangerous, can snap violently |
| Durability | 15,000-20,000 cycles | 5,000-10,000 cycles |
| Cost | More expensive | Less expensive |
| Adjustment Difficulty | Requires winding bars, more complex | Easier with hand tools |
Common Mistakes And How To Avoid Them
Many DIYers make small mistakes that lead to big problems. Here’s what you should watch out for:
- Using the Wrong Tools – Never use screwdrivers or makeshift bars. They can slip and cause injury.
- Adding Too Much Tension – Over-tightening the spring makes the door fly open quickly, creating a safety risk.
- Forgetting to Mark Spring Position – Without a mark, you won’t know how much you’ve changed the tension.
- Working Alone – Always have someone nearby in case of an emergency, but keep them out of the danger zone.
- Ignoring Old or Rusty Springs – If the spring is rusty or looks worn out, replacing it is safer than tightening.
- Not Checking Door Balance – Test the door after every adjustment. Don’t assume “one more turn” will solve all problems.
- Skipping Safety Gear – Gloves and glasses protect against sharp edges and snapping metal.
When To Call A Professional
While many people can handle basic garage door maintenance, spring adjustment is risky. Call a professional if:
- You don’t have the right tools
- The spring looks worn, stretched, or cracked
- The door is very heavy, oversized, or custom
- You feel unsure about any step
Professional repairs cost between $150 and $350 on average, but this is small compared to the risk of injury or property damage.
Table: Diy Vs. Professional Spring Adjustment
To help you decide, here’s a comparison of doing it yourself versus hiring a professional:
| Aspect | DIY | Professional |
|---|---|---|
| Cost | $20–$60 (tools only) | $150–$350 (labor + parts) |
| Safety | High risk | Low risk |
| Time | 1–2 hours | 30–45 minutes |
| Warranty | None | Usually included |
| Quality | Depends on skill | Guaranteed by expert |
Spring Maintenance Tips For Long Life
Tightening your garage door spring is important, but good maintenance can help avoid frequent adjustments. Here’s how you can keep springs healthy:
- Lubricate Regularly – Use a silicone-based spray on springs and hinges every six months. Avoid WD-40 as it’s a cleaner, not a lubricant.
- Inspect for Wear – Look for gaps, rust, or stretched coils. Replace springs at the first sign of trouble.
- Keep the Door Balanced – Test the door balance every few months.
- Check Alignment – Make sure the door tracks are straight and clear.
- Clean the Tracks – Remove dust, debris, and cobwebs.
- Don’t Overload the Door – Don’t hang bikes or tools from the door itself.
- Replace Both Springs Together – If one breaks, the other is likely close to failure.
Real-world Example: A Homeowner’s Experience
Jason from Ohio noticed his garage door was getting harder to lift by hand. He followed all the safety steps, used the right tools, and marked the springs. After two quarter-turns on each torsion spring, the door moved smoothly again.
But he also learned that his springs were 12 years old and starting to rust. He decided to schedule a replacement before problems got worse.
This example shows that tightening can be a good short-term fix, but old springs should be replaced for long-term safety.
Table: Signs It’s Time To Replace, Not Tighten
Sometimes tightening isn’t enough. Here are clear signs you need a new spring:
| Sign | What It Means | Action |
|---|---|---|
| Large gap in spring | Spring is broken | Replace immediately |
| Rust or corrosion | Weakens metal | Replace soon |
| Spring is stretched | Lost tension | Replace |
| Loud snap | Spring has failed | Do not use door |
| Multiple adjustments needed | Spring is worn out | Replace |
Non-obvious Insights For Beginners
Many people miss these important points when dealing with garage door springs:
- Spring Cycle Life – Every spring is rated for a number of cycles (one open and close equals one cycle). If your door is used often (four times daily), a typical 10,000-cycle spring will last about seven years. Frequent use means you’ll need replacements sooner.
- Door Weight Changes – Adding insulation, panels, or windows changes the weight of your door. Springs sized for the original weight may be too weak or strong after upgrades.
- Matching Pairs – Springs should always be replaced or adjusted in pairs. If one wears out, the other is close behind.
What To Do After Tightening
Once you’ve finished tightening the spring and the door is balanced, do a few extra checks:
- Test Safety Reversal – If you have an automatic opener, test the safety reverse feature with a 2×4 board laid flat under the door. The door should reverse when it touches the board.
- Listen for Sounds – Operate the door several times. Listen for new noises, which can signal a problem.
- Observe Door Travel – Watch the door as it opens and closes. It should move smoothly with no jerks or stops.

Environmental And Legal Considerations
Some states and cities have codes about garage door safety. For example, all new garage doors are required to have safety cables if they use extension springs. Check your local building codes before making changes.
Also, old springs and metal parts should be recycled properly. Don’t just throw them in the trash—take them to a metal recycling center.
Resources For Further Learning
If you want to understand more about garage door springs, repair safety, and home maintenance, check out Family Handyman, a trusted resource for DIY homeowners.
Frequently Asked Questions
How Do I Know If My Garage Door Spring Is Too Loose?
If your garage door feels very heavy when you try to lift it manually, or if it starts to fall closed after you raise it halfway, the spring is likely too loose. You may also notice the automatic opener struggling or stopping.
Is It Dangerous To Tighten A Garage Door Spring Myself?
Yes, garage door springs are under high tension and can cause serious injury if they snap or slip. Always use the correct tools and follow safety steps. If you are not sure, call a professional.
How Often Should Garage Door Springs Be Adjusted?
Most springs do not need frequent adjustments. However, if you notice changes in door balance or operation, check the spring tension. Generally, springs last 7–10 years, depending on use.
Can I Use Any Lubricant On Garage Door Springs?
No, you should use a silicone-based lubricant or one made for garage doors. Avoid WD-40, as it is a cleaner and not a true lubricant.
What Should I Do If My Spring Breaks During Tightening?
Stop immediately. Do not try to open or close the door. Call a professional for repair or replacement. A broken spring can make the door dangerous and very heavy.
Adjusting a garage door spring is a job that demands respect for safety and careful steps. For most homeowners, tightening the spring can restore smooth operation, but always know your limits and call for help if you feel unsure. With the right knowledge, tools, and caution, your garage door can work like new again.