Now Reading: How to Connect Liftmaster Garage Door Opener Easily and Quickly
- 01
How to Connect Liftmaster Garage Door Opener Easily and Quickly
How to Connect Liftmaster Garage Door Opener Easily and Quickly
Connecting your LiftMaster garage door opener can seem overwhelming, especially if you have never set up a garage door system before. Many people worry about wiring, Wi-Fi, and programming remotes. However, with the right guidance, you can connect your LiftMaster opener safely and confidently. This guide will walk you through every detail, from tools and safety steps to Wi-Fi connections and troubleshooting. Whether you’re setting up a new device or updating an older model, you’ll find step-by-step help for every stage. You’ll also learn common mistakes to avoid and get answers to the questions that confuse most beginners. By the end, you’ll understand not just what to do, but why each step matters.
Understanding Your Liftmaster Garage Door Opener
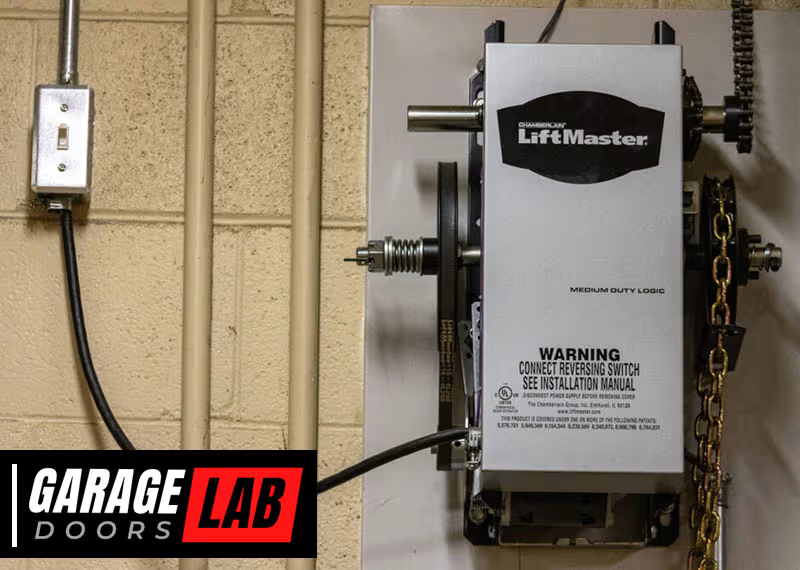
Before you start, it helps to know what you’re working with. LiftMaster is a leading brand of garage door openers in the US, known for reliability and smart features. Most modern LiftMaster openers support Wi-Fi and can be controlled from your phone using the MyQ app. Older models may use remotes or wall buttons only.
Main Parts You’ll Work With
- Motor unit: This is the main box on your garage ceiling.
- Rail and trolley: The metal track and moving part that lifts your door.
- Safety sensors: Small boxes near the floor on both sides of the door.
- Control panel/wall button: Where you open/close the door from inside.
- Remote controls: Handheld openers for cars or keychains.
- Wi-Fi module (if present): For connecting the opener to your home network.
Knowing these parts will help you follow instructions and spot problems. If you’re unsure about your model, look for a label on the motor unit or check the manual.
What You Need Before You Start
Getting ready saves time and stress. Here’s what to check and gather:
Tools And Materials
- Step ladder (6 ft or higher)
- Screwdriver set (Phillips and flathead)
- Wire stripper/cutter (if wiring needed)
- Drill (if installing new brackets)
- Measuring tape
- Smartphone (for MyQ setup)
- Wi-Fi password
- Owner’s manual (download from LiftMaster’s website if missing)
Safety Precautions
- Turn off power at the breaker before working with wires.
- Wear safety glasses and gloves.
- Never bypass safety sensors—they prevent accidents.
- Ask for help if the opener is too heavy or you’re unsure.
A surprising number of beginners forget to check their Wi-Fi signal in the garage. Weak Wi-Fi can block the MyQ app from connecting. Test your signal with your phone before starting. If it’s weak, consider a Wi-Fi extender.
Step-by-step: Connecting Your Liftmaster Garage Door Opener
Let’s break down the connection process into clear steps. Whether you’re installing from scratch or just adding Wi-Fi, these steps will guide you.
1. Mount The Garage Door Opener (if Not Installed)
If your opener is already mounted, you can skip this step.
- Place the motor unit on the ceiling, centered above your garage door.
- Attach the rail to the motor and extend it toward the door.
- Connect the trolley and arm to your garage door.
- Secure everything with the included brackets and screws.
- Double-check that the opener is stable and does not wobble.
Tip: Always use the mounting hardware provided by LiftMaster. Using random brackets or screws can cause the opener to fall or vibrate.
2. Wire The Safety Sensors
Safety sensors are required by law in the US. They stop the door if something blocks the path.
- Mount the sensors 4-6 inches above the floor, one on each side of the door.
- Point the sensors directly at each other—there should be no obstacles.
- Run the wires along the wall and ceiling to the motor unit. Use the wire clips or staples provided.
- Attach the wires to the terminals on the motor unit. Usually, white wires go to white terminals, and black/white wires go to gray terminals.
Common mistake: Not aligning the sensors. If the sensor lights are not solid, adjust until they face each other perfectly.
3. Connect The Wall Control Panel
- Run the control panel wire from the wall button to the opener.
- Strip ½ inch of wire insulation and attach to the red and white terminals on the motor.
- Mount the control panel near the door to your house, about 5 feet above the ground.
Insight: Many people mount the panel too high or too low. The recommended height is safe for adults but out of reach of small children.
4. Power On And Test Basic Operation
- Restore power at the breaker.
- Press the wall control to see if the opener works.
- Open and close the door fully, watching for smooth movement.
- The safety sensors should stop or reverse the door if you wave something in their path.
If the door does not move, double-check all connections. Loose wires are a common cause.
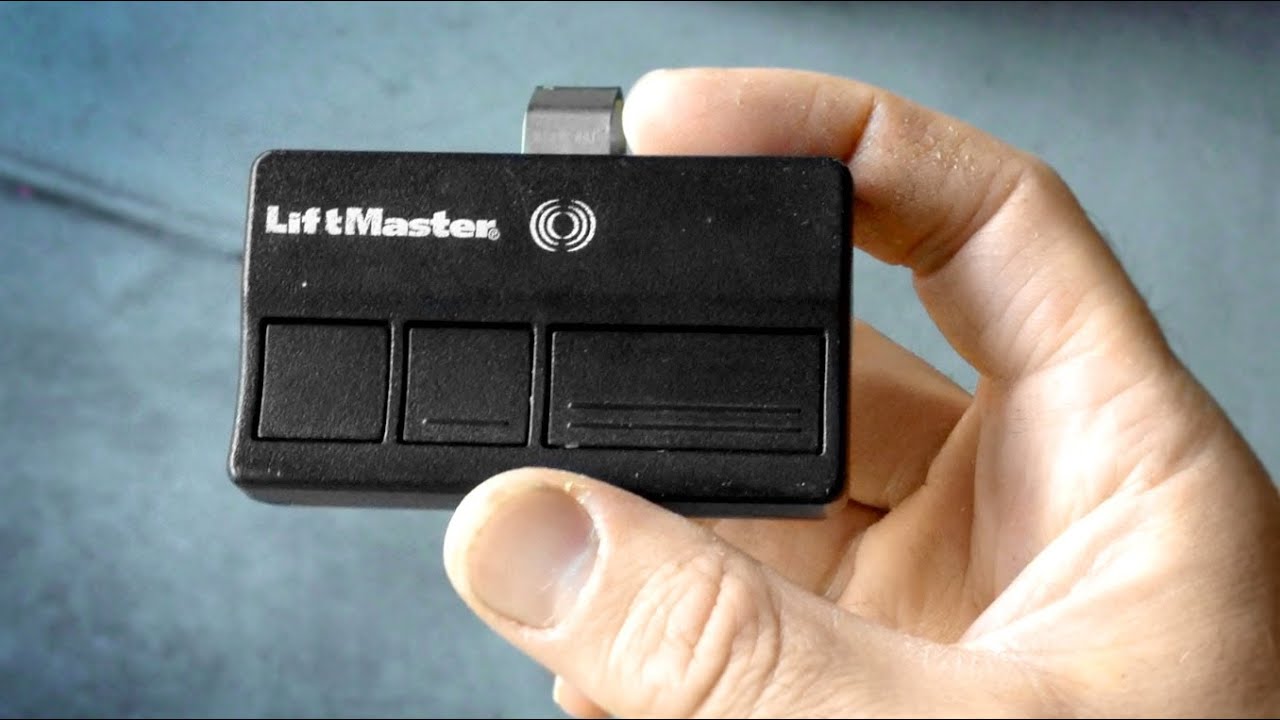
5. Program Remote Controls
- Press the Learn button on the motor unit (usually yellow, purple, or orange).
- Within 30 seconds, press the button on your remote.
- The light on the opener will blink to confirm the pairing.
You can program multiple remotes this way. If a remote will not pair, check the battery or try standing closer to the opener.
6. Connect To Wi-fi (myq Setup)
Most newer LiftMaster openers use MyQ technology for smart control. Here’s how to connect:
A. Prepare Your Phone And Opener
- Download the MyQ app from the App Store or Google Play.
- Create an account if you don’t have one.
- Make sure your phone is connected to your home Wi-Fi.
B. Put Opener In Wi-fi Setup Mode
- On the motor unit, press and hold the Learn button until the LED turns blue (usually 6 seconds).
- The opener is now in Wi-Fi setup mode.
C. Use The Myq App To Connect
- Open the app, tap “Add Device,” and choose “Garage Door Opener.”
- Follow the prompts. You’ll be asked to connect to the opener’s temporary Wi-Fi network.
- Select your home Wi-Fi from the app, enter your password, and wait for the connection.
- The LED will turn solid green when connected.
Insight: If you have dual-band Wi-Fi (2.4GHz and 5GHz), use 2.4GHz. Many garage openers do not support 5GHz yet.
D. Test The App
- Try opening and closing the door from the app.
- Set up notifications to alert you if the door is left open.
If you run into issues, check your Wi-Fi password and move your router closer to the garage.
Table: Liftmaster Opener Wi-fi Compatibility
Not all LiftMaster models support Wi-Fi. Here’s a quick comparison:
| Model Series | Wi-Fi Compatible | MyQ Support | Year Introduced |
|---|---|---|---|
| 8500W | Yes | Built-in | 2017 |
| 8355W | Yes | Built-in | 2016 |
| 8500 | No | Not available | 2011 |
| 1265 | No | Not available | 2002 |
If your model is not Wi-Fi compatible, you can buy a MyQ Smart Garage Hub as an add-on.

Updating Or Replacing An Existing Opener
Sometimes you need to connect a new opener or upgrade an old one. Here’s what to do:
Removing The Old Opener
- Unplug the old unit and disconnect all wires.
- Remove the mounting brackets, rail, and trolley.
- Reuse strong mounting points if possible.
Installing The New Opener
- Follow the same steps as above for mounting and wiring.
- Use new sensors and wiring for best results.
Transferring Remotes
- Old remotes may not work with new models.
- Program new remotes as described earlier.
Connecting To Smart Home Systems
- Many newer openers work with Amazon Alexa, Google Assistant, or Apple HomeKit.
- In the MyQ app, look for “Works with” options.
- Follow the instructions to connect your preferred smart home system.
Example: If you want to open your garage with Siri, you’ll need to set up HomeKit in the app.
Table: Features Comparison – Smart Vs. Non-smart Openers
To help you decide if you should upgrade, here’s a comparison of modern smart openers and traditional non-smart models:
| Feature | Smart Opener (Wi-Fi) | Non-Smart Opener |
|---|---|---|
| Remote Operation | From anywhere via app | Only with physical remotes |
| Notifications | Yes (door open/close alerts) | No |
| Integration with Smart Home | Yes | No |
| Guest Access | Yes, via app | No |
| Maintenance Alerts | Some models | No |
If you value convenience and security, a smart opener is often worth the upgrade.
Common Problems And Troubleshooting
Even with careful setup, things can go wrong. Here’s how to fix the most frequent issues:
Wi-fi Won’t Connect
- Check your Wi-Fi signal in the garage.
- Make sure your phone is on the same network as the opener.
- Try resetting the opener by holding the Learn button for 10 seconds.
Remote Won’t Program
- Replace the battery in the remote.
- Stand closer to the opener when pairing.
- Make sure you press the remote button within 30 seconds of pressing Learn.
Door Won’t Close Completely
- Check the safety sensors—they must be aligned and have solid lights.
- Look for obstacles or debris in the tracks.
- Adjust the down travel limit (see your manual).
App Says “offline” Or “not Responding”
- Reboot your Wi-Fi router and the garage opener.
- Check for MyQ app updates.
- If all else fails, remove the device from the app and set it up again.
No Power To Opener
- Check the outlet and circuit breaker.
- Some openers have a reset button on the side—try pressing it.
Non-obvious insight: Many “dead” openers are actually caused by a tripped GFCI outlet in the garage. Press the reset button on all outlets if there’s no power.
Table: Typical Installation Time And Difficulty
Here’s how long each step usually takes for beginners:
| Step | Average Time | Difficulty (1=Easy, 5=Hard) |
|---|---|---|
| Mount Opener | 60-90 minutes | 4 |
| Wire Sensors | 20-30 minutes | 2 |
| Wall Panel | 10-20 minutes | 2 |
| Program Remotes | 5-10 minutes | 1 |
| Wi-Fi Setup | 10-20 minutes | 2 |
If you’re new to DIY, plan for 2-3 hours for a full install.

Tips For A Smooth Connection
- Label wires during removal if replacing an old opener.
- Photograph each step with your phone for easy reassembly.
- Test the door balance by disconnecting the opener and lifting the door by hand. It should stay up on its own. If not, call a pro—badly balanced doors can be dangerous.
- Update firmware in the MyQ app if prompted. This can solve bugs and add new features.
- Secure your account with a strong password to protect your garage from hackers.
Safety And Security Features
Modern LiftMaster openers have many safety features:
- Photoelectric sensors to prevent closing on people or pets.
- Rolling code remotes (Security+ 2.0) that change codes each time for better security.
- Automatic locking (on some models) to prevent forced entry.
- App alerts so you know if your door is left open.
Non-obvious insight: Burglars sometimes try “code grabbing” to open garage doors. Rolling code technology makes this almost impossible.
Maintenance After Connection
Regular maintenance helps your system last longer:
- Check and clean safety sensors every 3 months.
- Lubricate the rail and trolley with garage door lubricant twice a year.
- Tighten all screws and brackets yearly.
- Replace remote batteries each year.
- Test auto-reverse by placing a 2×4 board in the door’s path—door should reverse when hitting the board.
Following these steps keeps your opener safe and reliable.
When To Call A Professional
While most connections are DIY-friendly, call a pro if:
- Your garage door is very heavy or unbalanced.
- You see frayed or damaged wires.
- The opener buzzes but doesn’t move.
- You’re uncomfortable with electricity or ladders.
A professional installer will ensure everything is safe and up to code.
Connecting Older Models Without Wi-fi
If you have an older LiftMaster opener, you can still get smart features. Buy a MyQ Smart Garage Hub and follow these steps:
- Plug in the hub near your opener.
- Attach the included sensor to your garage door.
- Use the MyQ app to connect the hub to Wi-Fi.
- Pair the hub with your existing opener following the instructions.
This method works with most brands made after 1993 (with safety sensors).
Keeping Your System Secure
Garage doors are a common target for thieves. Here’s how to stay safe:
- Change your MyQ password regularly.
- Don’t share app access with people you don’t trust.
- Cover any emergency release cords with a guard to prevent fishing from outside.
- Monitor your garage with a smart camera for extra peace of mind.
For more on garage security, visit the official LiftMaster website.
Frequently Asked Questions
What Do I Do If My Liftmaster Opener Won’t Connect To Wi-fi?
First, make sure your Wi-Fi signal is strong in the garage. Try rebooting your router and the opener. Double-check your Wi-Fi password and ensure you’re using the 2. 4GHz band. If issues continue, reset the opener and repeat the setup in the MyQ app.
Can I Connect An Old Liftmaster Opener To My Phone?
Yes, with a MyQ Smart Garage Hub. This device adds Wi-Fi and app control to most openers made after 1993. It’s easy to set up and much cheaper than buying a new opener.
Why Are My Safety Sensor Lights Blinking?
Blinking lights mean the sensors are not aligned or something is blocking the beam. Adjust the sensors so both lights are solid and clear any debris from the path.
How Many Remotes Can I Program With My Opener?
Most LiftMaster openers support up to 8 remotes and 1-2 keypads. Check your model’s manual for the exact number.
Is It Safe To Connect My Garage Opener To The Internet?
Yes, if you use strong passwords and keep your app and opener firmware up to date. LiftMaster uses encrypted connections for security. For extra protection, don’t share access with people you don’t fully trust.
Connecting your LiftMaster garage door opener is a practical project you can do with patience and the right steps. Take your time, double-check each connection, and use the MyQ app for smart features. If you run into challenges, don’t hesitate to call a professional. With proper setup, your garage will be safer, smarter, and more convenient for years to come.


