Now Reading: How to Reset Liftmaster Garage Door Opener Remote Easily
- 01
How to Reset Liftmaster Garage Door Opener Remote Easily

Resetting a Liftmaster garage door opener remote can save you headaches, time, and sometimes even money. People often lose remotes, buy a home with a pre-installed opener, or experience technical glitches. Many believe this task is complex, but with the right knowledge, anyone can handle it.
Knowing how to reset your remote means you’ll keep your garage secure and your daily routine smooth.
In this guide, you’ll learn how to reset Liftmaster garage door opener remotes step by step. This article covers different models, common problems, advanced troubleshooting, and extra tips most beginners miss. Whether you are a homeowner, renter, or property manager, you will find clear answers here.
Understanding Liftmaster Garage Door Opener Remotes
Liftmaster is one of the most trusted brands for garage door openers in North America. Their remotes are designed to be reliable and easy to use. But before you reset one, it helps to know how these devices work.
Each Liftmaster remote uses a radio frequency to send a signal to the opener. When you press the button, the remote tells the opener to open or close the door. For security, newer models use “rolling code” technology. This means the code changes every time you use the remote, making it hard for others to copy the signal.
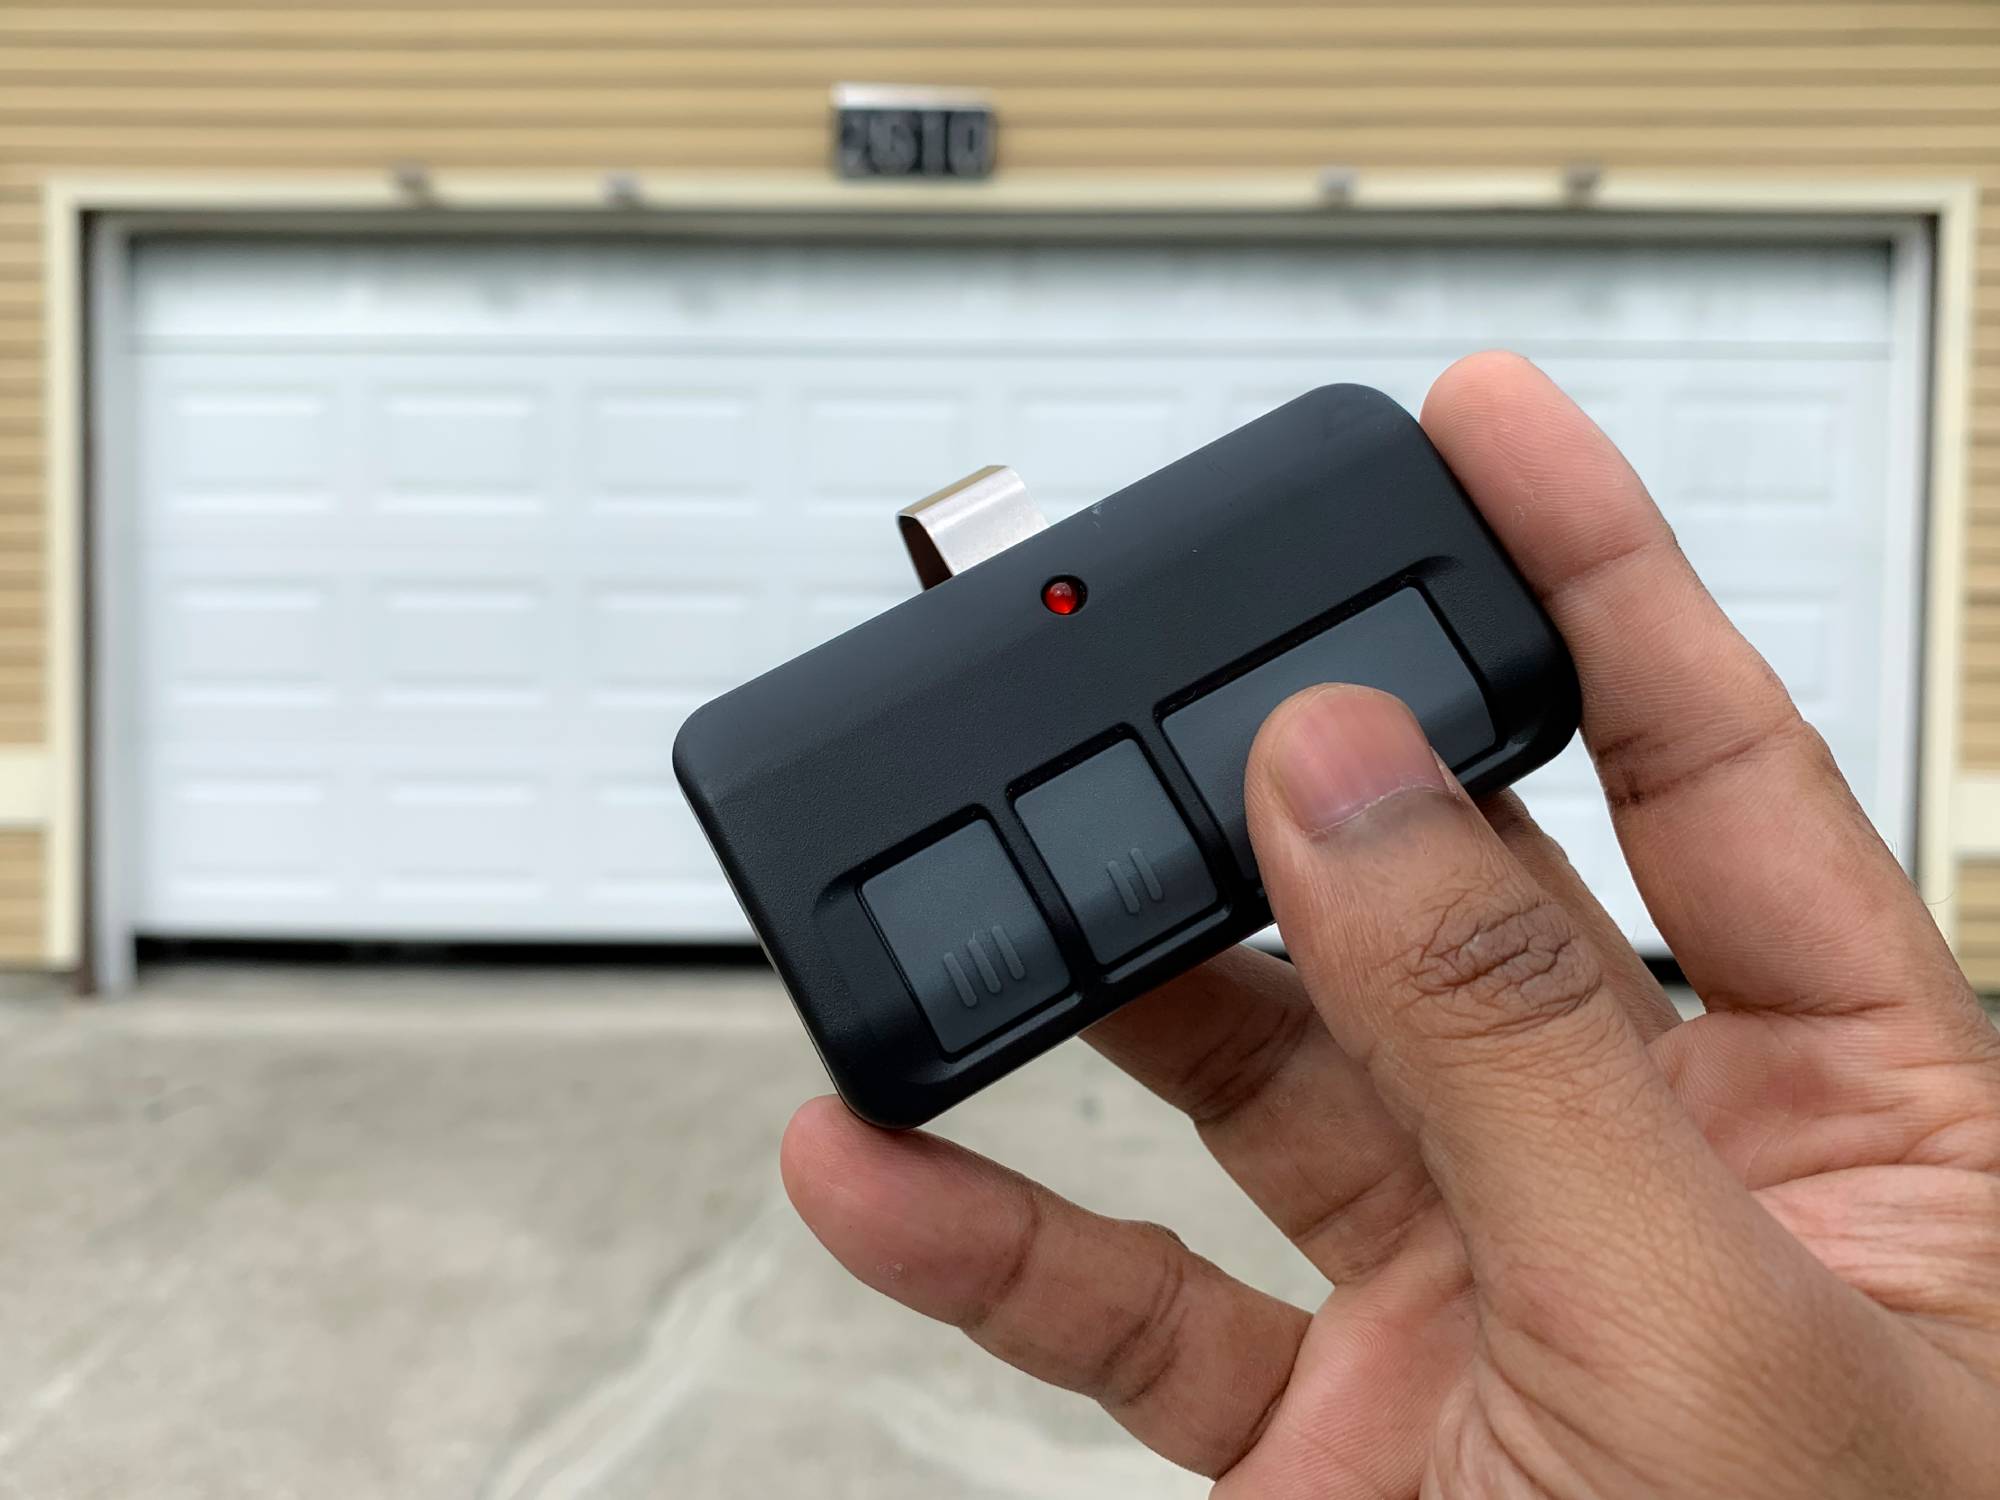
Liftmaster remotes come in different styles:
- Single-button remotes: One button controls one door.
- Multi-button remotes: Up to three doors or gates.
- Keychain remotes: Small enough for a keyring.
- Wall-mounted keypads: Enter a code instead of using a remote.
Understanding your model is important because reset steps can vary.
Why You May Need To Reset Your Remote
People reset their Liftmaster remotes for different reasons. Here are the most common scenarios:
- Lost or stolen remote: To keep your garage secure, you must erase the old remote from the opener’s memory.
- Bought a new house: Previous owners may still have access. Resetting ensures only your remotes work.
- Remote stops working: Sometimes, reprogramming fixes glitches or connection issues.
- Adding a new remote: You need to clear old codes if you’ve reached the memory limit.
- Battery change or power surge: These can wipe settings or cause remotes to lose sync.
In all these cases, knowing how to reset your Liftmaster remote helps keep your property safe and your system working smoothly.

Key Steps Before You Begin
Before resetting your remote, take a few minutes to prepare. Skipping these steps can lead to confusion or even damage.
- Identify your opener model. Look for a sticker on the main motor unit (usually hanging from the garage ceiling). Write down the model number and serial if possible.
- Check your remote type. Single, multi-button, or keypad? Each has a slightly different process.
- Gather all remotes. If you plan to erase all codes, you’ll need every remote you want to reprogram.
- Get a ladder. Most openers have the “Learn” button high up on the unit.
- Test your remote. Make sure the battery is fresh and the remote works before you start. If it doesn’t, replace the battery first.
Pro tip: If your garage door opener is connected to a smart home system, review your app settings. Sometimes, resetting the remote requires a quick app update.
How To Reset A Liftmaster Garage Door Opener Remote
The main steps for resetting a Liftmaster remote are similar across most models. However, small differences exist depending on the age and type of your system. This section covers the most common methods.
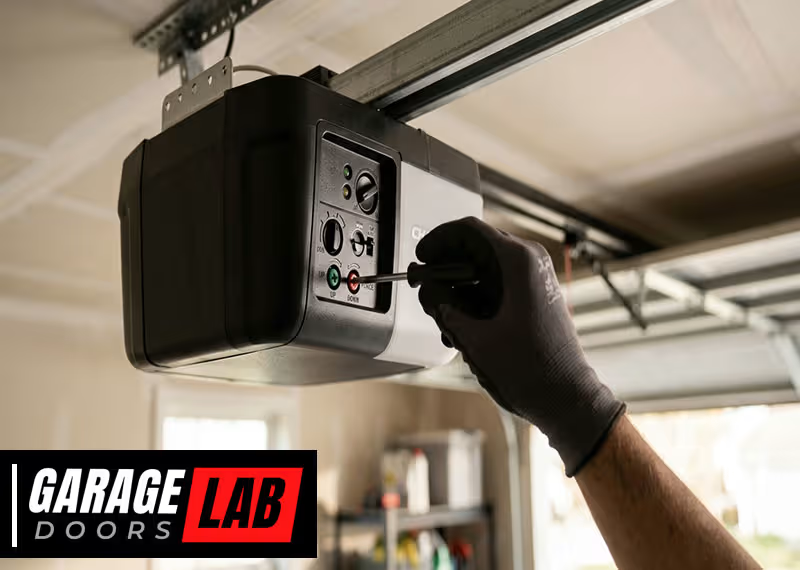
Step 1: Locate The “learn” Button
The “Learn” button is the heart of Liftmaster’s programming system. On almost all models, you’ll find this button on the side or back of the main motor unit. It’s often under a light cover.
- Color codes: The color of the “Learn” button sometimes tells you the frequency or age of your unit. For example:
- Yellow: Security+ 2.0 (2011 and newer)
- Purple: Security+ (2005–2011)
- Red/Orange: Security+ (1997–2005)
- Green: Older systems
Liftmaster’s official guide explains these differences in detail. If you’re unsure, check the color before you continue.
Step 2: Clear The Opener’s Memory
Erasing the opener’s memory removes all remotes, keypads, and wireless accessories. This is the most secure reset.
- Climb the ladder and locate the “Learn” button.
- Press and hold the “Learn” button for about 6–10 seconds. The indicator light will turn off or blink, depending on your model.
- Release the button. All remote controls are now erased.
Important: If you only want to erase one remote, you can’t do this directly. Clearing memory wipes all paired devices, so you’ll have to reprogram each remote you want to keep.
Step 3: Reprogram Your Remotes
After clearing the memory, you need to pair your remotes again. Here’s how:
- Press and release the “Learn” button. The indicator light will start blinking.
- Within 30 seconds, press the button on your remote that you want to use for the garage door.
- The opener’s light will flash or you’ll hear a click. This means the remote is now programmed.
- Test the remote by pressing the button. The door should move.
Repeat these steps for every remote you wish to use.
Step 4: Resetting Wireless Keypads
Liftmaster keypads allow you to open the door using a PIN. To reset and reprogram a keypad:
- Press and release the “Learn” button on the opener.
- Within 30 seconds, enter your desired PIN on the keypad and press the Enter button.
- The opener light will blink or click to confirm.
- Test your PIN to ensure it works.
If you want to change the PIN later, repeat this process.
Step 5: Resetting Myq And Smart Remotes
Some newer Liftmaster openers use MyQ technology for smart home integration. To reset a MyQ remote or app connection:
- Open the MyQ app and sign in.
- Go to your device settings and select the opener.
- Choose “Remove Device” or “Factory Reset.”
- Follow on-screen instructions to clear the connection.
- Re-pair the opener in the app as a new device.
This ensures smart features and mobile controls stay in sync with your physical remotes.

Liftmaster Remote Reset: Model Comparison
Different Liftmaster openers have unique buttons, indicator lights, and programming methods. Here’s a side-by-side look at common models:
| Model/Series | Learn Button Color | Programming Method | Typical Year |
|---|---|---|---|
| Security+ 2.0 | Yellow | Press Learn, then remote button | 2011-present |
| Security+ | Purple/Red | Press Learn, then remote button | 1997-2011 |
| Older (390 MHz) | Green | Press Learn, then remote | Pre-1997 |
| MyQ Smart | Yellow | Use app + Learn button | 2014-present |
Knowing your model saves time and prevents frustration.
Troubleshooting Common Problems
Even after following the reset steps, things sometimes don’t work as expected. Here’s how to fix common issues:
Remote Still Not Working
- Dead battery: The most common cause. Replace with a fresh CR2032 or CR2016 battery.
- Out of range: Stand within 20–30 feet of the opener during programming.
- Obstructed signal: Metal garage doors or nearby electronics can block signals.
- Wrong button pressed: Make sure you are pressing the correct button during programming.
- Damaged remote: Try a different remote to confirm if the issue is with the opener.
Opener Won’t Enter Programming Mode
- Wrong button: Some people press the “light” or “lock” button by mistake. Only use the “Learn” button.
- Power issues: Unplug the opener for 30 seconds and try again.
- Sticky button: On older units, dust can make the Learn button stick. Gently clean around the button.
- Memory full: Most openers support 5–8 remotes. If you reach the limit, erase and start over.
Keypad Won’t Reset
- Old PIN not cleared: Perform a full memory erase first.
- Low battery: Wireless keypads use 9V batteries. Replace if the keypad is unresponsive.
- Keypad lockout: Entering the wrong PIN too many times may lock the keypad for a few minutes.
How To Reset A Single Remote Without Affecting Others
Many users ask if it’s possible to erase just one remote. The short answer: Liftmaster openers do not let you remove one remote at a time. When you clear memory, all remotes and keypads are erased.
Workaround: If you have a remote you want to remove (for example, if you lost it), you must clear the memory and reprogram the remotes you want to keep. This is why it’s so important to have all remotes on hand before starting.
Extra Tips Most People Miss
Resetting a Liftmaster remote is simple, but there are a few advanced tricks that can help.
Use The Opener’s Light As A Signal
When programming, the opener’s main light (the one that turns on when you open the garage) flashes to confirm a new remote. If the light doesn’t blink, the process didn’t work.
Don’t Forget About Vehicle Homelink
Many cars come with built-in garage door buttons (HomeLink). After resetting your opener, you’ll need to reprogram your car’s button. This often requires two people: one to press the Learn button on the opener and another to press the car’s HomeLink button.
Watch For Interference
LED bulbs in garage openers can sometimes cause remote interference. If your remotes work poorly after switching to LED bulbs, try changing to a different brand or type. Look for bulbs labeled “garage door opener safe. ”
Secure Your System
If you move into a new home, always reset the opener. Previous owners may have extra remotes or keypad codes. Take a few minutes to secure your property.
Keep A Backup Remote
Program a spare remote and keep it in a safe place. If your main remote is lost or stolen, you can quickly erase all codes and restore access.
When To Call A Professional
Most people can reset a Liftmaster remote with basic tools. But there are times when you should consider expert help:
- You can’t reach the opener: Some garages have high ceilings or difficult access.
- The Learn button is broken: If the button doesn’t work or is missing, call a technician.
- Wires are loose: If you see frayed wires or sparks, stop and call for service.
- Older units: Pre-1993 openers may lack safety features. Upgrading is safer.
Professional garage door companies can reset, repair, or upgrade your system. They may also help with smart home integration or advanced troubleshooting.
Security And Safety Considerations
Resetting your garage door remote is not just about convenience. It also protects your home.
- Always erase old remotes after a move, break-in, or lost remote.
- Set a unique keypad PIN (not 1234 or your address).
- Disable vacation mode if you are having trouble. Some Liftmaster openers have a vacation lock that disables all remotes. Check your wall panel for a “lock” button.
- Keep remotes out of sight in your car. Thieves often target vehicles for garage access.
For more on garage door opener safety, you can visit the Liftmaster Safety Center.
How Resetting Affects Other Systems
Modern homes often link garage door openers with smart home hubs, security systems, or even Amazon delivery (Key by Amazon). Resetting your opener can break these connections.
If you use:
- MyQ: You’ll need to re-link the opener in your MyQ app.
- Alexa, Google Home, Apple HomeKit: Remove and re-add the device in each app.
- HomeLink in your car: Program again after resetting the opener.
Resetting does not affect wall switches or wired controls. Only wireless remotes and keypads are erased.
Comparison: Liftmaster Vs. Other Brands
How does resetting a Liftmaster remote compare to other garage door opener brands? Here’s a quick look:
| Brand | Reset Method | Single Remote Erase? | Smart Home Integration |
|---|---|---|---|
| Liftmaster | Hold Learn button | No | Yes (MyQ) |
| Chamberlain | Hold Learn button | No | Yes (MyQ) |
| Genie | Learn button or DIP switches | Some models | Yes (Aladdin Connect) |
| Craftsman | Hold Learn button | No | Some models |
Liftmaster’s reset process is similar to Chamberlain and Craftsman (they share much of the same technology). Genie uses DIP switches on older models, which can be more confusing.
Advanced Troubleshooting: What If Nothing Works?
If your remote still does not work after a reset, try these advanced steps:
- Power cycle the opener: Unplug it for 60 seconds, then plug it back in.
- Check antenna wire: On the opener, look for a hanging wire. Make sure it’s straight, not broken or bent.
- Reprogram using a different button: Try pairing a different button on your multi-button remote.
- Test with a new remote: If possible, buy a new Liftmaster-compatible remote and see if it works.
- Factory reset (for smart openers): Some models have a menu option for a full factory reset. Check your manual for steps.
- Consult the manual: Search for your model number on the Liftmaster website for detailed instructions.
- Check local codes: Some homeowners’ associations restrict certain opener types or frequencies.
These steps cover almost all cases. If problems continue, a professional service call may be your best option.
Frequently Asked Questions
How Do I Find The Learn Button On My Liftmaster Opener?
The Learn button is usually located on the back or side of the opener’s motor unit, often under a light cover. It may be yellow, red, purple, or green. Check for a small button labeled “Learn” near a small LED light. If you can’t find it, look up your model number on the Liftmaster website for a diagram.
Can I Program A New Remote Without Erasing Existing Remotes?
Yes. To add a new remote, simply press and release the Learn button, then press your new remote’s button within 30 seconds. Only the new remote is added; existing remotes are not affected. But to remove a lost remote, you must erase all and reprogram the ones you want to keep.
Why Does My Remote Stop Working After A Power Outage?
After a power outage, some openers lose their memory or develop glitches. Try resetting the opener by unplugging it for 30 seconds, then reprogramming your remote using the Learn button. If problems continue, replace the remote’s battery or check for interference from new electronics.
How Many Remotes Can I Program To My Liftmaster Opener?
Most Liftmaster openers support 5–8 remotes and 1–2 keypads. If you try to add more, the oldest programmed remote will be deleted automatically. Check your owner’s manual for your exact model’s limit.
Is It Safe To Share My Keypad Pin With Visitors Or Delivery People?
It’s best not to share your main PIN. Instead, set a temporary PIN if your keypad allows it, and erase it after use. Always change your PIN if you believe it’s been shared with someone you no longer trust.
Resetting your Liftmaster garage door opener remote is a smart way to keep your home secure and your system running smoothly. With a few simple steps, you’ll be back in control—and you’ll know exactly what to do next time.