Now Reading: How to Adjust Chamberlain Garage Door Opener for Smooth Operation
- 01
How to Adjust Chamberlain Garage Door Opener for Smooth Operation
How to Adjust Chamberlain Garage Door Opener for Smooth Operation
A garage door opener is a small detail that makes life easier every day. When it works well, you may not think about it. But when your Chamberlain garage door opener is too loud, stops before closing, or does not respond as you want, frustration can build quickly. Many problems can be fixed with a simple adjustment—no need to call a pro or struggle for hours. Learning how to adjust your Chamberlain opener helps you save time and money while keeping your garage safe and secure.
This guide explains everything you need to know about adjusting a Chamberlain garage door opener. Whether you own a new model with smart features or an older chain-drive unit, you will find step-by-step advice. You will also see common mistakes, safety warnings, and tricks that most beginners miss. By the end, you will feel confident about handling your garage door adjustments—and you may even solve problems you didn’t realize you had.
Understanding Your Chamberlain Garage Door Opener
Before making any changes, it’s important to understand the main parts and how they work together. Chamberlain garage door openers are known for their reliability and many models share similar designs.
The basic system includes:
- Motor unit: Hangs from the ceiling, powers the door movement.
- Trolley and rail: Guides the door as it opens and closes.
- Limit switches: Tell the motor when to stop.
- Force controls: Set how much power is needed to move the door.
- Safety sensors: Located near the floor, prevent the door from closing on objects or people.
- Wall control panel: Lets you operate the door from inside the garage.
- Remote controls: Open or close the door from your car or outside.
Many Chamberlain openers also have Wi-Fi for smart features and battery backup systems. While the core adjusting process is similar, always check your user manual for details specific to your model.
Safety First: What To Know Before Adjusting
Adjusting a garage door opener may look simple, but it can be risky if you skip safety steps. The door is heavy and the springs hold a lot of tension. Here are some key precautions:
- Unplug the opener before working on it. This prevents accidental starts.
- Clear the area around the garage door. Keep children and pets away.
- Wear gloves and safety glasses if you need to handle springs or metal parts.
- Do not adjust springs or cables unless you are trained. These can be dangerous.
Most adjustments, like setting limits or force, are safe for DIY with basic tools. But if you notice a broken spring or cable, call a pro.

Tools And Materials You Will Need
You don’t need fancy tools for most Chamberlain garage door opener adjustments. A few simple items are enough:
- Step ladder (to reach the motor unit)
- Flat-head and Phillips screwdrivers
- Wrench or small socket set
- User manual (for your specific model)
- Small flashlight (helpful for seeing adjustment screws)
- Pen and paper (to note original settings)
If you have a newer smart model, keep your smartphone handy for Wi-Fi or app-related features.
Common Reasons To Adjust Your Chamberlain Opener
You might need to adjust your opener for several reasons. Understanding the problem helps you fix it faster:
- The garage door does not close all the way or reopens after closing.
- The door stops before reaching the floor or ceiling.
- The door reverses when closing, even if nothing is in the way.
- The opener is too loud or moves the door too forcefully.
- The remote or wall button does not respond as expected.
- You have installed a new door or made repairs.
Adjustments keep your system safe, quiet, and reliable. Sometimes, a small tweak is all you need.
How To Identify Your Chamberlain Model
Before starting, check your opener’s model number. This is usually found:
- On the motor unit label (look for a sticker on the side or bottom)
- In your user manual
- In the Chamberlain app (for smart models)
Knowing your model helps you find the right instructions and parts. Common types include chain drive, belt drive, and wall mount units. Most openers made since the 1990s have similar adjustment screws and buttons.
Step-by-step Guide: Adjusting Chamberlain Garage Door Opener
Let’s walk through the main adjustments you might need. Take your time and check the results after each step.
1. Adjusting The Up And Down Travel Limits
Travel limits control how far the door opens and closes. If your door doesn’t go all the way up or down, adjust these settings.
How To Adjust Travel Limits
- Locate the adjustment screws or buttons.
- On most models, these are on the side or back of the motor unit.
- They are often labeled UP and DOWN or OPEN and CLOSE.
- Some units use dials or electronic buttons.
- Test the current limits.
- Use your remote or wall button to open and close the door.
- Watch where the door stops.
- Adjust the DOWN (close) limit.
- Turn the DOWN screw clockwise to make the door close further.
- Turn it counterclockwise to make it stop higher.
- Move the screw in small steps (1/4 turn at a time).
- Adjust the UP (open) limit.
- Turn the UP screw clockwise to open the door more.
- Turn it counterclockwise to stop it lower.
- Test after each adjustment.
- Run the door through a full cycle to see the new stop points.
- Repeat if needed.
Non-obvious insight: If the door closes too far, it may crush the floor seal or put stress on the motor. Setting the limits just right prevents extra wear.
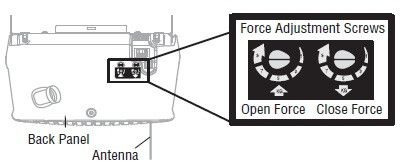
2. Adjusting The Force Settings
Force settings control how much power the opener uses to move the door. If the force is too low, the door may not fully open or close. If it’s too high, the door may not reverse when hitting something—this is a safety risk.
How To Adjust Force
- Find the force adjustment controls.
- These are usually small dials or screws labeled UP FORCE and DOWN FORCE.
- Test the door movement.
- Open and close the door, watching for stalls or reversals.
- Adjust as needed.
- Increase the force slightly if the door does not move smoothly.
- Decrease the force if the door does not reverse when blocked.
- Test the safety reverse.
- Place a 2×4 board flat under the door.
- Close the door. It should reverse when it touches the board.
Practical tip: Never set force to maximum to fix a sticky door. This hides real problems and can damage the opener or door.
3. Adjusting The Safety Sensors
All Chamberlain openers made since 1993 use safety sensors near the floor. If these are misaligned or blocked, the door will not close—or will reopen suddenly.
How To Adjust Sensors
- Check both sensors (photo eyes).
- They should face each other across the door opening, about 6 inches from the floor.
- Each will have a small LED light.
- Clean the lenses.
- Dust or spider webs can block the beam.
- Align the sensors.
- If the LED is off or blinking, gently move the sensor until the light stays solid.
- Secure the brackets.
- Tighten screws so the sensors stay in place.
- Test the door.
- Try closing it with the remote. If the door reverses or the light flashes, check alignment again.
Non-obvious insight: Sunlight or reflective surfaces can interfere with sensors. If alignment seems good but problems remain, try shading the sensors with a small cover.
4. Adjusting The Chain Or Belt Tension
If your Chamberlain opener uses a chain drive or belt drive, the tension needs to be just right. Too loose and the door moves roughly or skips; too tight and it strains the motor.
How To Adjust Chain/belt Tension
- Locate the tension bolt.
- Usually at the trolley end, near the door.
- Check current tension.
- The chain or belt should sag slightly (about 1/2 inch above the base of the rail at the midpoint).
- Turn the tension nut.
- Tighten to remove excess slack.
- Do not overtighten—this can wear out the drive.
- Test the movement.
- Run the door. Listen for smooth, quiet operation.
Example: If your opener suddenly gets louder, check both the chain tension and if the drive sprocket is wearing out.
5. Adjusting The Door Balance (manual Test)
A poorly balanced door puts stress on the opener. You should check the balance before making force or travel adjustments.
How To Test And Adjust Balance
- Disconnect the opener.
- Pull the emergency release cord to separate the door from the opener.
- Lift the door halfway by hand.
- It should stay in place, not fall or rise.
- If the door moves, the springs may need adjustment. Call a pro for spring work.
- Reconnect the opener and test automatic operation.
Common mistake: Many people adjust the opener when the real problem is a heavy or unbalanced door.
6. Resetting The Opener After Adjustments
After making adjustments, it’s smart to reset your opener. This helps the motor “learn” the new limits and force settings.
- Unplug the opener for 30 seconds.
- Plug it back in.
- Use the wall button to run a full open-close cycle.
For smart models, you may need to reset via the app or hold a specific button. Check your manual for details.

Troubleshooting: When Adjustments Don’t Work
Even after careful adjustments, you might face stubborn problems. Here’s what to check next:
- Door still reverses when closing: Check sensor alignment and clean the lenses.
- Opener hums but doesn’t move: Door may be locked or springs broken.
- Remote doesn’t work: Replace batteries or reprogram the remote.
- Door only moves a few inches: Check for obstructions on the tracks.
If the issue continues, inspect the tracks, rollers, and hinges for damage or debris. Sometimes, a thorough cleaning and lubrication fix issues that adjustments cannot.
Modern Features: Adjusting Smart Chamberlain Openers
Many Chamberlain openers now include smart features via the myQ app. These add new ways to adjust settings and monitor your garage.
Adjusting Via The Myq App
- Connect your opener to Wi-Fi following the manual’s steps.
- Open the myQ app on your smartphone.
- Find Settings > Door Controls.
- Adjust travel limits and notifications as needed.
You can also set alerts for door activity and schedule automatic closing times. These features add convenience, but basic mechanical adjustments are still done at the opener.
Insight: If your opener loses Wi-Fi connection, it will still work manually, but you lose app-based features until reconnection.
Comparing Chain, Belt, And Wall-mount Chamberlain Openers
Understanding your opener type helps you adjust it properly. Here’s a quick comparison:
| Type | Noise Level | Maintenance | Typical Adjustments Needed |
|---|---|---|---|
| Chain Drive | Louder | Lubricate chain; adjust tension | Travel, force, chain tension |
| Belt Drive | Quieter | Check belt; less frequent lube | Travel, force, belt tension |
| Wall-Mount | Very quiet | Lubricate door, not drive | Travel, force |
Tip: Belt drive openers are often chosen for attached garages where noise matters.
When To Call A Professional
Some adjustments are safe for DIY, but others need expert help:
- Broken or stretched springs
- Frayed or broken cables
- Bent tracks or damaged panels
- Opener motor not running at all
Attempting these repairs yourself can be dangerous. A pro can fix these issues safely and reset your opener for best performance.
Maintenance Tips For Long-term Reliability
Adjusting your Chamberlain opener is just part of keeping it running smoothly. Regular maintenance helps prevent problems and reduces the need for major repairs.
- Lubricate moving parts every six months. Use garage door lubricant on rollers, hinges, and the chain (not the belt).
- Inspect the door balance twice a year.
- Test the safety reverse monthly with a board under the door.
- Clean the sensors and check their alignment.
- Replace remote batteries once a year.
Bonus tip: Keep a log of your adjustments and maintenance. This helps you spot patterns and explain problems if you need a pro.
Upgrading Your Chamberlain Opener
If your opener is over 15 years old, or lacks safety features, consider an upgrade. Newer models are quieter, more secure, and easier to adjust.
Features To Look For
- Battery backup: Keeps working during power outages.
- Smart control: Open, close, and monitor your door via smartphone.
- Improved safety sensors: More reliable and easier to align.
- Quieter operation: Especially important for attached garages.
Compare the most popular Chamberlain models below:
| Model | Drive Type | Wi-Fi Enabled | Battery Backup | Best For |
|---|---|---|---|---|
| B970 | Belt | Yes | Yes | Quiet, smart homes |
| C450 | Chain | No | No | Basic, detached garages |
| RJO20 | Wall-Mount | Yes | Yes | Space-saving, modern garages |
For more details, you can check the official Chamberlain website.
Real-world Examples: Common Adjustment Scenarios
Let’s look at some everyday situations and how adjustment solves the problem.
Scenario 1: Door Reverses When Closing
Problem: The garage door goes down, touches the floor, and immediately reopens.
Fix: Adjust the DOWN limit so the door stops right at the floor, not past it. Check safety sensor alignment.
Scenario 2: Opener Won’t Respond To Remote
Problem: Remote works sometimes, but not always.
Fix: Replace remote batteries. If problem continues, reprogram the remote and check for interference (e.g., LED lights nearby).
Scenario 3: Door Stops Partway
Problem: Door opens or closes only halfway and then stops.
Fix: Reduce force settings if set too high. Check for obstructions or a sticky door. Adjust travel limits if needed.
Scenario 4: Loud Or Jerky Operation
Problem: Opener is much louder than before, and movement is rough.
Fix: Check and adjust chain or belt tension. Lubricate moving parts. Inspect rollers and tracks for damage.
Insight: Many people ignore sudden changes in noise. Addressing these quickly prevents bigger, costlier problems.
Why Proper Adjustment Matters
Some homeowners ignore small garage door issues. This can lead to:
- Shorter opener lifespan: Motors and gears wear out faster.
- Safety risks: Door may not stop for people, pets, or cars.
- Higher energy bills: Poorly sealed doors let air in and out.
A well-adjusted Chamberlain opener works quietly, safely, and saves you money in the long run.
Frequently Asked Questions
What Do I Do If My Garage Door Opener Is Still Not Working After Adjustments?
If basic adjustments do not solve your problem, check for obstructions on the tracks, weak springs, or damaged parts. Make sure your remote and wall button are working. If the opener is very old or the motor does not run, it may be time for a replacement or professional repair.
How Often Should I Adjust My Chamberlain Garage Door Opener?
Most homeowners only need to adjust their opener once or twice a year, or after making repairs or changing the door. Regular maintenance, like lubricating and testing the safety reverse, is more important for long-term performance.
Can I Adjust My Chamberlain Opener Without The Manual?
Yes, most adjustments (limits, force, sensors) are similar across Chamberlain models. Labels on the motor unit guide you. However, the manual gives the most accurate steps for your specific opener. You can usually find digital copies on the Chamberlain website.
Is It Safe To Adjust Garage Door Springs Myself?
No. Springs hold a lot of tension and can cause serious injury if handled incorrectly. Only adjust the opener’s settings. If you suspect spring problems, call a trained technician.
What Should I Do If My Chamberlain Opener Loses Wi-fi Connection?
Try restarting your router and opener, then reconnect using the myQ app. If problems persist, check for software updates or interference from other devices. Your opener will still work manually, but app features won’t be available until you restore the connection.
A well-adjusted Chamberlain garage door opener makes daily life easier, safer, and quieter. With the right steps, a few tools, and a careful approach, you can handle most adjustments yourself—even if you are not a DIY expert. Take time to check each setting, test your results, and keep up with regular maintenance.
If you ever feel unsure, it’s always smart to call in a professional. Your garage door is a key part of your home—give it the attention it deserves for years of trouble-free use.


