Now Reading: How to Change a Battery in a Garage Door Opener Easily
- 01
How to Change a Battery in a Garage Door Opener Easily
Changing the battery in a garage door opener might seem simple, but for many homeowners, it’s a task that brings confusion. A weak or dead battery can leave you locked out—or worse, stuck inside—when you least expect it. Understanding this small maintenance step saves you time, stress, and sometimes money on unnecessary service calls.
In this guide, you’ll learn exactly how to change a battery in a garage door opener, what tools you’ll need, common mistakes to avoid, and extra tips to make the process smooth. Whether you have a wall-mounted panel or a handheld remote, this article will walk you through every detail with clear, practical advice.
Why Battery Maintenance Matters For Garage Door Openers
A garage door opener is more than a convenience—it’s a part of your home’s security and daily routine. The battery powers the remote or keypad, letting you open the door with a click instead of getting out of your car. When the battery dies, the system stops responding, which can be especially frustrating in bad weather or late at night.
Many people don’t realize that a weak battery can cause the garage door to work inconsistently. You might notice the door opens only when you’re close, or sometimes not at all. Ignoring these early signs often leads to bigger problems, like being unable to access your garage during emergencies.
Regular battery checks and timely replacement keep everything running smoothly.
Recognizing When To Change The Battery
Most garage door openers don’t have a display that says “low battery.” Instead, you’ll see warning signs. Here’s what to watch for:
- Reduced remote range: You need to get closer to the door for the remote to work.
- Delayed response: The door takes longer to start moving after you press the button.
- Flashing LED lights: Some remotes blink when the battery is low.
- No response: The door doesn’t move at all, even after several tries.
If you notice any of these, it’s time to change the battery. Don’t wait until the remote stops working completely.
Types Of Garage Door Opener Batteries
Not all garage door openers use the same battery. The most common types are:
- Button cell batteries: Small, round batteries like CR2032 or CR2016, often found in remote controls.
- 9-volt batteries: Rectangular batteries, usually in wireless keypads.
- AA or AAA batteries: Sometimes used in older or universal remotes.
- Backup batteries: Larger batteries inside the opener unit itself, used during power outages.
Here’s a simple comparison of common battery types used in garage door openers:
| Battery Type | Where Used | Average Lifespan | Replacement Difficulty |
|---|---|---|---|
| CR2032 (Button cell) | Remote controls | 1-2 years | Easy |
| 9V | Keypads | 1 year | Easy |
| AA/AAA | Universal remotes | 1-2 years | Easy |
| Backup battery | Opener unit | 2-3 years | Moderate |
Before buying a new battery, check your opener’s manual or look inside the battery compartment for the correct type.
Tools And Materials Needed
Changing a garage door opener battery is a simple task, but having the right tools makes it easier:
- New battery (correct type for your device)
- Small screwdriver (usually Phillips or flat-head)
- Clean cloth (for dust or corrosion)
- Step stool (if your keypad is mounted high)
- Pen or small tool (for pressing reset buttons, if needed)
Most remotes only need a screwdriver. Keypads may require both a screwdriver and step stool.

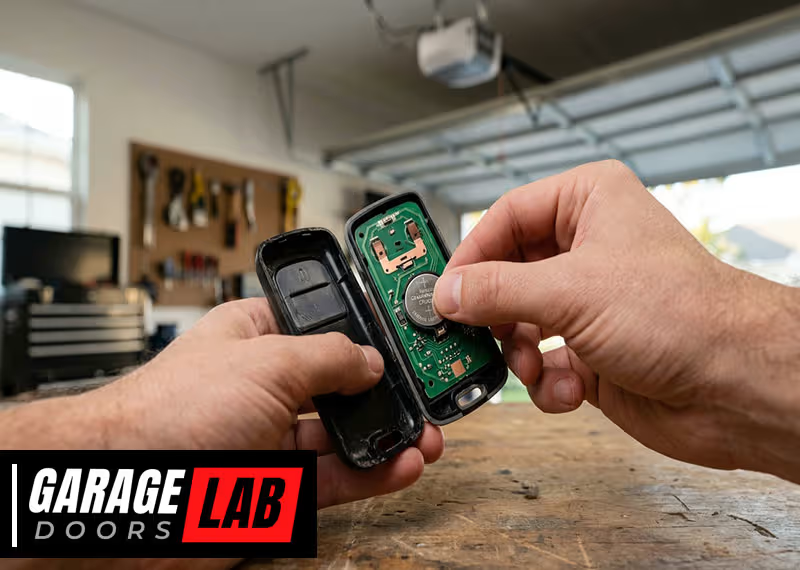
Step-by-step Guide: Changing The Battery In A Remote Control
Remote controls are the most common device needing a battery change. Here’s how to do it:
1. Locate The Battery Compartment
Turn the remote over. Look for a small slot or screw.
2. Open The Compartment
If there’s a screw, use a small screwdriver to remove it. If not, slide or pry open the cover with your thumb or a coin.
3. Remove The Old Battery
Take note of the battery’s position (which side is facing up). Use a finger or tool to gently pop it out.
4. Clean The Contacts
Wipe the battery contacts with a clean cloth. If there’s corrosion, you can gently rub with a pencil eraser.
5. Insert The New Battery
Place the new battery in the same direction as the old one. Check the “+” and “–” symbols.
6. Close The Compartment
Snap the cover back on or screw it tight.
7. Test The Remote
Stand a few feet from your garage and press the button. The door should respond immediately.
Pro Tips
- If the remote still doesn’t work, double-check the battery orientation.
- Keep a spare battery handy for future changes.
- Dispose of old batteries properly. Many stores have recycling bins.
Changing The Battery In A Keypad
Wall-mounted keypads usually control the garage door from outside. Their batteries last about a year. Here’s how to replace them:
1. Open The Keypad Cover
Most keypads have a flip cover. Open it to see the buttons.
2. Find The Battery Compartment
Look for a small panel, usually at the bottom or behind the keypad.
3. Remove The Panel
Use a screwdriver if needed. The panel may slide or pop out.
4. Take Out The Old Battery
Most keypads use a 9V battery. Pull it out gently.
5. Check For Corrosion
If the terminals are dirty, clean with a dry cloth.
6. Insert The New Battery
Match the terminals (“+” and “–”) with the symbols inside.
7. Replace The Panel And Cover
Secure everything and close the cover.
8. Test The Keypad
Enter your code and open the garage door.
Common Issues And Fixes
- If the keypad doesn’t work after changing the battery, wait a few seconds and try again.
- Some keypads need a reset after a battery change. Check your manual for instructions.

Replacing The Backup Battery In The Opener Unit
Some newer garage door openers have a backup battery inside the main unit. This battery lets you open the door during a power outage.
How To Change The Backup Battery
1. Unplug The Opener
For safety, always unplug the unit before opening it.
2. Locate The Battery Compartment
Usually on the side or bottom of the opener. It may have a small door or panel.
3. Remove The Panel
Use a screwdriver if needed.
4. Take Out The Old Battery
The battery is usually connected by a wire clip. Carefully unplug it.
5. Install The New Battery
Plug in the wire and fit the battery in place.
6. Close The Panel And Plug In The Opener
Restore power and test the opener.
When To Replace The Backup Battery
Manufacturers recommend changing the backup battery every 2-3 years. Some openers beep or show a warning light when the battery is low.
How Battery Type Affects Performance
Many people think all batteries are the same. However, the type and brand of battery you choose can affect how long your opener works between changes.
For example, lithium batteries like CR2032 last longer and work better in cold weather compared to cheaper alkaline batteries. Name-brand batteries usually have better quality control, which means fewer surprises.
Here’s a quick comparison of battery brands and types:
| Brand/Type | Average Lifespan | Cost Range (USD) | Known For |
|---|---|---|---|
| Energizer CR2032 | 2 years | $2-3 each | High reliability |
| Duracell 9V | 1 year | $3-5 each | Consistent performance |
| Generic CR2032 | 6-12 months | $1 each | Budget option |
Choosing a quality battery means fewer replacements and better performance.
Safety Precautions When Changing Batteries
Changing a battery seems safe, but there are some risks if you’re not careful:
- Always unplug the opener before replacing a backup battery.
- Avoid metal tools near battery terminals to prevent short circuits.
- Don’t mix old and new batteries; always replace all at once.
- Keep batteries out of reach of children, as they can be a choking hazard.
If you see corrosion (white powder or green rust), use gloves and clean the terminals before installing the new battery.
What To Do If The Opener Still Doesn’t Work
Sometimes, changing the battery doesn’t fix the problem. Here are some steps to troubleshoot:
- Check the battery orientation: Make sure the “+” and “–” ends match the diagram.
- Test with a second new battery: Sometimes new batteries are bad out of the box.
- Inspect the contacts: If the contacts are dirty or bent, clean or adjust them.
- Reset the remote or keypad: Some devices need a reset. Check the manual.
- Check for interference: Wi-Fi routers or LED lights can block the signal.
- Try reprogramming: The remote may need to be paired again with the opener.
- Test with another remote: If another remote works, yours may be faulty.
If nothing works, the remote or opener may need professional service.
When To Call A Professional
Most battery changes are DIY-friendly, but there are times to get help:
- Physical damage: If the remote or keypad is cracked, water-damaged, or won’t close after changing the battery.
- Corroded terminals: Heavy corrosion can cause lasting problems.
- Repeated battery failures: If new batteries only last days or weeks, there may be a wiring or circuit problem.
- Backup battery replacement: Some openers require special batteries or tools.
A professional can check for deeper issues and save you from bigger repairs later.
How To Extend Battery Life
You can make your garage door opener battery last longer with a few simple habits:
- Store remotes in a cool, dry place: Heat shortens battery life.
- Avoid pressing buttons longer than needed: Short taps are best.
- Check for stuck buttons: A button stuck “on” drains the battery quickly.
- Replace all batteries at the same time: This keeps power levels even.
- Use quality batteries: They last longer and perform better.
A surprising tip: If your remote sits in your car, extreme temperatures can reduce battery life by up to 50%.
Environmental Impact Of Garage Door Batteries
Millions of garage door batteries end up in landfills each year. Most contain metals that can be recycled. Here’s how to reduce the impact:
- Recycle used batteries at local collection points or hardware stores.
- Don’t throw batteries in household trash.
- Switch to rechargeable batteries if your device allows.
For more information about safe battery disposal, visit the official EPA household battery recycling guide.
Real-world Examples: Common Mistakes People Make
Even experienced homeowners sometimes make errors when changing garage door opener batteries. Here are two mistakes beginners often overlook:
- Forgetting to test before closing: Many people close the remote or keypad before testing. If the battery is in backward, you’ll need to open it again.
- Using the wrong battery: Buying “almost the same” battery (like CR2025 instead of CR2032) can cause weak performance or damage.
Another insight: Some remotes lose their programming when the battery is out too long. Change the battery quickly to avoid re-pairing.

How Often Should You Change The Battery?
The answer depends on how often you use your garage and the battery type:
- Remotes: Every 1-2 years, or sooner if you notice problems.
- Keypads: Every 1 year.
- Backup batteries: Every 2-3 years.
Heavy users or families with multiple drivers may need to change batteries more often. Mark your calendar or set a reminder to check batteries every spring and fall.
Special Cases: Smart Garage Door Openers
New smart garage door openers often have extra features, like Wi-Fi or Bluetooth. These can drain batteries faster, especially in keypads and backup units.
- Check your app: Some smart openers send battery alerts to your phone.
- Firmware updates: Update the opener’s software if the manufacturer recommends it, as this can improve battery life.
If you have a smart system, follow the manufacturer’s advice for battery types and replacement schedules.
Comparing Battery-powered Vs. Wired Keypads
Some garage door keypads run on batteries, while others use a direct wired connection. Each has pros and cons:
| Feature | Battery-Powered Keypad | Wired Keypad |
|---|---|---|
| Installation | Easy, no wires needed | Requires wiring |
| Maintenance | Needs battery changes | Little maintenance |
| Reliability | Affected by battery life | Always on (unless power outage) |
| Placement | Flexible | Limited by wire length |
Battery-powered keypads are more common in new homes, but if you want zero maintenance, a wired keypad may be a better choice.
Practical Tips For A Stress-free Battery Change
- Take a photo: Before removing the old battery, snap a picture. This helps if you forget how it fits.
- Label the date: Use a marker to write the date on the new battery.
- Keep a backup remote: Having a spare means you’re never locked out.
- Buy batteries in bulk: It’s cheaper, and you’ll always have extras.
- Teach your family: Make sure everyone knows how to change the battery.
Frequently Asked Questions
How Do I Know What Battery My Garage Door Remote Uses?
Check inside the battery compartment or look in your opener’s manual. The battery type is usually printed on the battery itself or inside the cover.
Will I Need To Reprogram My Remote After Changing The Battery?
Most remotes keep their programming, but some older models may need to be re-paired if the battery is removed for too long. Check your manual for instructions.
Why Is My Remote Still Not Working After Changing The Battery?
Double-check the battery orientation, test with a fresh battery, and clean the contacts. If it still doesn’t work, the remote may be faulty or need reprogramming.
Can I Use Rechargeable Batteries In My Garage Door Opener Remote?
Some remotes work with rechargeable batteries, but many are designed for standard alkaline or lithium types. Rechargeables have lower voltage, which may affect range or reliability.
How Should I Dispose Of Old Garage Door Opener Batteries?
Recycle them at hardware stores or designated recycling centers. Do not throw them in the trash, as they can leak chemicals harmful to the environment.
Changing a battery in a garage door opener is a simple skill that brings peace of mind and ensures your home stays accessible. With the steps above, you’ll handle the task confidently and avoid the frustration of a non-working opener.
Remember, a small bit of maintenance today saves big headaches tomorrow.