Now Reading: How to Set Up Chamberlain Garage Door Opener: Easy Guide
- 01
How to Set Up Chamberlain Garage Door Opener: Easy Guide
Setting up a Chamberlain garage door opener may seem challenging at first, but with the right guidance, it’s a task most homeowners can complete in a single afternoon. Whether you’re replacing an old opener or installing one for the first time, understanding each step matters. A well-installed garage door opener brings not only convenience but also security to your home. In this guide, you’ll learn exactly how to set up your Chamberlain garage door opener from start to finish, how to avoid common mistakes, and ways to get the best performance from your system.
Understanding Your Chamberlain Garage Door Opener
Before you start, it’s important to understand what makes Chamberlain one of the most popular brands in the market. Chamberlain openers are known for their reliability, smart features, and straightforward installation process. Most models include Wi-Fi connectivity, quiet operation, and compatibility with modern smart home systems.
Main Components
Every Chamberlain garage door opener kit includes some basic parts:
- Motor unit: The main device that powers your opener.
- Rail assembly: Guides the door as it opens and closes.
- Trolley and carriage: Move along the rail to pull or push the door.
- Chain or belt drive: Transfers motor power to the trolley.
- Safety sensors: Prevent the door from closing on objects or people.
- Wall control panel: Lets you operate the door from inside your garage.
- Remote controls: For wireless use from your car or outside.
- Hardware: Brackets, fasteners, and other mounting parts.
What To Check Before You Begin
- The height and weight of your garage door. Most openers work with standard residential doors (7-8 feet tall).
- A power outlet in the ceiling near the opener location.
- The condition of your door springs and rollers. Worn parts should be replaced before installing a new opener.
Tools And Materials You’ll Need
Gathering your tools ahead of time can save frustration later. For most Chamberlain openers, you will need:
- Drill with various drill bits
- Stepladder (6 ft or taller)
- Socket wrench set and adjustable wrench
- Screwdrivers (flat and Phillips)
- Tape measure
- Pencil or marker
- Pliers
- Level
- Wire stripper/cutter
- Hammer
You may also need additional mounting wood if your garage ceiling lacks joists where you want to install the opener.
Preparing For Installation
Proper preparation is half the job. A safe and successful installation starts here.
Clearing The Area
Remove any cars or large objects from your garage. You’ll need enough space to move a ladder and work with long rails.
Inspecting The Door
A balanced garage door is critical for opener performance. Disconnect the existing opener (if any) and manually lift the door. It should stay about halfway open by itself. If it slams shut or is hard to lift, the springs may need adjustment by a professional.
Checking Power Supply
The opener must be plugged into a grounded outlet. Extension cords are not recommended, as they can cause safety hazards and performance issues.
Marking Door Centerline
Find the center of your garage door from inside. Mark this spot on the header above the door with a pencil. It helps you align the opener rail for smooth operation.
Assembling The Rail And Opener
This is the first hands-on step. Most Chamberlain openers use a rail system that must be assembled before mounting.
- Lay out all rail sections on the floor.
- Slide the sections together as directed by your model’s manual. The trolley should be installed on the rail before fully assembling.
- Attach the rail to the motor unit using the provided bolts and brackets.
- Install the idler pulley at the door end of the rail (for belt or chain drive models).
- Feed the belt or chain along the rail, attaching it to both the trolley and the motor sprocket.
Make sure all fasteners are tight, but don’t overtighten, as this can damage the rail.
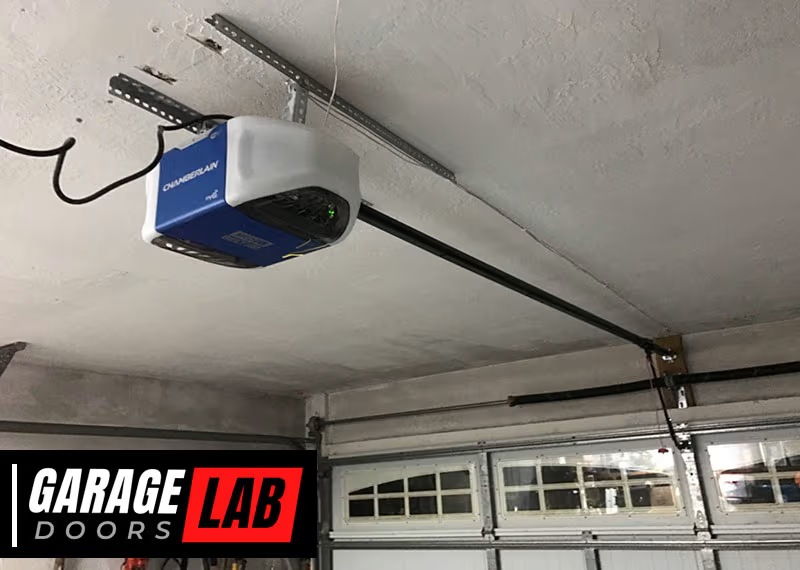
Mounting The Opener To The Ceiling
Now it’s time to lift and secure the assembled opener in place.
Locating The Mounting Point
The opener must be centered over the door or as close as possible. Use your earlier centerline mark as a reference.
Attaching The Header Bracket
- Secure the header bracket above the garage door at the marked center point. Use lag screws to attach it directly to the wall framing.
- The bracket should be high enough so the opener rail slopes slightly toward the back of the garage.
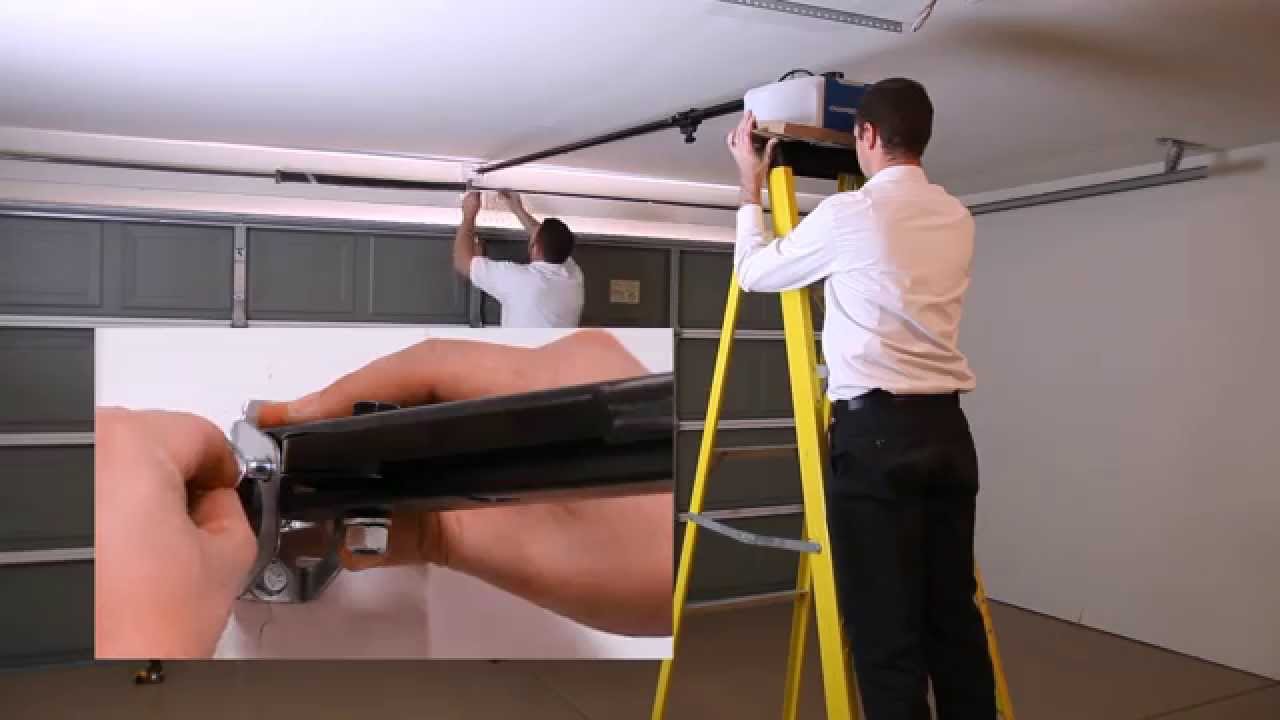
Lifting And Securing The Rail
- With help (an extra person is useful here), lift the assembled opener.
- Attach the front end of the rail to the header bracket using the supplied clevis pin and fastener.
- Lift the motor end and rest it on a ladder or temporary support.
Securing The Motor Unit
- Use angle iron or the provided mounting straps to fasten the motor to the garage ceiling joists.
- The opener must be rigid and not sway when the door moves.
- Use a level to ensure the rail is straight and not twisted.
Connecting The Door Arm And Trolley
With the opener secure, connect it to the garage door.
- Attach the curved door arm to the garage door’s top bracket.
- Connect the other end to the trolley on the rail.
- Use the straight arm as needed to ensure a strong connection.
- Make sure all bolts and pins are tight.
This linkage moves the door as the opener activates.
Installing Safety Sensors
Safety sensors are required by law. They stop the door if something is in the way.
- Mount the sensor brackets on both sides of the garage door, about 6 inches above the floor.
- Attach the sensors, making sure they face each other.
- Run the wires along the wall or ceiling, securing with staples or clips.
- Connect sensor wires to the opener’s terminals (usually color-coded).
If the sensors are not aligned, the door will not close—so take your time.
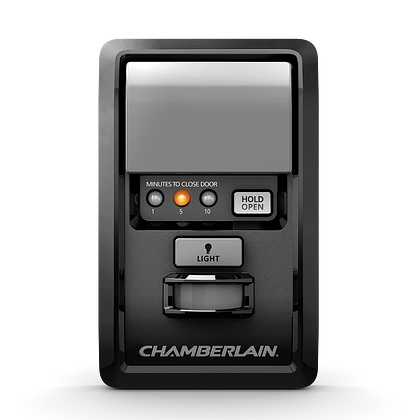
Wiring The Wall Control Panel
The wall control lets you open or close the door from inside the garage.
- Mount the panel on the wall near the door to the house, out of reach of children.
- Run the control wires to the opener, stapling them neatly.
- Connect the wires to the opener’s control terminals (check manual for the correct slots).
Some models use wireless wall controls; if so, follow pairing instructions in the manual.
Powering Up And Testing
Plug the opener into the ceiling outlet. The lights on the motor unit should come on.
Setting Up Travel And Force Limits
Travel limits tell the opener how far to open and close the door. Force limits control how hard the opener pushes.
- Use the “Up” and “Down” buttons on the opener to adjust how far the door moves.
- Test the door several times. The door should stop at the ground and at the full open position without slamming or straining.
- Adjust the force settings as needed so the door reverses easily if it hits an obstacle.
Refer to your Chamberlain manual for specific button locations and adjustment procedures.
Programming Remotes And Keypads
Chamberlain openers make it easy to add remotes and keypads for convenience and security.
Pairing Remotes
- Press the “Learn” button on the opener motor (usually on the back or side).
- Within 30 seconds, press the button on your remote.
- The opener light will blink, signaling the remote is paired.
Setting Up Keypads
- Press the “Learn” button on the motor.
- Enter a personal code on the keypad and press “Enter.”
- The light flashes—your keypad is ready to use.
You can program multiple remotes and keypads for family members.
Integrating Wi-fi And Smart Features
Many Chamberlain models support Wi-Fi connectivity and the MyQ app, letting you control your door from your smartphone.
Connecting To Wi-fi
- Download the Chamberlain MyQ app on your phone.
- Follow the app’s steps to connect your opener to your home Wi-Fi network.
- Name your garage door and test remote operation through the app.
Benefits Of Smart Features
- Open or close your garage door from anywhere.
- Get alerts if the door is left open.
- Set schedules for automatic closing.
Smart integration also allows you to connect with services like Amazon Key, letting delivery drivers place packages inside your garage.
Fine-tuning And Maintenance
A Chamberlain garage door opener will last longer and work better with regular checks.
Lubricating Moving Parts
Every 6 months, apply garage door lubricant to the rollers, hinges, and rail. Avoid using grease, which attracts dust.
Checking Safety Reversal
Test the door’s safety system monthly:
- Place a small object (like a roll of paper towels) in the door’s path.
- Close the door; it should reverse when it touches the object.
Tightening Hardware
Vibration can loosen bolts over time. Use a wrench to check and tighten all mounting hardware annually.
Replacing Remote Batteries
If remotes stop working, replace the batteries before troubleshooting further.
Common Mistakes And How To Avoid Them
Many first-time installers make similar errors. Here are some to watch out for:
- Ignoring the manual: Chamberlain’s instructions vary by model. Always double-check with the official guide.
- Poor sensor alignment: If the safety sensors aren’t aimed at each other, the door won’t close.
- Loose mounting: An opener that shakes can damage your ceiling and shorten the motor’s life.
- Using extension cords: This can lead to power problems and even void the warranty.
- Skipping the door balance check: If your door is too heavy, the opener will strain and wear out quickly.
Advanced Options And Accessories
Chamberlain offers a range of add-ons to customize your system.
- Battery backup: Keeps your opener working during a power outage.
- Laser parking assist: Projects a red dot on your dash so you park perfectly every time.
- Automatic garage door lock: Adds an extra layer of security by physically locking the door.
If you want to add these, most accessories are plug-and-play with Chamberlain systems.
Comparing Chamberlain To Other Brands
If you’re still deciding, it helps to see how Chamberlain stacks up against competitors.
| Feature | Chamberlain | Genie | Craftsman |
|---|---|---|---|
| Wi-Fi Integration | Yes | Some models | No |
| Battery Backup | Optional | Optional | No |
| Noise Level | Very Quiet (belt models) | Moderate | Loud (chain models) |
| Warranty | 10 Years | Limited Lifetime | 6 Years |
Chamberlain is often chosen for its modern features and quiet operation, especially in homes with rooms above the garage.
Troubleshooting: What To Do If Things Don’t Work
Even with careful setup, you might run into problems. Here’s how to solve the most common ones:
Opener Won’t Operate
- Check the power supply.
- Make sure the sensors are connected and facing each other.
- Test the wall control and remote batteries.
Door Only Moves Part Way
- Adjust the travel limits. The opener may think the door is closed/open too early.
- Check for physical obstructions on the rails.
Door Reverses Before Closing
- Sensors may be dirty or misaligned.
- Check for objects in the door path.
Remotes Not Working
- Reprogram the remotes using the Learn button.
- Replace batteries if needed.
Wi-fi Issues
- Move your router closer to the garage or use a Wi-Fi extender.
- Reset your opener’s Wi-Fi settings and try again.
Real-world Example: A Homeowner’s Experience
John, a homeowner in Ohio, installed his Chamberlain opener over a weekend. He found the trickiest part was lining up the sensors—a fraction of an inch off, and the door wouldn’t close. By taping a ruler to the wall, he made sure the sensors were exactly the same height. He also had to buy extra angle iron because his garage joists didn’t line up with the opener. After a few hours and some patience, his opener worked perfectly, and the Wi-Fi features allowed him to let in deliveries while at work.
Cost Breakdown: What To Expect
Wondering how much a Chamberlain garage door opener installation costs? Here’s a rough estimate:
| Item | Estimated Cost (USD) |
|---|---|
| Chamberlain Opener (Standard Model) | $180 – $300 |
| Professional Installation | $120 – $250 |
| DIY Supplies (hardware, angle iron) | $20 – $50 |
| Accessories (battery backup, keypad, etc.) | $30 – $100 each |
Installing it yourself saves money, but factor in your skill level and available time.

Safety Considerations
Garage doors are heavy. If your door is not balanced, or if you’re unsure about spring tension, call a professional. Also:
- Never remove or adjust torsion springs yourself.
- Unplug the opener when working on wiring.
- Keep remotes out of reach of children.
These steps prevent accidents and ensure a safe installation.
Upgrading Your Old Opener
If you’re replacing an old opener, disconnect and remove it before installing the new Chamberlain. Be sure to:
- Remove all old wiring and brackets.
- Check the door hardware for wear.
- Reuse existing wiring only if it’s in excellent condition and meets Chamberlain’s requirements.
Most old rails and trolleys are not compatible with new Chamberlain models.
Environmental Factors And Long-term Durability
Chamberlain openers are designed for various climates, but extreme cold or heat can affect performance. For unheated garages in cold regions:
- Use a belt drive for quieter, more reliable winter operation.
- Lubricate moving parts more often in cold weather.
- Battery backups may have reduced performance in freezing temperatures.
The motor and electronics are rated for garage use, but water leaks or high humidity can shorten their lifespan.
When To Call A Professional
If any part of the installation feels unsafe or confusing, it’s wise to hire a professional. For example, if your garage ceiling is unusually high or finished with drywall, running wires and mounting brackets gets complicated. Likewise, if your door is extra wide or heavy, special supports may be needed.
A professional installer can finish the job in 2–3 hours and ensure everything meets safety codes.
Essential Maintenance Schedule
Keeping your Chamberlain system in top shape is simple if you follow a regular routine:
- Monthly: Test safety reversal, check sensor alignment.
- Every 6 months: Lubricate moving parts, tighten hardware.
- Annually: Inspect the door balance, check for worn rollers or hinges.
Write these tasks on your calendar or set reminders in your phone.
Final Tips For A Smooth Installation
- Read through the entire instruction manual before starting.
- Lay out all parts and tools so you’re not searching mid-project.
- Ask a friend or family member to help with heavy lifting.
- Take photos of wiring before disconnecting anything (for replacement projects).
- Register your opener with Chamberlain for warranty support and software updates.
The most common beginner mistake is rushing—take your time, and your Chamberlain opener will work reliably for years.
For more technical details, the official Chamberlain support page is an excellent resource: Chamberlain Support.
Frequently Asked Questions
How Long Does It Take To Install A Chamberlain Garage Door Opener?
Most DIY installations take 3–5 hours, depending on your experience, the complexity of your garage, and whether you’re replacing an old opener. Allow extra time if you need to run new wiring or adjust your garage door.
Do I Need Special Tools To Install A Chamberlain Opener?
No special tools are required, but a drill, level, socket set, and stepladder are essential. Some installations may need extra angle iron or wood for ceiling mounting.
Can I Use My Old Wall Control Or Sensors With A New Chamberlain Opener?
Usually, no. Chamberlain systems are designed to work with their own accessories for safety reasons. Mixing brands can cause malfunctions or fail to meet safety standards.
What If My Garage Ceiling Is Higher Than Normal?
You’ll need a rail extension kit (available from Chamberlain) for doors over 7 feet tall. For high ceilings, additional angle iron or custom supports may be necessary.
How Do I Reset My Chamberlain Opener’s Wi-fi Settings?
Press and hold the Wi-Fi or Learn button on the motor until the LED blinks. Then, follow the instructions in the MyQ app to reconnect to your network.
Setting up your Chamberlain garage door opener is a smart investment in your home’s security and convenience. By following each step, watching for common errors, and performing simple maintenance, you’ll enjoy years of smooth, quiet operation. And if you ever need help, Chamberlain’s support and community forums offer quick answers and updates.


