Now Reading: How to Reset Garage Door Sensors: Step-by-Step Guide
- 01
How to Reset Garage Door Sensors: Step-by-Step Guide
A garage door is one of the most important parts of a home’s safety and convenience. Many people use their garage as the main entry point to their house. When the garage door sensors fail or stop working, it can be frustrating and even dangerous. Sometimes, the sensors just need a simple reset to work again. Learning how to reset garage door sensors can help you avoid unnecessary repair bills, keep your family safe, and restore your daily routine quickly.
This guide will show you everything you need to know about garage door sensors, from how they work, to why they might fail, and most importantly, how to reset them in clear steps. You’ll also learn how to avoid common mistakes and what to do if a reset does not solve the problem.
Whether you’re a first-time homeowner or just want to do some basic troubleshooting, this article will help you regain control over your garage door with confidence.
Understanding Garage Door Sensors
Before you try to reset your sensors, it’s important to know what they do. Garage door sensors are safety devices. They are installed near the floor, on both sides of the garage door. Their job is to detect any object, person, or pet in the path of a closing door. If something is detected, the door will stop or reverse. This prevents accidents and damage.
Most modern garage doors use photo-eye sensors. Each sensor sends an invisible infrared beam to the other. If the beam is broken, the door will not close. Some older systems use different technology, but the idea is the same—keeping people and things safe.
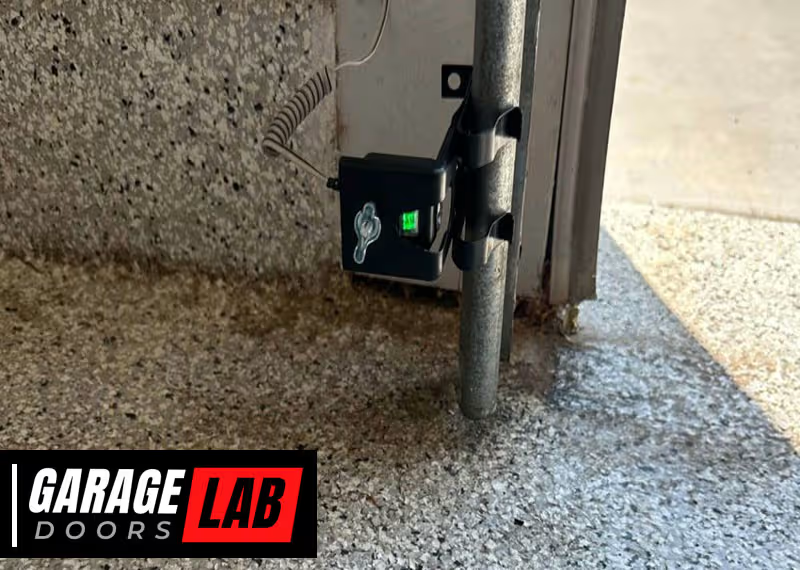
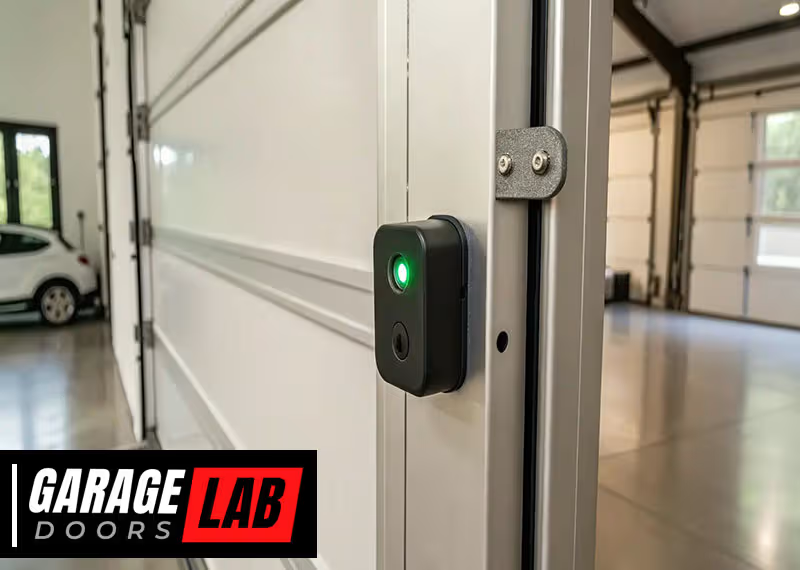
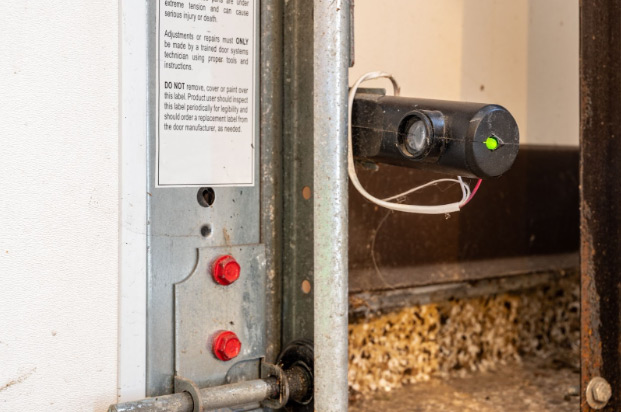
Key Parts Of A Garage Door Sensor System
- Photo-eye units: Small boxes with a lens, placed on each side of the door.
- Wiring: Connects the sensors to the garage door opener.
- Indicator lights: Usually one green and one yellow or red, showing if the sensors are working.
- Mounting brackets: Hold the sensors in place near the floor.
Knowing these parts will help you spot problems and handle resets more easily.
Why Do Garage Door Sensors Need Resetting?
Sensors are sensitive devices. They can stop working properly for many reasons. Sometimes, a simple reset can bring them back to life. Understanding these reasons will help you fix problems faster and avoid them in the future.
Common Reasons For Sensor Problems
- Power surges: A lightning storm or electrical issue can confuse the sensor’s tiny computer.
- Dirt or spider webs: These can block the sensor’s beam.
- Physical bump: Kids, pets, or moving objects may knock the sensors out of line.
- Wiring problems: Loose or corroded wires stop power from reaching the sensors.
- Moisture: Rain or snow can damage parts over time.
Resetting the sensors is often the first step before replacing any parts. Many sensor errors are temporary and can be fixed quickly.
Signs Your Garage Door Sensors Need A Reset
How do you know when a reset is needed? Some problems are easy to spot if you know what to look for.
Warning Signs
- The garage door won’t close unless you hold down the wall button.
- Blinking or solid sensor lights show an error.
- The door starts to close but reverses right away.
- You hear a clicking noise from the opener, but nothing happens.
- The remote works to open, but not to close the door.
If you notice any of these, try resetting the sensors before calling a repair service.
Tools And Supplies You’ll Need
You don’t need special tools to reset most garage door sensors. But having a few basic items on hand makes the process smoother.
- Flat-head screwdriver: For adjusting sensor brackets.
- Soft cloth or tissue: For cleaning lenses.
- Small ladder: If your sensors are set a bit high.
- Flashlight: To check wiring or look for dirt.
- Replacement batteries: For remotes, if needed.
- Multimeter (optional): For checking electrical current if you suspect wiring issues.
Using the right tool for each step keeps you safe and avoids damage.
How To Reset Garage Door Sensors: Step-by-step
Resetting garage door sensors is not difficult, but it must be done carefully. Follow these steps to avoid mistakes and get the best results.
1. Turn Off The Power
Safety comes first. Find the power switch for your garage door opener. This could be on the opener unit (usually hanging from the ceiling) or at your home’s main breaker panel. Turn off the power to avoid electric shock.
Pro Tip: Wait at least 60 seconds before turning the power back on. This short pause helps reset the opener’s internal computer and clears memory errors.
2. Clean The Sensor Lenses
Dust, dirt, or spider webs on the sensor’s lens can block the beam. Use a soft cloth to gently wipe each sensor lens. Do not use harsh chemicals or rough paper towels—these can scratch the lens and make the problem worse.
Beginner Insight: Many people forget about cleaning. Even a tiny smudge can cause false errors and stop your door from closing.
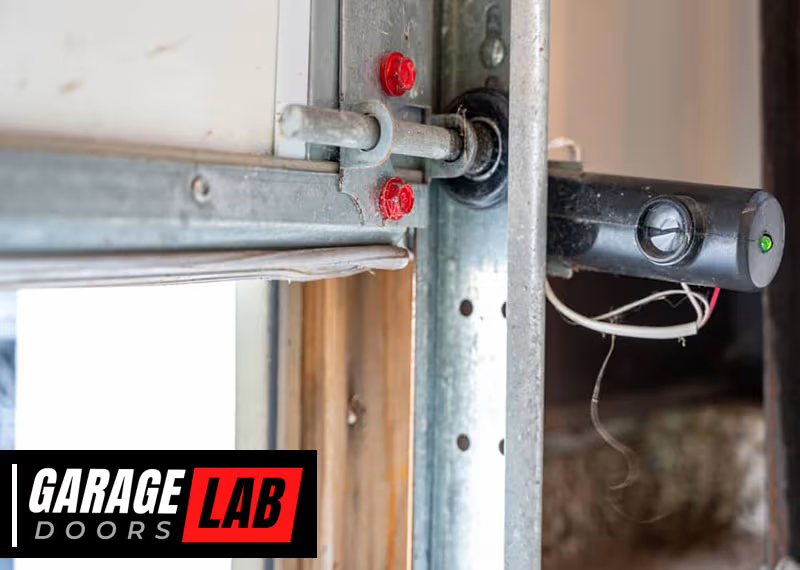
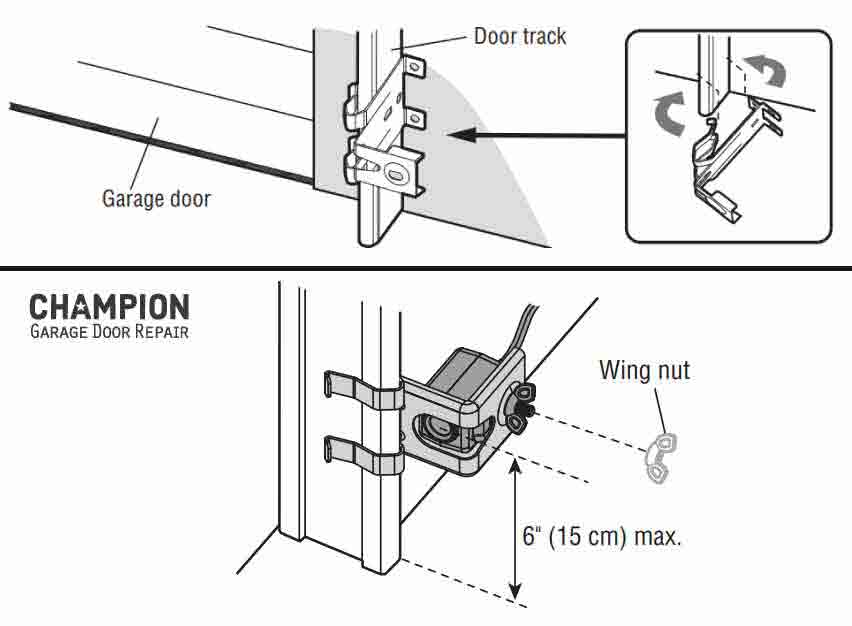
3. Check Sensor Alignment
Garage door sensors must face each other directly. If they are even a little out of line, the beam will not connect. Look at each sensor’s light. Most brands use a green light for “good” and a red or blinking light for “error.”
- If one or both lights are off or blinking, gently move the sensor until the light stays solid.
- Use a screwdriver to loosen and adjust the bracket if needed.
- Tighten the bracket once the lights are steady.
Non-obvious tip: Garage floors may shift over time, especially in cold climates. Check alignment twice a year for best results.
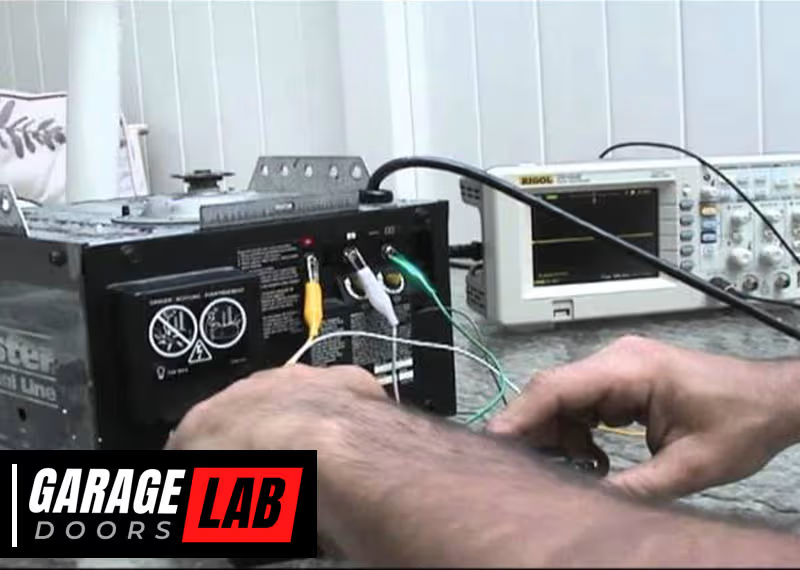
4. Inspect The Wiring
Sometimes, the problem is with the wires. Look for any loose, broken, or corroded wires coming from the sensors. If you see rust or a wire that’s not connected, it must be repaired or replaced. If you’re not comfortable with wiring, call a professional.
- Push any loose wires gently back into their connectors.
- Do not force or twist the wires.
Advanced tip: If you have a multimeter, test the voltage across the sensor wires. Most systems use low-voltage (12–24V DC). If there’s no power, the wiring may be at fault.
5. Reconnect Power And Test
Turn the power back on at the opener or breaker. Wait a few seconds for the sensors to “wake up.” Try closing the door using the wall button. Watch the sensor lights:
- If both lights are on and solid, the reset was successful.
- If one or both lights blink or stay off, repeat the steps above.
6. Reset The Garage Door Opener (if Needed)
Some sensor errors are stored in the opener’s memory. Resetting the opener itself may solve stubborn issues.
- Unplug the opener from the ceiling for 30 seconds.
- Plug it back in and wait for the lights to come on.
- Test the door’s operation.
Warning: Resetting the opener may erase remote controls or keypad codes. Follow your opener’s manual to reprogram these if needed.
7. Test The Safety System
Once your sensors are back on, make sure they work as designed:
- Close the garage door and wave a long object (like a broom) across the sensor beam.
- The door should stop or reverse.
- If not, check alignment and wiring again.
Testing the safety system after every reset keeps your family and pets safe.
Troubleshooting: What If Resetting Doesn’t Work?
Sometimes, a sensor reset is not enough. Here’s what to check next.
Double-check Power Supply
If the opener or sensors have no lights at all, there may be a tripped breaker or blown fuse. Check your home’s breaker box and reset any switches if needed.
Examine The Sensor Lights
Different brands show errors in unique ways. Here’s a quick comparison:
| Brand | Normal Light | Error Light |
|---|---|---|
| Chamberlain/LiftMaster | Solid green & yellow | Blinking or off |
| Genie | Solid red | Blinking red |
| Craftsman | Solid green & yellow | Blinking or off |
If your brand’s sensors do not match these lights, check your user manual for specific color codes.
Look For Obstructions
Even small objects, leaves, or snow can block the beam. Clear away anything near the sensor area.
Replace Sensor Units
If you’ve tried everything and the sensor light never turns on, the sensor may be broken. Replacements are available at most hardware stores. Match the brand and model for best results.
Call For Professional Help
If you are not comfortable working with electricity or wiring, it’s best to call a garage door technician. They can diagnose deeper problems such as damaged circuit boards or opener logic issues.
How Garage Door Sensors Work: A Closer Look
Understanding how sensors work helps you spot problems faster and handle resets with confidence.
Infrared Beam System
Most garage doors use a simple system:
- One sensor sends an infrared beam.
- The other sensor receives the beam.
- If the beam is broken, the opener “knows” something is in the way.
This system is very reliable, but also easy to disrupt with dirt, misalignment, or wiring problems.
Safety And Regulations
Garage door sensors became standard after 1993, following safety laws in the US. The Consumer Product Safety Commission requires all new openers to have this feature. This has prevented thousands of injuries and deaths, especially among children.
Sensor Types And Reset Differences
Not all sensors are the same. Some need extra steps for a full reset. Here’s a brief comparison:
| Sensor Type | Reset Method | Extra Steps |
|---|---|---|
| Standard photo-eye | Power cycle, clean, align | No |
| Wireless sensors | Power cycle, battery check | Replace batteries |
| Smart sensors | Power cycle, app reset | Re-pair with opener |
Note: If you have a “smart” garage door system, follow the app’s instructions for a full reset.
Preventing Future Sensor Problems
A little care goes a long way. These habits keep your sensors working smoothly:
- Clean lenses monthly with a soft cloth.
- Check alignment every season, especially after storms or cold weather.
- Keep the area clear of toys, tools, or garden items.
- Test the safety system twice a year.
- Replace damaged wires or brackets as soon as possible.
Non-obvious insight: In homes with pets, fur can collect on sensors and cause false errors. Check for hair buildup if your door acts strangely.
When You Shouldn’t Reset Sensors
While resetting solves many problems, there are times when you should not try to reset sensors yourself:
- Visible damage: Cracked or broken sensor units need replacement, not a reset.
- Water damage: If the sensor has gotten wet inside, it may short out.
- Burnt smell: This could mean an internal electrical problem. Unplug the opener and call a technician.
Trying to reset in these cases could make things worse or create a fire risk.
Garage Door Sensor Reset: Brand-specific Tips
Some brands have small differences in how their sensors and openers work. Here are a few examples:
Chamberlain And Liftmaster
- Use solid green and yellow lights.
- Sensors must be aligned within 1/8 inch.
- If the opener “learn” button is pressed, remotes and sensors may need reprogramming.
Genie
- Uses a solid red light.
- If the light blinks after reset, check for wiring issues.
- Genie openers often need a full power cycle to clear memory errors.
Craftsman
- Follows Chamberlain’s color code.
- Older models may need the wall button held down for 5 seconds after a reset.
Always check your owner’s manual for details unique to your opener.
Comparing Diy Vs Professional Sensor Reset
Fixing your garage door sensors yourself is possible for most people. But sometimes, hiring a pro makes more sense. Here’s a quick comparison:
| Factor | DIY Reset | Professional Service |
|---|---|---|
| Cost | Usually free | $80–$200 (US average) |
| Time | 15–30 minutes | 1–2 hours (including waiting for tech) |
| Safety | Safe for most people | Recommended for electrical issues |
| Success rate | High for basic problems | High for advanced issues |
Common Mistakes When Resetting Garage Door Sensors
Even careful people make mistakes. Avoid these to save time and money:
- Forgetting to turn off the power: This risks electric shock and can damage the opener.
- Not cleaning the lenses: Many errors are just dirt or spider webs.
- Forcing the sensor brackets: Too much pressure can break the sensor.
- Ignoring blinking lights: These are signs of ongoing problems, not just a reset issue.
- Mixing up wires: Make sure each wire goes back to the correct sensor and terminal.
Taking your time and following each step avoids these mistakes.
Quick Reference: The Reset Process In Simple Steps
Many people like a short checklist. Here’s a simple version:
- Turn off power to the garage door opener.
- Clean both sensor lenses gently.
- Check and adjust sensor alignment.
- Inspect wiring for damage or loose connections.
- Turn power back on and test.
- Reset the opener if lights still blink.
- Test the safety system with an object.
Keep this list handy for future problems.
How Often Should You Reset Garage Door Sensors?
In most homes, sensors only need a reset after a power surge, wiring issue, or if the door won’t close. Regular cleaning and testing are more important than frequent resets.
- Reset as needed: After storms, electrical work, or sensor errors.
- Test monthly: Make sure the door reverses when the beam is blocked.
- Clean every month: Dust and debris build up quickly in garages.
Too many resets could mean you need new sensors or professional help.
Extra Tips For Reliable Garage Door Sensors
- Use surge protectors on your opener to prevent power damage.
- Consider upgrading to smart garage door systems for more reliable sensor feedback and easier troubleshooting.
- Label wires with colored tape if you disconnect them—this prevents mix-ups when reconnecting.
- If you live in a cold climate, check sensors after ice or snow melts, as moisture can shift sensors or cause wiring issues.
- Talk to your neighbors—sometimes, radio interference from nearby devices can affect sensor function.

More Resources
If you want to dig deeper into garage door safety, the US Consumer Product Safety Commission has helpful guidelines. You can learn more by visiting their official site: CPSC Garage Door Safety.
Frequently Asked Questions
Why Does My Garage Door Only Close When I Hold The Wall Button?
This means your safety sensors are not working correctly. The wall button overrides the sensor system, letting the door close no matter what. Try resetting the sensors, cleaning the lenses, and checking alignment. If the problem continues, the sensors may need replacement.
How Do I Know If My Garage Door Sensor Is Bad?
If the sensor light never turns on, keeps blinking, or the door will not close even after a reset, the sensor could be broken. Try swapping the sensors left to right—if the problem stays on one side, the sensor is likely bad. If it moves, the wiring may be the problem.
Can I Bypass Garage Door Sensors Permanently?
It is not safe or legal to bypass garage door sensors in the US. Doing so puts people and pets at risk and can void your garage door opener’s warranty. Always fix or replace faulty sensors instead of bypassing them.
Do All Garage Doors Have Sensors?
All garage doors made since 1993 in the US are required to have safety sensors. Older doors may not have them. Adding sensors to an old door is possible and improves safety.
What If My Sensor Wires Are Damaged?
If you see damaged or frayed wires, turn off power to the opener right away. Damaged wires can cause shorts, errors, or even fire. Replace the wires or call a professional to handle repairs safely.
Resetting garage door sensors is a simple but important task. With the right knowledge and careful steps, you can solve most problems yourself and keep your garage door working safely for years to come.