Now Reading: How Do You Measure Garage Doors: Expert Tips for Perfect Fit
- 01
How Do You Measure Garage Doors: Expert Tips for Perfect Fit

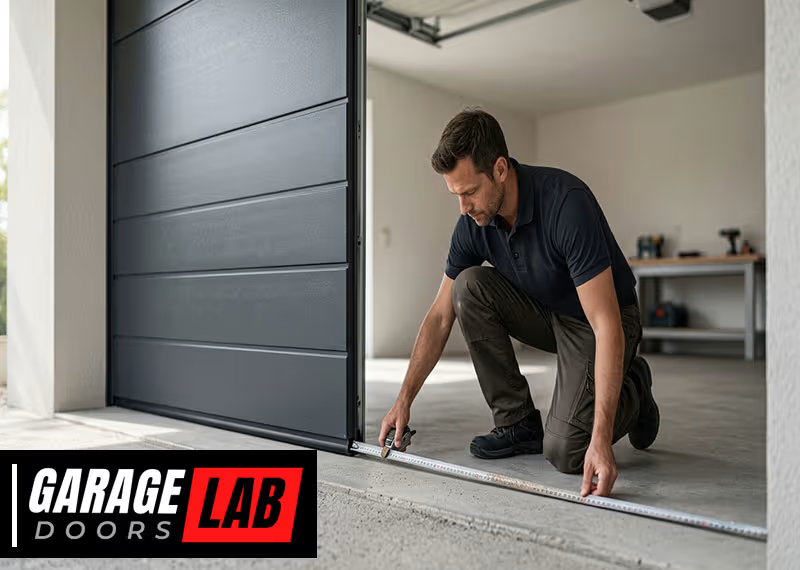
Measuring a garage door may seem simple, but it’s a key step that impacts everything from installation to maintenance and even home value. Many homeowners, builders, and DIY enthusiasts find themselves confused by the process. Are you looking to replace a garage door, add insulation, or get a new opener?
Accurate measurement is the foundation. A small mistake can lead to gaps, poor fit, or even make the door impossible to install. Let’s clear away the confusion and walk through the full process—step by step—so you can measure any garage door confidently.
Why Measuring Garage Doors Matters
The size of your garage door determines more than how well it fits. It affects safety, energy efficiency, and the overall appearance of your home. Choosing the wrong size can mean extra costs, delays, and frustration. For example, a door that’s too small may leave gaps for pests and weather, while one that’s too large simply won’t fit.
Manufacturers and installers rely on precise measurements. Standard sizes exist, but garages often have custom sizes. A 1-inch error might seem small, but it can ruin the installation. That’s why understanding how to measure is essential, whether you’re replacing a door or building a new garage.
Key Measurements You Need
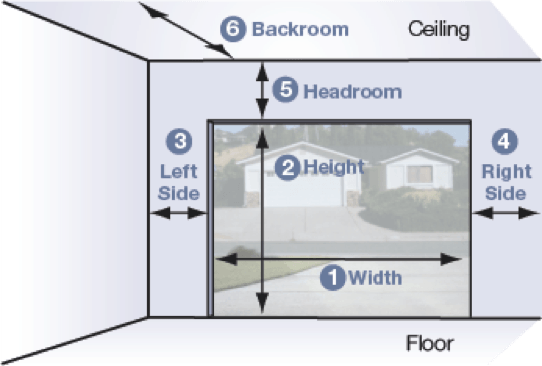
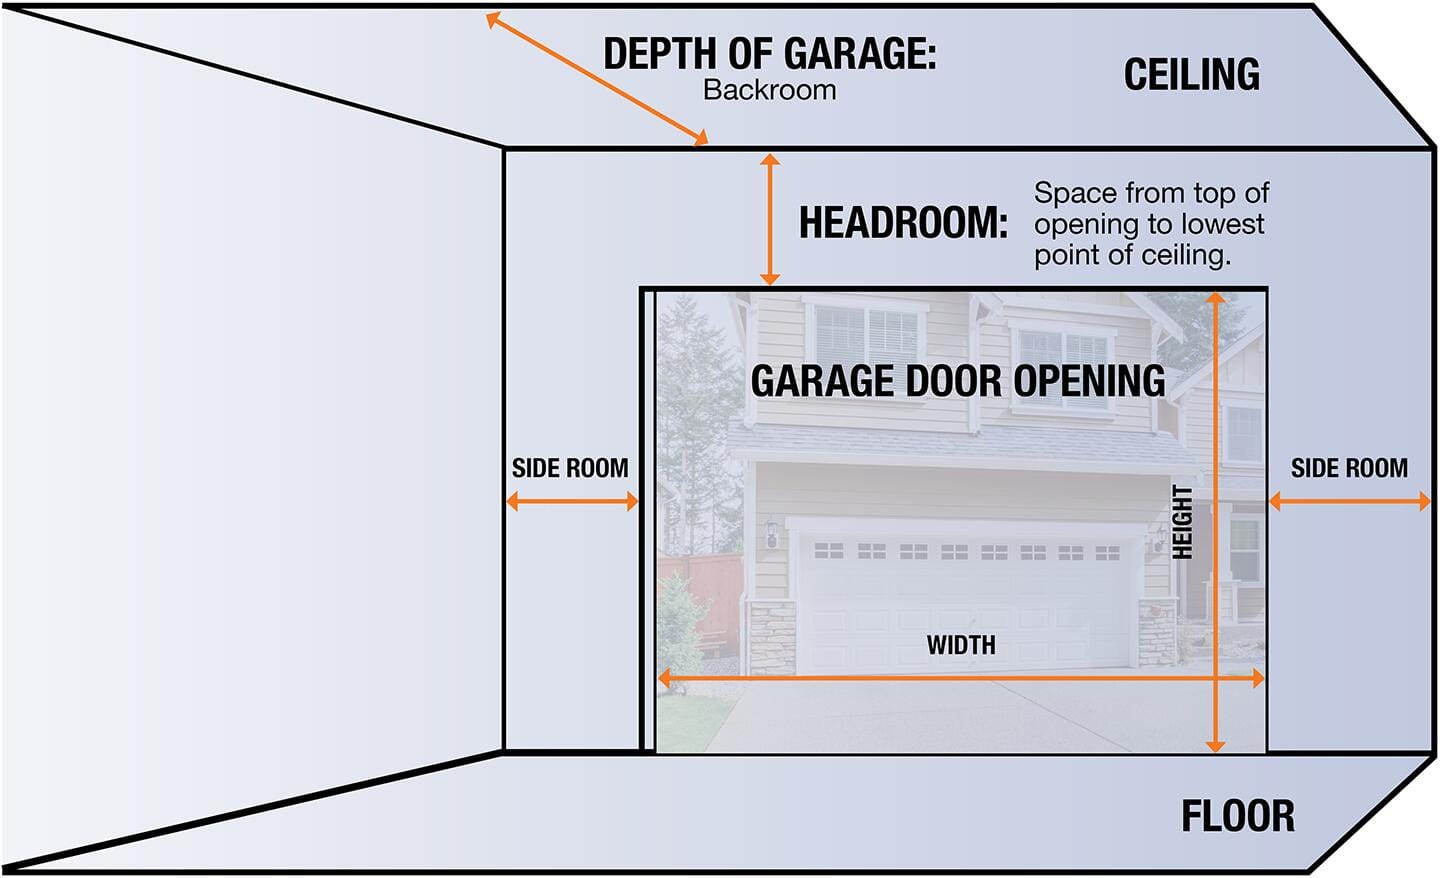
Before you grab your tape measure, it’s important to know what you’ll be measuring. For all garage doors, there are six main measurements:
- Width of the Opening (Door Width)
- Height of the Opening (Door Height)
- Side Room
- Headroom
- Backroom
- Sill or Floor Level
Each dimension serves a purpose in ensuring the door functions safely and fits perfectly. Let’s break down each one in detail.

Tools You’ll Need
Measuring a garage door is not complicated, but having the right tools makes the job easier and more accurate. Here’s what you should have ready:
- Tape measure (25 feet or longer is best)
- Step ladder (for reaching high points)
- Notepad and pencil
- Level (to check for uneven surfaces)
- Helper (optional, but useful for large doors)
A laser measure can help if you have one, but it’s not necessary. Always double-check your measurements for accuracy.
Step-by-step Guide To Measuring Your Garage Door
Let’s go through the process in a logical order. Each step matters. Even if you’re only replacing a door panel or adding insulation, the same process applies.
1. Measure The Width
Stand inside your garage. Measure the width of the garage door opening at the widest point—from the finished left side to the finished right side. Make sure your tape measure stays level.
Tip: Measure in inches. Most garage door sizes are listed in feet and inches (e.g., 9’0” or 16’0”). If your garage has molding or trim, measure only the finished opening, not the trim.
2. Measure The Height
Still inside the garage, measure from the floor (finished concrete or threshold) straight up to the bottom of the header (the beam above the opening). This is your door height.
Non-obvious insight: The finished floor matters. If you plan to add flooring or raise the garage floor, measure after those changes.
3. Check The Side Room
The side room is the space between each side of the opening and the wall or any obstruction. This space is needed for the tracks and hardware.
- Measure from the edge of the opening to the nearest wall or obstruction on both sides.
- Minimum side room is usually 3.5 inches for a standard door. But for some openers or insulated doors, you may need more.
Beginner’s mistake: Forgetting pipes, electrical panels, or shelves that might block the tracks.
4. Measure The Headroom
Headroom is the space from the top of the garage door opening to the ceiling or any obstruction above. This space is crucial for the door to open and for the installation of springs and openers.
- Measure from the top of the opening to the lowest point of the ceiling or an overhead beam.
- Standard headroom required is 10 to 12 inches for a regular door with a torsion spring. Low-headroom kits can work with less, but always check with the manufacturer.
Extra tip: If you plan to install a garage door opener, you may need even more headroom.
5. Find The Backroom
Backroom is the distance from the garage door opening to the back wall of your garage. This space is needed for the door panels to fully open and rest parallel to the ceiling.
- Measure from the opening (at the floor) straight back to the rear wall.
- You need at least the door height plus 18 inches for most systems.
Practical example: If your door is 7 feet (84 inches) high, you need a backroom of at least 8.5 feet (102 inches).
6. Check The Floor Level
Is the garage floor level? Many garages have a slight slope for drainage. Use a level to check if the floor under the door is flat. If it isn’t, note the difference. This affects the door seal and fit.
Non-obvious insight: A sloping floor can lead to gaps under the door. Some people use adjustable bottom seals or request a custom cut for the door to match the slope.
Standard Garage Door Sizes
Most garage doors come in standard sizes, but custom options are common, especially in older homes or special designs. Here’s an overview of standard sizes in the US:
| Type | Common Widths | Common Heights |
|---|---|---|
| Single Car | 8′, 9′, 10′ | 7′, 8′ |
| Double Car | 12′, 14′, 16′, 18′ | 7′, 8′ |
| RV/Custom | 10′, 12′, 14′, 16′ | 10′, 12′, 14′ |
It’s important to measure your specific opening, even if you think you have a “standard” size. Homes settle, builders make changes, and small errors can happen.
Practical Example: Measuring A Typical Single Garage Door
Let’s say you want to replace a single garage door. Here’s how the process might look:
- Measure the width—from finished left to finished right—result: 8’11”.
- Measure the height—from floor to header—result: 7’1”.
- Measure the side room—left: 5”, right: 4”.
- Measure the headroom—top of opening to ceiling: 13”.
- Measure the backroom—from opening to rear wall: 9’0”.
Your garage door size, in this case, is likely a 9’ x 7’ standard. But always use the smallest measurement you find—if the width is a little less or height is a little short, use that number.
Measuring For Special Garage Door Types
Not all garage doors are the same. Some types need extra care when measuring.
Sectional Doors
These are the most common, with panels that bend as they go up. They need side room for tracks and headroom for springs.
Roll-up Doors
Mostly used in commercial settings, they require less backroom but more headroom for the roll. Measure the space above the opening carefully.
Tilt-up (one-piece) Doors
These swing out and up as one piece. They need extra clearance in front and above the opening. Check for cars, lights, or storage that might block the swing path.
Carriage-style Or Custom Doors
These often have unique hardware. Always check with the manufacturer for specific measurement requirements.
Comparing Manual Vs. Automatic Garage Door Measurement Needs
Manual and automatic garage doors have similar measurement steps, but there are some key differences:
| Feature | Manual Door | Automatic Door |
|---|---|---|
| Side Room | 3.5″ minimum | More needed for opener brackets |
| Headroom | 10″ minimum | 12″-18″ often needed |
| Backroom | Height + 18″ | Height + 24″ recommended |
| Obstructions | Fewer concerns | Watch for lights, pipes, beams |
If you plan to automate your door later, measure for the opener now to avoid problems.
Common Mistakes When Measuring Garage Doors
Many people make simple mistakes that lead to costly errors. Here are the most frequent:
- Measuring trim, not the finished opening. This leads to oversized doors.
- Ignoring obstructions like pipes, shelves, or electrical panels.
- Not checking for level. A sloped floor or uneven header can change the size you need.
- Rounding up measurements. Always use the smallest exact measurement.
- Forgetting about hardware space. Tracks, springs, and openers need room.
Pro tip: Take every measurement twice. If you get different results, measure a third time to confirm.
Advanced Tips For Tricky Garages
Some garages have unusual features—odd shapes, supports, or other obstacles. Here’s how to handle those:
Dealing With Angled Or Arched Openings
Measure the narrowest width and lowest height. If the arch is decorative, measure the flat part for the door and the arch for trim.
Supporting Beams Or Pipes
Check for anything that might block the tracks or opener. Measure the clearance from the wall to the obstruction, not just the wall.
Installing In Unfinished Garages
If the walls aren’t finished, measure from stud to stud. When the garage is finished later, the opening might be smaller, so plan ahead.
When To Call A Professional
Measuring a garage door is possible for most homeowners, but there are times when calling a pro is smart:
- Odd shapes or very old garages
- Noisy or damaged structures
- Special requirements (oversized, RV, or custom doors)
- Confusing results (when your measurements don’t match standard sizes)
Garage door professionals have tools and experience to spot problems that homeowners might miss. If you’re unsure, ask for a measurement service—most reputable installers offer this.
Using Your Measurements To Order A Garage Door
Once you have accurate measurements, you can confidently shop for a replacement or new door. Here’s what to do next:
- Compare your measurements with standard sizes.
- Check manufacturer specifications for the door and opener.
- Consider insulation, material, and design—these don’t affect measurement, but they do affect fit.
- Order the closest standard size that fits, or request a custom size if needed.
- Confirm with the supplier before ordering. Send photos and your measurements to double-check.
How Measurements Affect Garage Door Opener Selection
A garage door opener needs certain clearances to work properly. Here’s how your measurements come into play:
- Headroom: Some openers need more space above the door.
- Backroom: Chain or belt drives need space for the rail.
- Side room: Wall-mount openers need extra side clearance.
Example: If you have only 6 inches of headroom, a traditional opener may not fit. A jackshaft (side-mount) opener is a better choice.
Beginner’s tip: Always pick your opener after measuring, not before.
The Impact Of Measurement On Energy Efficiency And Security
A well-measured garage door seals tightly, which keeps out wind, rain, and pests. It also improves energy efficiency by preventing drafts. If there are gaps, you’ll lose heat or cool air, and your security is weaker.
Stat: According to the U.S. Department of Energy, poorly sealed garage doors can raise energy bills by up to 15%.
A snug fit also improves security. Thieves often look for gaps or weak spots to pry open. A perfectly sized door is harder to break into.
Real-world Case Study
A homeowner measured their 1950s garage and ordered a “standard” 8’x7’ door. When the installer arrived, they found that the real opening was 7’10” wide and 7’1” high. The door didn’t fit. The result? They had to pay for a custom cut and a second installation visit—costing an extra $400 and two weeks’ delay.
Lesson: Always measure, never assume.
Comparison: Measuring For Residential Vs. Commercial Garage Doors
While the basic process is similar, commercial doors often require more precise measurements and have stricter code requirements.
| Feature | Residential Door | Commercial Door |
|---|---|---|
| Size Range | 8′-18′ wide | Up to 40′ wide |
| Hardware Space | Standard tracks/springs | Heavier, industrial hardware |
| Code Compliance | Basic requirements | Fire, wind, and safety codes |
| Measurement Precision | 1/4″ tolerance | 1/8″ tolerance often required |
If you’re measuring for a commercial building, always check local codes and consult with a professional.
How To Record And Communicate Your Measurements
After measuring, write down all dimensions clearly. Use this format for clarity:
- Width: 9’0”
- Height: 7’0”
- Side Room: Left 5”, Right 4”
- Headroom: 13”
- Backroom: 9’0”
- Floor: Level or 1” slope left-to-right
When ordering, communicate both the dimensions and any special notes (like a sloped floor or obstructions). Take photos to share with the installer or supplier.
Safety Tips During Measurement
- Use a sturdy ladder for high points.
- Watch for sharp objects, nails, or spiders in older garages.
- Don’t measure alone if your garage is cluttered or hard to access.
- Wear gloves if you’re dealing with rough wood or metal.
Trusted Resources For More Information
If you want to learn more, the International Door Association and the Wikipedia page on garage doors offer extra details on types, installation, and history.
Frequently Asked Questions
How Do I Measure For An Insulated Garage Door?
Measure the opening just like for a standard door—width, height, side room, headroom, and backroom. But make sure to allow extra space for the thickness of the insulation, especially on the sides and top. Some insulated doors are thicker and may need more track space.
What If My Garage Door Opening Is Not A Standard Size?
You may need a custom door. Always use your exact measurements when ordering. Do not try to force a standard size into a non-standard opening. Many manufacturers can build doors to fit almost any size.
Can I Measure My Garage Door From The Outside?
It’s best to measure from the inside for accuracy, since that’s where the tracks and hardware go. Outside measurements can include trim or siding, which don’t reflect the finished opening.
How Much Extra Space Do I Need For A Garage Door Opener?
Most openers need at least 2-4 inches above the top of the door (headroom) and enough backroom for the rail, usually the door height plus 3-4 feet. Side-mount openers need at least 7 inches of side room.
What Should I Do If My Garage Floor Is Sloped?
Measure both sides of the opening, and note the difference. Tell your installer about the slope. They may recommend a flexible or adjustable bottom seal, or a custom door cut to match the floor angle.
Measuring a garage door is more than just reading a tape measure—it’s about making sure the door works safely, efficiently, and looks great. Take your time, double-check your numbers, and don’t hesitate to ask for help if you need it.
With the right steps, you’ll get the perfect fit every time.