Now Reading: How to Size a Garage Door Spring: Easy Guide for Homeowners
- 01
How to Size a Garage Door Spring: Easy Guide for Homeowners
Sizing a garage door spring may seem simple at first. You measure the old spring and buy a new one, right? But the truth is, garage door springs are not all the same. Getting the correct size is critical for safety, smooth operation, and the life of your garage door system. A wrong-sized spring can damage the opener, wear out the door, or even cause injury.
This guide will give you clear, step-by-step instructions on how to size a garage door spring. Whether you are a homeowner wanting to save money or a curious DIYer, you will learn how to measure, compare, and choose the right spring.
We will also share mistakes to avoid and give you practical tips that most beginners miss. By the end, you will have all the knowledge you need to size a garage door spring accurately and confidently.
Understanding Garage Door Springs
Before you start measuring, you must know the two main types of garage door springs. Each has different sizing methods and uses.
Torsion Springs
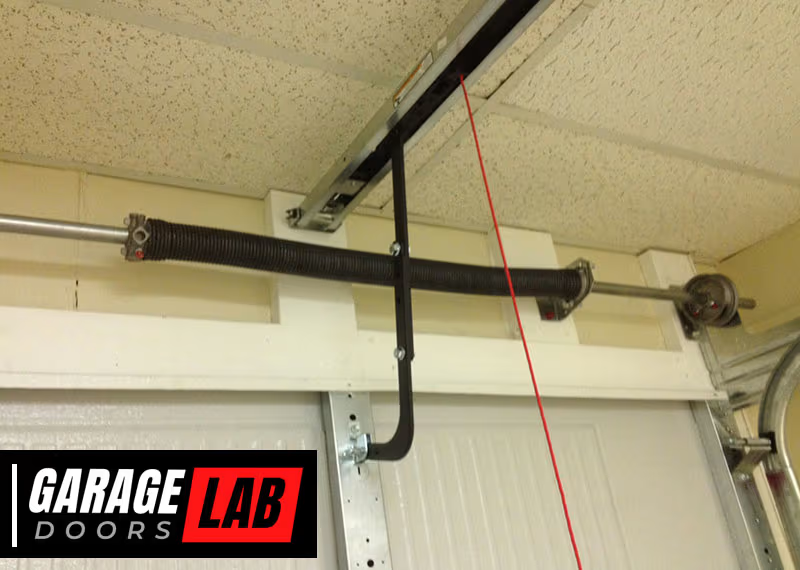
Torsion springs sit above the garage door, attached to a metal shaft. They twist (add torque) to lift the door. These are the most common in modern homes. Torsion springs last longer and balance the door better than extension springs.
Extension Springs
Extension springs run alongside the horizontal tracks on both sides of the door. They stretch and contract to open and close the door. You see them more in older or lighter doors. Sizing methods are different for extension springs.
Why Getting The Size Right Matters
A spring that is too strong can slam the door upward or keep it from closing fully. A weak spring will not lift the door properly and can burn out your opener. Both cases are dangerous. The right-sized spring ensures:
- The door opens and closes smoothly
- The opener does not work too hard
- The door stays balanced and safe
- The spring lasts as long as possible
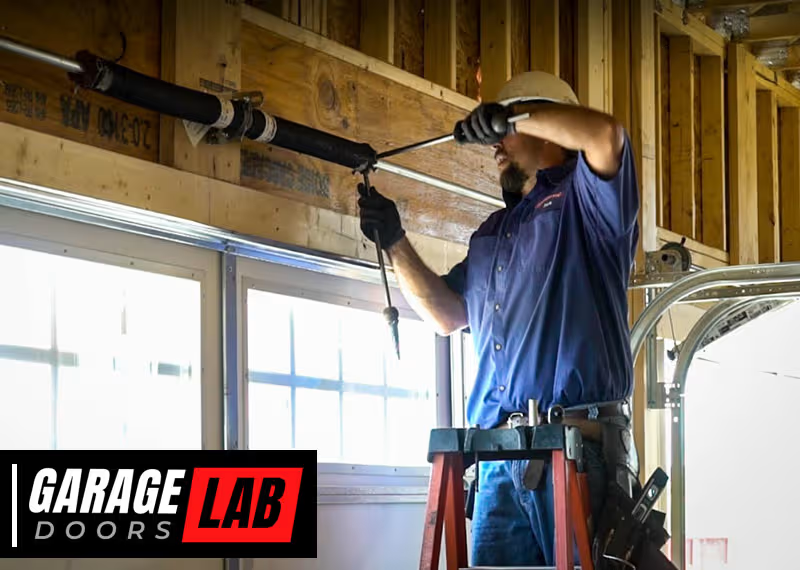
Tools And Safety Precautions
Working with garage door springs can be risky. Torsion springs, in particular, are under a lot of tension. Before you start, gather the right tools and take safety steps.
Tools You Will Need
- Tape measure (at least 10 feet)
- Safety glasses and gloves
- Winding bars (for torsion springs)
- Marker or chalk
- Stepladder
- Notepad or smartphone (to record measurements)
- Scale (to weigh the door, if needed)
- Level (to check balance)
Safety First
- Disconnect power to the opener before working on the springs.
- Release tension carefully, especially with torsion springs. Use proper winding bars, never screwdrivers.
- Work with a partner if possible. Some steps need an extra hand.
- If you are not confident, call a professional. Spring replacement is among the most dangerous home repairs.
Two non-obvious safety insights:
- Never remove both springs at once on a double-spring system. Always replace one at a time to keep tension.
- Take a photo before starting. It helps if you need to reassemble or order parts.
How To Identify Your Spring Type
If you are unsure whether your door uses torsion or extension springs, look above the door opening. A long metal shaft with one or two tightly wound springs means torsion. If you see long, thin springs running parallel to the tracks on each side, those are extension springs.
Knowing your spring type is critical, as the measurement and sizing process is different for each.
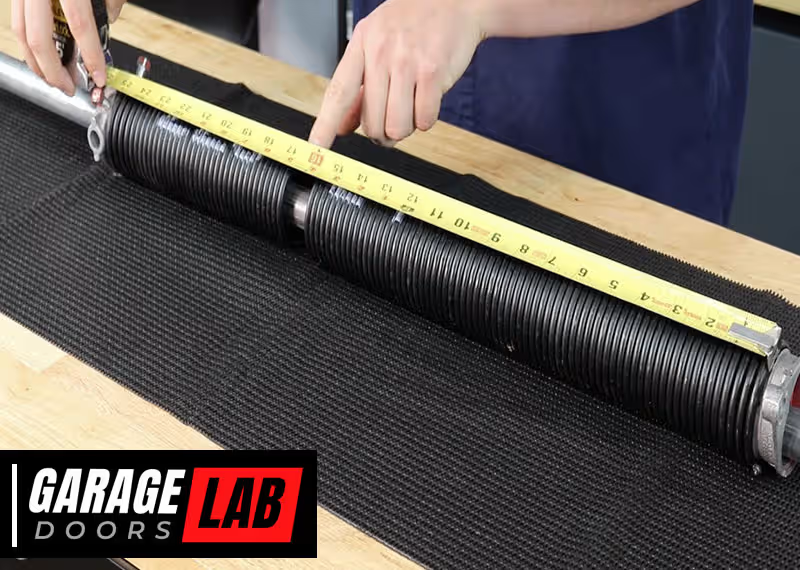
Sizing Torsion Springs
Torsion springs have four key measurements: wire size, inside diameter, spring length, and wind direction. Let’s break down how to measure each.
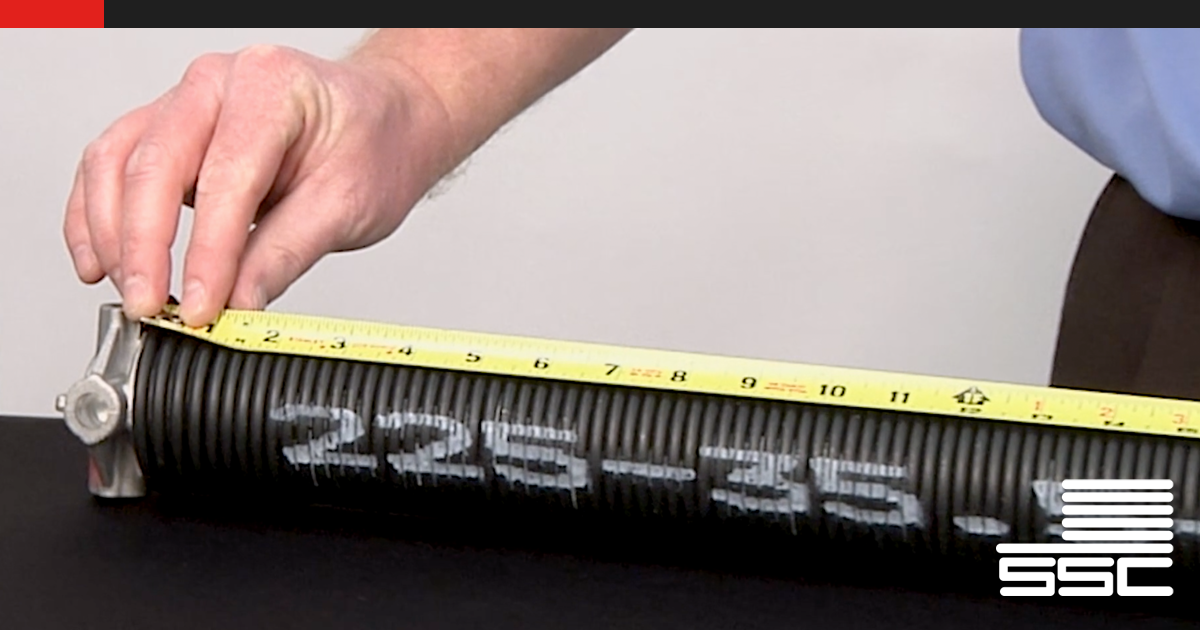
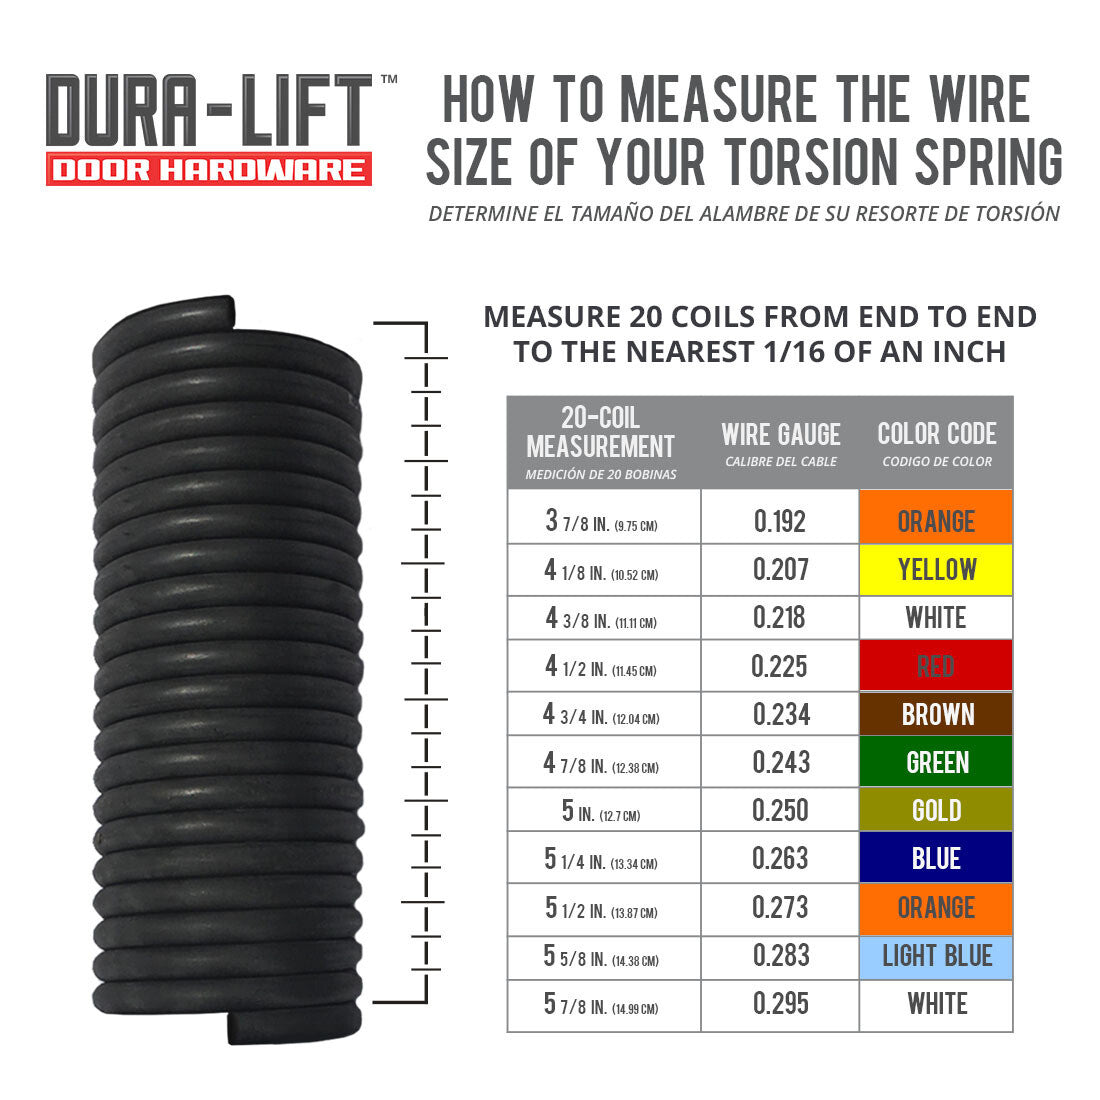
1. Measure The Wire Size
Wire size (thickness) is the most important detail. It determines the strength and number of turns the spring can make.
How to measure:
- Use a tape measure to measure 10, 20, 30, or 40 coils in a row.
- The more coils you measure, the more accurate your result.
- Divide the length you measured by the number of coils.
Example: If 20 coils measure 5 inches, wire size = 5 ÷ 20 = 0.25 inches (or 1/4 inch).
Tip: Compare your measurement with a wire gauge chart for springs to confirm your calculation.
2. Measure The Inside Diameter
Measure the inside diameter (not the outside) of the spring. Most residential springs are 1. 75″ or 2″. Place the tape measure inside the spring and check the distance across.
Practical tip: The diameter is sometimes stamped on the spring cone. Look for numbers like “175” (for 1.75 inches).
3. Measure The Spring Length
Measure the length of the unwound spring (do not include the cones or end fittings). If the spring is broken, measure the pieces and add them together.
Caution: Springs stretch a little when under tension. If possible, measure the spring after it has been unwound or removed.
4. Determine The Wind Direction
Torsion springs come in right-wind and left-wind versions, depending on which side of the door they are installed. This affects how they lift the door.
How to tell the wind:
- Place the spring on a flat surface.
- If the end of the coil points to the right, it’s a right-wind spring.
- If it points to the left, it’s left-wind.
Note: Most double garage doors use one of each wind direction.
Putting It All Together
You need all four pieces of information to order or size a new torsion spring:
- Wire size
- Inside diameter
- Length
- Wind direction
Missing any one can result in the wrong spring.
Non-obvious insight: Some springs look identical but have different strengths due to wire thickness. Always measure; never guess based on visual appearance.
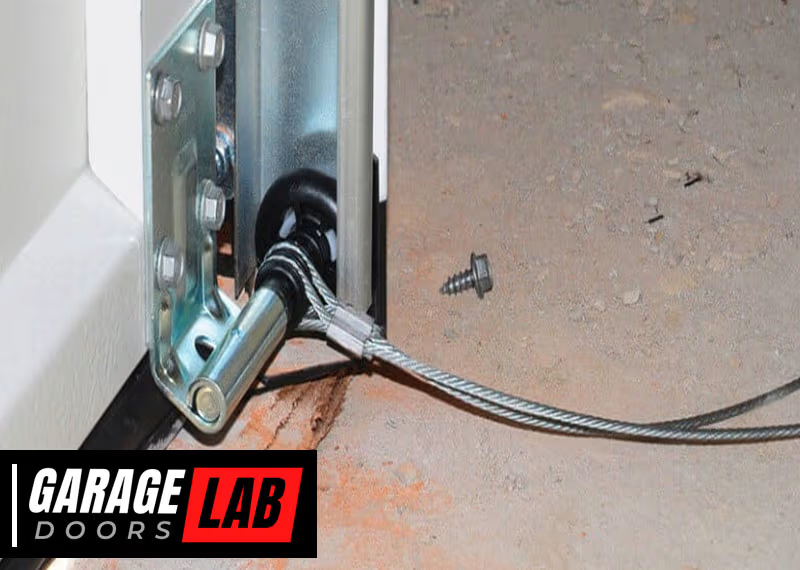
Sizing Extension Springs
Extension springs are easier to measure, but you still need the right details.
1. Measure The Spring Length
Measure the length of the spring, from end to end, not stretched and not including the hooks.
2. Measure The Spring’s Outside Diameter
Use your tape to measure the outside edge-to-edge distance of the coil (not the hooks).
3. Determine Wire Size
As with torsion springs, measure 10 or 20 coils and divide the length by the number of coils. This gives you the wire thickness.
4. Determine Spring Weight Capacity (color Code)
Most extension springs are color-coded to show the weight they support. Look for a colored stripe painted on the spring. Each color matches a weight range.
Example: Yellow might indicate 130–140 lbs, blue 150–160 lbs, etc.
If the color is missing or unclear, you may need to weigh the door (explained below).
Pro tip: Even on old springs with faded paint, you can sometimes see the color under the dirt or in the coil’s grooves.
How To Weigh Your Garage Door
Sometimes, you cannot find the original spring specs or the color code is gone. In that case, weighing the door is the best way to size a new spring. Here’s how:
- Disconnect the opener and make sure the door is closed.
- Release the springs (carefully!) So the door is not under tension.
- Attach a bathroom scale under the center of the door.
- Lift the door slightly (just enough to take the weight off the bottom).
- Read the scale. This is the true weight of the door.
The weight tells you the strength rating you need for new springs. Most residential doors range from 90 to 350 lbs. Heavier, custom, or wood doors can be more.
Non-obvious insight: If your door has windows or insulation panels, it may weigh much more than a standard steel door of the same size. Always weigh if unsure.
Common Mistakes When Sizing Garage Door Springs
Even experienced DIYers get these wrong:
- Measuring old, stretched springs: Springs stretch over time. Always measure after the spring is unwound or replaced, not while installed.
- Ignoring the wind direction: Using two of the same wind can make your door unbalanced and dangerous.
- Confusing wire size with diameter: Wire size is the thickness of one wire, not the diameter of the whole spring.
- Forgetting to match pairs: On double-spring doors, always replace both springs, even if only one is broken. This ensures even wear and door balance.
- Not checking door weight: Guessing can lead to under- or over-powered springs. Weigh when in doubt.
How To Read A Garage Door Spring Label
Some springs (especially newer ones) have labels with all the information you need. Look for:
- Part number (may include wire size, diameter, length)
- Manufacturer code
- Wind direction (L or R)
- Color code for extension springs
If you find a label, record all details. It makes ordering a replacement much easier.
Sizing Chart Example
To help you visualize, here is a sample sizing comparison for torsion springs based on typical measurements:
| Door Weight | Wire Size | Inside Diameter | Spring Length |
|---|---|---|---|
| 100 lbs | 0.207″ | 1.75″ | 23″ |
| 150 lbs | 0.218″ | 2.00″ | 25″ |
| 200 lbs | 0.225″ | 2.00″ | 27″ |
This table is for illustration only. Always use your own measurements.
How To Replace Both Springs Correctly
If your garage door uses two springs, always replace both at the same time. Here’s why:
- Old and new springs will not have the same tension, so the door will not balance evenly.
- The second spring will likely break soon after the first, leading to repeat labor and risk.
- Manufacturers often sell springs in pairs for this reason.
Extra tip: Mark the left and right springs before removing. This avoids mixing up the wind direction during installation.
Choosing The Right Material And Life Cycle
Garage door springs come in different materials and rated lifespans.
Spring Material
- Oil-tempered springs: Most common, strong, and long-lasting.
- Galvanized springs: Rust-resistant, but may be noisier or less durable.
Cycle Life
A typical spring is rated for 10,000 cycles (one open/close = one cycle). You can buy higher-cycle springs (20,000 or more) for busy garages.
Non-obvious insight: If you open and close your garage door four times a day, a 10,000-cycle spring will last about 7 years. Heavy use means you should consider high-cycle springs.
Checking Your Work: Testing The Balance
After installing new springs, always test the door’s balance:
- Close the door and disconnect the opener.
- Lift the door by hand to halfway.
- Let go. The door should stay in place, not fall or shoot up.
If the door rises, the springs are too strong. If it falls, they are too weak. Adjust or recheck your sizing if needed.
Extension Springs Sizing Color Codes
Here is a common color code reference for extension springs:
| Color | Door Weight Supported |
|---|---|
| White | 10 lbs |
| Green | 120 lbs |
| Yellow | 130 lbs |
| Blue | 140 lbs |
| Red | 150 lbs |
| Brown | 160 lbs |
| Orange | 170 lbs |
| Gold | 180 lbs |
| Light Blue | 190 lbs |
| Tan | 200 lbs |
Color codes may vary by manufacturer, so always check with your supplier.
When To Call A Professional
Some jobs are best left to experts. If you have:
- Very heavy, custom, or commercial doors
- Broken or stuck torsion springs
- No experience with power tools
- Unusual spring setups
It is safer to hire a certified garage door technician. Many injuries happen each year from spring replacement attempts gone wrong.
For more about garage door safety and standards, check the U.S. Consumer Product Safety Commission.
Real-world Example: Sizing A Spring For A Typical Door
Suppose you have a single, 8 ft wide steel garage door. The old extension spring is missing its color code.
- You measure the weight: 130 lbs.
- You measure the old spring: 27″ long, 1.75″ diameter, wire size 0.177″.
- According to color code charts, yellow is for 130 lbs.
You now know to order a 27″ long, 1. 75″ diameter, 0. 177″ wire yellow extension spring, or the equivalent torsion spring based on the door weight.
Troubleshooting: What If The Door Still Feels Heavy?
If you sized your springs correctly but the door is hard to lift, check:
- Rollers or hinges are not worn or sticking
- Tracks are aligned and clean
- You used the correct wind direction and both springs are new
- The door was weighed with all panels and hardware attached
If everything checks out, but you still have problems, the door may have been repaired or modified before. Re-measure all parts, and consider a professional inspection.
Quick Reference: Sizing Steps For Torsion Springs
- Measure wire size (length of 10, 20, 30 coils divided by coil count)
- Measure inside diameter
- Measure total spring length (unwound, no cones)
- Identify wind direction
- Record all numbers and order matching replacements
Quick Reference: Sizing Steps For Extension Springs
- Measure spring length (not stretched, no hooks)
- Measure outside diameter
- Measure wire size
- Find color code (or weigh the door)
- Order spring with matching specs
How To Extend Spring Life After Replacement
- Lubricate springs twice a year with garage door spray lube
- Keep tracks and rollers clean and oiled
- Do not add extra weight (like insulation panels) without checking spring size
- Open and close the door smoothly; avoid slamming shut
Advanced: Custom And High-lift Garage Doors
If your door has a high-lift or custom track setup, sizing is more complex. The spring must match both the weight and the travel distance of the door. It is best to consult the door’s manual or a pro for these cases.
Non-obvious insight: High-lift doors often require special springs not found at hardware stores. Ordering from a garage door supplier with your exact measurements is the safest choice.
Frequently Asked Questions
How Do I Know If My Garage Door Spring Is The Wrong Size?
If your door is hard to lift, will not stay open, or slams shut, the spring may be the wrong size. A door that is balanced should stay in place when opened halfway by hand.
Can I Use A Spring That Is Close In Size If I Cannot Find The Exact Match?
It is best to match all measurements exactly. Small differences in wire size or length can affect door balance and safety.
How Often Do Garage Door Springs Need To Be Replaced?
Most springs last 7–10 years with normal use (10,000 cycles). If you use your door more often, consider high-cycle springs or replace sooner.
What Is The Most Important Measurement When Sizing A Torsion Spring?
Wire size is most important, as it determines the spring’s strength. Inside diameter and length are also critical for a good fit.
Is It Safe To Replace Garage Door Springs Myself?
Extension springs are easier for skilled DIYers, but torsion springs can be dangerous if you are not experienced. Always use proper tools and safety gear, or call a professional for help.
Sizing a garage door spring is not just about measuring—it is about understanding your door’s needs, matching all the specs, and working safely. With these steps, you can get the right spring, keep your door running smoothly, and avoid costly mistakes. Remember, when in doubt, consult a professional or use trusted resources like the U.S. Consumer Product Safety Commission for more guidance.
A well-balanced garage door means safety, convenience, and peace of mind for years to come.