Now Reading: How to Change a Chamberlain Garage Door Opener Battery Easily
- 01
How to Change a Chamberlain Garage Door Opener Battery Easily
How to Change a Chamberlain Garage Door Opener Battery Easily
Changing the battery in your Chamberlain garage door opener might seem like a small task, but it’s a key part of keeping your garage safe and convenient. Many homeowners don’t think about the battery until the remote stops working, the keypad fails to respond, or they get stuck outside in the rain.
In reality, understanding how to change this battery can save you time, money, and frustration. This guide covers everything you need to know, from the types of Chamberlain batteries to practical step-by-step instructions, troubleshooting, and some pro tips that most people miss.
Whether you’re new to DIY tasks or have replaced batteries before, you’ll find clear advice, easy explanations, and answers to common questions.
Understanding Chamberlain Garage Door Opener Batteries
Not all Chamberlain garage door openers use the same battery. The type of battery you need depends on the model and the device part—remote, wall control, or backup system. Knowing this before you start is important.
Common Battery Types
Most Chamberlain remotes and keypads use small coin-cell batteries (like CR2032 or CR2016), while some older models may use a 9V or AA battery. Newer Chamberlain openers with backup systems often use a larger, rechargeable 12V battery. To make things clearer, here is a comparison:
| Device | Battery Type | Average Lifespan |
|---|---|---|
| Remote Control | CR2032, CR2016, 9V | 1-2 years |
| Wireless Keypad | 9V, CR2032 | 1-2 years |
| Backup Battery | 12V Rechargeable | 3-5 years |
It’s helpful to check both your remote and your opener unit before buying batteries, since many people assume all parts use the same type. If you have an older Chamberlain opener, you might even find AA batteries in some wall-mounted control panels.
The manual for your specific model (usually found online if you’ve misplaced the printed copy) will list the exact battery type required. Keeping a note of your battery types somewhere handy can save you time in the future.
Non-obvious tip: Some Chamberlain models have a built-in backup battery inside the main opener unit. This battery keeps the door working during a power outage, but many users forget about it until it fails. It’s easy to overlook backup batteries because they’re out of sight—usually tucked inside the overhead opener casing. But when your power goes out, you’ll be glad you kept it charged.
Signs Your Chamberlain Garage Door Opener Battery Needs Replacing
Knowing the signs of a weak or dying battery can help you avoid sudden failures. Here’s what to watch for:
- Remote range decreases – You need to stand closer for the door to open.
- Slower response time – The door takes longer to react to commands.
- Keypad or wall control blinks or shows a warning light.
- Beeping sound from the opener unit – Usually from models with a backup battery.
- Complete failure – Nothing happens when you press the remote.
These signs can develop slowly, so it’s easy to ignore them until the battery is totally dead. For example, you might start parking closer to your garage door, not realizing the remote’s range is dropping. Or, you might think your keypad is acting up due to cold weather, when it’s really a sign the battery is almost gone.
Pro insight: If your remote starts working only sometimes, don’t assume it’s just a weak signal. Battery replacement solves this in most cases. Also, if you hear beeping from the opener, don’t ignore it—this usually means the backup battery needs attention. Some newer Chamberlain openers will flash a red indicator or even display an error code on a small LCD panel.
Preparing For Battery Replacement
Before you start, gather everything you need:
- Replacement battery (correct type for your device)
- Small screwdriver (often Phillips or flat-head)
- Ladder (for reaching wall units or opener)
- Clean cloth (optional, for cleaning contacts)
Having all these items ready can save you frustration. For example, some battery compartments are held with a tiny screw, and using the wrong tool can strip the head. A small container or dish can help you avoid losing screws during the process.
Safety note: Always unplug the main opener unit before opening it to replace a backup battery. For remotes or keypads, this is not necessary. If your garage shares a circuit with other appliances, double-check to avoid accidental shocks.
Common mistake: Many homeowners try to force open the remote or keypad without checking for hidden screws. This can damage the device. Always check for a release tab or screw. Some remotes have a sliding cover that clicks open with gentle pressure, while others require you to remove a screw first.
A quick look at your device’s seams and back can help you find the right way to open it. Rushing or using too much force is one of the main reasons people break their remotes during battery changes.
How To Change The Battery In A Chamberlain Remote Control
Most Chamberlain remotes use a coin-cell battery. The process is straightforward, but small errors can lead to broken remotes.
Steps To Replace The Remote Battery
- Find the battery compartment: Turn the remote over. Look for a small screw or a release tab.
- Open the compartment: If there’s a screw, use a small screwdriver to remove it. If not, gently pry open the cover using your finger or a flat tool.
- Remove the old battery: Note the battery orientation (which side is up). Use your fingernail or a non-metal tool to lift it out.
- Insert the new battery: Place the new battery in the same orientation. If your remote uses a coin cell, the positive side (marked “+”) usually faces up.
- Close the compartment: Snap the cover back in place or screw it shut.
- Test the remote: Stand a few feet from the door and press the button. The door should respond quickly.
If you have difficulty opening the compartment, double-check for a second screw or a locking tab you may have missed. Forcing the cover can break the plastic or damage the internal circuit board. If your remote has a rubber membrane for the buttons, be careful not to lose it—it helps keep dust out of the electronics.
Extra tip: If your remote still doesn’t work after changing the battery, reprogramming may be needed. Check your Chamberlain manual for instructions. Sometimes, the remote loses its memory during the battery swap, especially if the battery was dead for a long period.
Replacing The Battery In A Wireless Keypad
Wireless keypads are often used for exterior garage entry. They usually use a 9V battery, but some use coin cells.
Steps To Replace The Keypad Battery
- Open the keypad cover: Slide or lift the front cover as designed.
- Locate the battery compartment: Usually on the bottom or behind the keypad.
- Remove the old battery: Pull the battery out gently. If it’s held by a clip, release it first.
- Insert the new battery: Make sure the positive and negative ends match the markings.
- Close the compartment and cover: Ensure everything snaps back securely.
- Test the keypad: Enter your code to verify the door opens.
Sometimes the battery contacts in a keypad become bent or corroded, especially if the unit is exposed to rain or humidity. If you notice green or white buildup on the contacts, gently clean them with a pencil eraser or a dry cloth before inserting the new battery.
Some keypads will have a small reset button inside the battery compartment—if you’re having trouble after a battery swap, pressing this with a paperclip can help.
Non-obvious insight: Some wireless keypads need to be re-synced with the opener after battery replacement. Don’t panic if the first try doesn’t work—follow the pairing steps in your manual. For some models, simply entering your PIN and holding the “Enter” button for a few seconds will re-establish the connection.
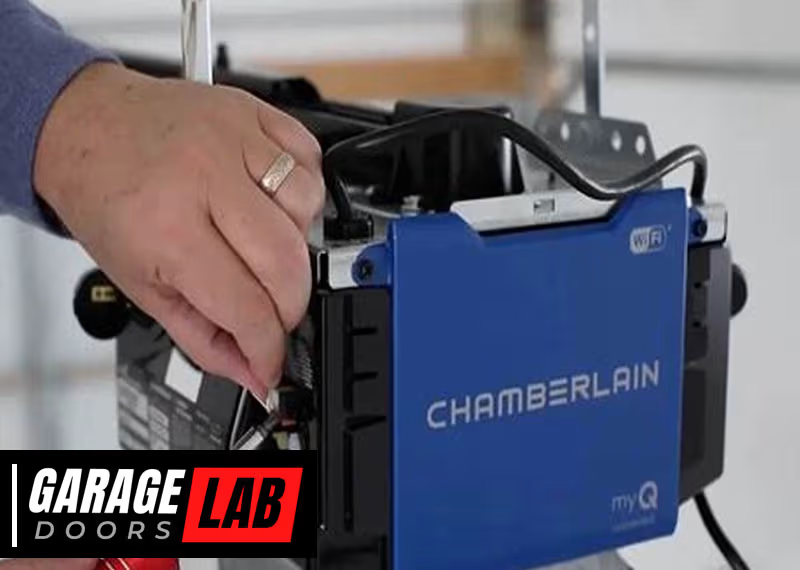
Changing The Chamberlain Backup Battery
Backup batteries are found inside the opener unit, usually attached to the ceiling. These 12V batteries are larger and heavier than remote batteries.
When To Change The Backup Battery
- Beeping from the opener, even when the power is on.
- LED indicator on the opener turns red or blinks.
- The door won’t open during a power outage.
Tip: Replace backup batteries every 3-5 years, even if you don’t notice problems.
It’s easy to forget about the backup battery because it’s hidden inside the main unit. However, these batteries are essential during storms or power failures. If your home is prone to power outages, testing the backup battery every few months is a smart habit.
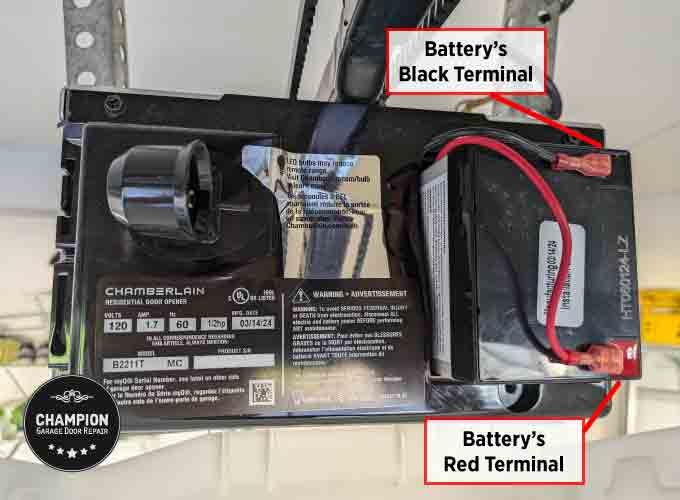
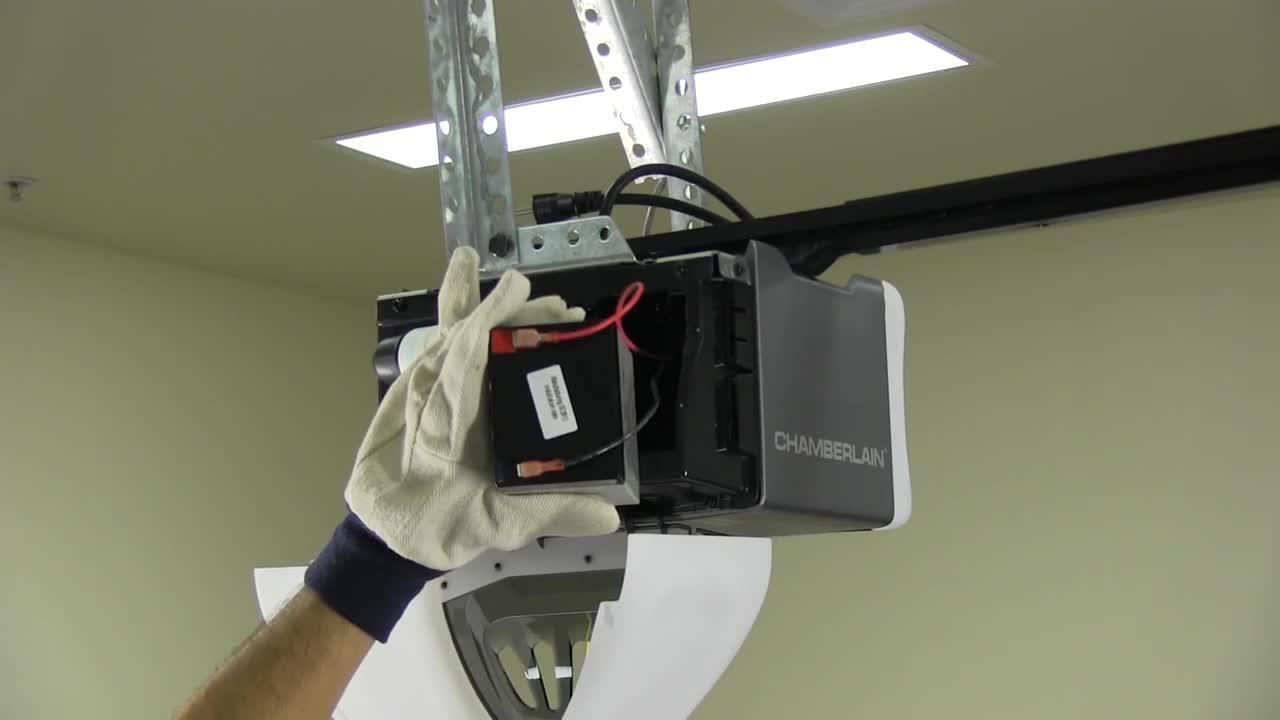
Steps To Replace The Backup Battery
- Unplug the opener: This prevents electric shock.
- Open the opener cover: Use a screwdriver if needed. Some units have a release button.
- Find the battery: Usually in a compartment on the side or back.
- Disconnect the battery wires: Note the position of the red (positive) and black (negative) wires.
- Remove the old battery: Slide or lift it out gently.
- Install the new battery: Connect the wires to the matching terminals on the new battery.
- Secure the battery and close the cover.
- Plug the opener back in: The unit should beep once, and the indicator should turn green.
- Test the system: Open and close the door to confirm normal operation.
If the opener doesn’t beep or the indicator stays red, double-check the wire connections. Sometimes the terminals can become loose or not fully seated on the new battery.
Safety reminder: Never use a car battery or other random 12V batteries. Use only Chamberlain-approved batteries for backup systems. Off-brand batteries can fit but may not deliver the right voltage or capacity, leading to poor performance or even damaging your opener’s circuit board.
Chamberlain Models And Battery Differences
Chamberlain has many models, and not all use the same batteries. Here’s a quick comparison of some popular models:
| Model | Remote Battery | Keypad Battery | Backup Battery |
|---|---|---|---|
| B970 | CR2032 | 9V | 12V Rechargeable |
| B550 | CR2032 | 9V | 12V Rechargeable |
| MYQ-G0401 | CR2032 | CR2032 | None |
| PD612EV | CR2016 | 9V | None |
If you have a smart garage system, like a MyQ-enabled opener, the battery requirements can be different for the Wi-Fi module or other add-ons. Always read the section of your manual that covers accessories—these sometimes require their own batteries for wireless sensors.
Practical note: Always check your model number (found on the opener’s main unit) before buying a battery. This avoids wasted trips and wrong purchases. If you are unsure, snap a picture of your opener’s label and bring it to the store or show it to online customer support for quick help.
What To Do If The Remote Still Doesn’t Work After Battery Change
Sometimes, after you install a new battery, the remote or keypad won’t work. Here are some possible reasons:
- Battery installed backward: The positive and negative sides are reversed.
- Dirty contacts: Corrosion or dirt inside the compartment can block power. Clean with a dry cloth.
- Faulty battery: Even new batteries can be dead. Test with another device.
- Remote needs reprogramming: Some Chamberlain remotes lose their settings after battery change.
- Broken remote: If all else fails, the remote may be defective.
If the remote still fails, try holding the button for a few seconds instead of a quick press. Some openers need a slightly longer signal to register after battery changes.
Advanced tip: If your opener has a “learn” button, press it and then press the remote button to reprogram. This is usually a small button on the opener’s side or back, often colored yellow, red, or purple.
Preventing Common Battery Replacement Mistakes
Mistake #1: Using the wrong battery type. This can damage your device or cause poor performance.
Mistake #2: Forgetting to check battery orientation. Putting the battery in the wrong way is a common error.
Mistake #3: Damaging the casing. Forcing the remote or keypad open can break plastic clips.
Mistake #4: Not cleaning contacts. Even a small amount of corrosion can stop the new battery from working.
Mistake #5: Skipping the system test. Always test your remote or keypad before putting everything away.
Extra tip: Keep a small brush or a pack of cotton swabs in your toolbox to quickly clean contacts during battery changes. And, if your remote or keypad gets wet, let it dry fully before installing a new battery—moisture can cause short circuits or rapid battery drain.
How Often Should You Change Your Chamberlain Garage Door Opener Battery?
Most batteries in remotes and keypads last 1-2 years. Backup batteries last 3-5 years. However, usage, temperature, and battery brand can affect lifespan.
- If you use the garage door often, check your batteries every 6-12 months.
- Store extra batteries in a dry, cool place.
- Replace all remote batteries at the same time to avoid surprises.
Real-world example: If your garage faces direct sunlight or extreme cold, batteries may drain faster. Regular checks help avoid getting locked out.
For those who travel frequently or have rental properties, it’s smart to change the batteries once a year on a set schedule—like when you change smoke detector batteries. This simple routine reduces the chance of emergency lockouts or late-night malfunctions.
Where To Buy Chamberlain Replacement Batteries
You can find Chamberlain-compatible batteries at hardware stores, big retailers like Home Depot or Walmart, or online. Always match the battery type and voltage.
Some stores sell “garage door opener battery packs” with multiple sizes—be sure you only use the ones that match your specific device. The wrong size or voltage can damage sensitive electronics inside your remote or opener.
Tip: Buying generic batteries is fine for remotes and keypads, but always use a Chamberlain-branded backup battery for the main opener to avoid warranty problems. For smart openers, it’s also wise to check for any software updates after battery replacement—some models require a quick reset to recognize new power sources.
Recycling Old Garage Door Opener Batteries
Batteries should not be thrown in the trash. Coin cell and 9V batteries can be recycled at many electronics stores. Backup batteries (lead-acid or lithium) must go to special recycling centers.
Why recycle? Old batteries can leak harmful chemicals into the environment. Always dispose of them safely.
Many big box stores have a battery recycling bin near the entrance. For backup batteries, look for your city or county’s hazardous waste collection events. Some battery manufacturers also offer mail-in recycling programs.
Non-obvious tip: Some local governments offer free battery recycling days. Check your city website for details. If you’re not sure where to go, ask at your local hardware store—they often know about local recycling options.

Maintenance Tips For Longer Battery Life
- Clean battery contacts: Wipe with a dry cloth during every battery change.
- Store remotes indoors: Extreme temperatures shorten battery life.
- Use quality batteries: Cheap brands may not last as long.
- Test backup batteries monthly: Unplug the opener briefly to see if the battery works.
- Replace all batteries at once: This keeps all devices working together.
If your garage is damp or dusty, consider storing remotes in a sealed bag or box. Dust and moisture can cause slow battery drain over time. For backup batteries, a quick test every few months ensures you’ll be ready when the power goes out.
Troubleshooting Guide: Quick Fixes
If you face issues after changing the battery, try these steps:
- Remote not responding: Recheck battery orientation and contacts.
- Keypad not lighting up: Make sure the compartment is closed fully.
- Opener beeping: The backup battery might not be connected properly.
- Door opens randomly: Try reprogramming the remote.
If you experience frequent problems, check for nearby sources of interference, like new wireless routers or LED bulbs, which can sometimes affect remote signals. Keeping a record of when you last changed each battery can help you spot patterns—like a remote that seems to eat batteries much faster than others, which could signal a deeper issue.
If problems persist, consult the Chamberlain manual or customer service. For more technical details, you can also check the Chamberlain official support page.
Safety Considerations
Changing a battery is safe, but remember:
- Keep small batteries away from children and pets.
- Never short-circuit or heat batteries.
- For backup batteries, always unplug the opener before touching wires.
- If you see leaking or swollen batteries, do not use them. Handle with gloves and dispose of properly.
In addition, always wash your hands after handling old batteries, especially if you see any powder or residue. Avoid touching your face or eyes during the process.
Comparing Diy Vs. Professional Battery Replacement
Some people prefer to hire a professional, especially for backup batteries. Here’s how the two options compare:
| Aspect | DIY Replacement | Professional Service |
|---|---|---|
| Cost | Low (just battery price) | High (labor + battery) |
| Time | 10-30 minutes | Depends on scheduling |
| Skill Needed | Basic DIY | None |
| Warranty Impact | Low if done correctly | None |
With remotes and keypads, DIY replacement is almost always simple. For backup batteries, professional replacement can be worth it if your opener is hard to reach or if you have physical limitations. Some Chamberlain dealers offer annual maintenance plans that include battery checks—this can be helpful for busy homeowners.
Experience-based advice: For remotes and keypads, DIY is quick and safe. For backup batteries, if you’re uncomfortable with wires or ladders, professional help is wise.
Why Regular Battery Changes Matter
A working garage door opener is more than just convenience—it’s about security and safety. Weak or dead batteries can:
- Prevent you from opening the door in emergencies.
- Cause you to be locked out (or in).
- Disable safety features during power outages.
- Lead to expensive service calls for simple issues.
Changing batteries regularly also extends the life of your opener by preventing power surges and system errors caused by failing batteries. If you have smart home features, dead batteries can even affect notifications and remote access.
By learning how to change your Chamberlain garage door opener battery, you keep your home running smoothly and avoid unwanted surprises.
Frequently Asked Questions
How Do I Know Which Battery My Chamberlain Remote Uses?
Check the back of your remote or the user manual. Most Chamberlain remotes use a CR2032 coin-cell battery, but older models may use a 9V or CR2016. If you’re unsure, open the compartment and look for the battery code.
How Long Does A Chamberlain Backup Battery Last?
A Chamberlain backup battery usually lasts 3-5 years under normal use. If your garage door opener beeps or shows a red light, it’s time to replace the battery.
Do I Need To Reprogram My Remote After Changing The Battery?
Usually, you do not need to reprogram the remote. However, some models lose their pairing when the battery is removed. If your remote doesn’t work after battery change, follow the reprogramming steps in your Chamberlain manual.
Can I Use A Generic Battery In My Chamberlain Opener?
Yes, you can use a generic coin-cell or 9V battery for remotes and keypads, as long as the size and voltage match. For backup batteries, always use an official Chamberlain battery to avoid compatibility or warranty issues.
What Should I Do With Old Garage Door Opener Batteries?
Recycle them at a battery recycling center or electronics store. Never throw batteries in the regular trash, as they can harm the environment. Many cities offer special recycling programs for household batteries.
Keeping your Chamberlain garage door opener working is simple if you know what to do. Changing the battery is a quick, easy job that makes a big difference in your daily life. With the right tools, a bit of care, and these tips, you’ll never be caught off guard by a dead battery again.


