Now Reading: How to Open Liftmaster Garage Door Opener: Step-by-Step Guide
- 01
How to Open Liftmaster Garage Door Opener: Step-by-Step Guide
How to Open Liftmaster Garage Door Opener: Step-by-Step Guide
Opening a LiftMaster garage door opener may sound simple, but the process can be confusing if you’ve never done it before. With so many models, safety features, and specific steps to follow, it’s easy to feel lost. Whether you need to access the opener for maintenance, to reset it, or to troubleshoot a problem, understanding the right procedure matters. Using the wrong method can damage the unit, void your warranty, or even cause injury.
This guide will walk you step-by-step through opening a LiftMaster garage door opener. You’ll learn how to do it safely, what tools you’ll need, and how to handle common issues. I’ll also cover special cases, like if you’ve lost your remote or need to open the unit during a power outage.
By the end, you’ll feel confident working with your LiftMaster opener, even if you’re not a technical expert.
Understanding Your Liftmaster Garage Door Opener
Before you start, it’s important to know what you’re working with. LiftMaster is a popular brand known for its reliability and advanced features. Most residential models are either chain drive, belt drive, or wall mount (jackshaft). Each model may look a little different, but the main steps to open the housing and access the controls are similar.
You’ll usually find the motor unit attached to the ceiling of your garage. The cover or housing protects the internal parts like the circuit board, light bulbs, and wiring. If you need to open the unit itself (not just the door), you’re most likely accessing the main housing.
Key insight: Many people confuse “opening the garage door” (making the door go up) with “opening the garage door opener” (accessing the motor unit’s inside). This guide focuses on the second meaning: opening the actual device.
When And Why You Need To Open The Opener
There are several reasons you might need to open your LiftMaster garage door opener:
- Changing the light bulb: Most units have a built-in light that can burn out.
- Resetting or programming: You may need to press the “learn” button to pair remotes or clear codes.
- Troubleshooting: Accessing the logic board or checking for burned-out parts.
- Maintenance: Cleaning or lubricating internal parts.
- Replacing the battery: Some models have backup batteries inside the housing.
- Fixing stuck or jammed doors: Sometimes, you need to release the opener manually.
Knowing your purpose helps you avoid unnecessary steps. For example, changing a remote’s battery is different from accessing the motor.
Safety Precautions
Before you start, always think about safety. Garage door openers use electricity and have moving parts.
- Unplug the opener from the power outlet. This prevents electric shock.
- Keep tools handy but away from water.
- Don’t force the cover. If it doesn’t come off, check for hidden screws or clips.
- If you’re on a ladder, ask someone to spot you.
- Keep children and pets away from the work area.
Pro tip: Some openers have capacitors that hold a charge even after unplugging. Avoid touching the circuit board or wires unless you know what you’re doing.
Tools You’ll Need
You don’t need many tools, but having the right ones makes the job easier:
- Screwdriver (Phillips and flathead)
- Step ladder (the opener is usually on the ceiling)
- Flashlight (for dark garages)
- Small container for screws
- Gloves (optional, for safety)
Some newer models use clips instead of screws, so check your manual if you have it.
Identifying Your Liftmaster Model
Before opening, it’s helpful to check your opener’s model number. You’ll usually find a sticker on the side or bottom of the unit. Knowing your model helps you find specific instructions if you need them.
Older models (before 2011) may have a square or rectangular cover with screws on the sides. Newer models are more streamlined and may have snap-on covers.
If you don’t have a manual, you can look up your model on the LiftMaster official website for diagrams and details.
How To Open The Liftmaster Garage Door Opener Housing
Let’s go through the general steps for most ceiling-mounted chain or belt drive models.
Step 1: Disconnect Power
Find the power cord coming from the opener and unplug it from the ceiling outlet. This is the most important safety step.
Step 2: Set Up Your Ladder
Position your ladder so you can reach the opener comfortably. Make sure it’s stable and on a flat surface.
Step 3: Locate Screws Or Clips
Most LiftMaster openers have 2-4 screws holding the cover. These are usually on the sides or underneath the unit. Some newer models use tabs or clips you press to release the cover.
Example: For the LiftMaster 8550, there are screws at the back and a clip at the front.
Step 4: Remove Screws
Use the appropriate screwdriver to loosen all screws. Place them in your small container so you don’t lose them.
Step 5: Detach The Cover
Gently slide or lift the cover off. If it sticks, check for hidden screws or tabs. Don’t force it—plastic parts can break.
Step 6: Access The Inside
Now you can see the internal parts: the circuit board, light bulb socket, learn button, and sometimes a battery compartment.
Non-obvious tip: Take a photo of the inside before touching anything. This helps you remember how to reassemble it if you disconnect wires or remove parts.
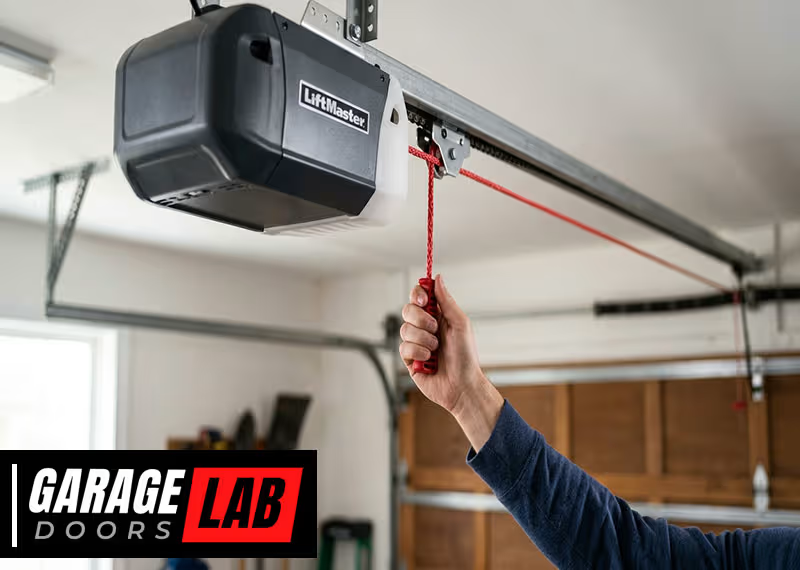
Special Cases: Opening During Power Outage
If your power is out and you need to open the garage door, you won’t be able to use the remote or the wall button. But you can still open the door manually.
Step 1: Locate The Emergency Release Cord
There’s a red cord hanging from the opener rail. This is the emergency release.
Step 2: Pull Down On The Cord
Pulling the cord disengages the trolley from the opener carriage. This lets you lift the door by hand.
Step 3: Lift The Door
Grasp the door handle and lift smoothly. If it feels stuck, don’t force it—check for locks or jams first.
Step 4: Re-engage After Power Returns
Once power is back, close the door and push the remote button. The opener should reconnect automatically. If not, pull the emergency cord back toward the motor to re-engage.
Important: Don’t leave the door unsecured for long. Manual mode makes the door easy to open from outside.
How To Open The Wall-mount (jackshaft) Liftmaster Opener
Wall-mount openers are installed beside the garage door, not on the ceiling. Opening the housing is similar but the cover may be on the side or front.
- Unplug the unit.
- Locate and remove any screws on the cover.
- Pull or slide the cover off.
- Access the inside as needed.
Some wall-mount models have a battery backup inside the housing. Always disconnect power before replacing the battery.

Common Tasks After Opening The Opener
You might open the unit for different reasons. Here’s how to handle the most common tasks:
Changing The Light Bulb
- Unscrew the bulb counterclockwise.
- Replace with a compatible bulb (usually 60-watt max, non-LED for older models).
- Don’t touch halogen bulbs with bare fingers—oil from skin can reduce their life.
Programming Or Resetting
Find the learn button (usually yellow, purple, or red). Press and hold to reset codes or pair new remotes. Check your manual for exact steps—different models use different processes.
Replacing The Battery
If your model has a battery backup, the battery is usually inside the housing. Disconnect wires, remove the old battery, and install a new one with the same voltage and size.
Inspecting For Damage
Look for:
- Burned or melted wires
- Loose connections
- Dust or spider webs (clean gently with a soft brush)
If you see major damage, call a professional.
What If You Lost Your Remote?
Losing your remote doesn’t stop you from opening the garage door. Here’s what to do:
- Use the wall button if you have power.
- Use the emergency release to open manually.
- Some newer LiftMaster models support MyQ, a smartphone app. You can open or close the door from your phone if you set it up earlier.
- If you need a new remote, buy a compatible one and pair it using the learn button inside the opener.
How To Open The Garage Door Without Power
If you lose power and need to get your car out, use the emergency release:
- Pull the red cord down and away from the door.
- Lift the door slowly.
- Be careful: The door is heavy, and springs help balance the weight. If the door is hard to lift, the springs may be broken—call a pro.
Non-obvious insight: Some doors have a lock on the emergency release to prevent break-ins. If you can’t pull the cord, check for a small padlock or zip tie.
Comparing Liftmaster Models: How Easy Are They To Open?
Here’s a quick look at how some popular LiftMaster models compare when it comes to opening the housing:
| Model | Cover Attachment | Battery Backup | Ease of Opening |
|---|---|---|---|
| 8500W | 2 side screws + front clip | Yes | Easy |
| 8365-267 | 2 bottom screws | No | Moderate |
| 8550W | Clips only | Yes | Very Easy |
| 1355 | 4 corner screws | No | Moderate |
Key Features Inside The Opener (what You’ll See)
Once you open the housing, you’ll notice several important parts:
- Light bulb socket: For illumination.
- Circuit board: The “brain” of the opener.
- Learn button: Used for programming remotes.
- Wiring terminals: For wall button and safety sensors.
- Battery compartment: Only in models with backup.
- Warning labels: Read these for important safety info.
If anything looks corroded, burned, or loose, note it down for repair.
Troubleshooting: What To Do If The Cover Won’t Come Off
Sometimes, you’ll run into trouble:
- Hidden screws: Some models have screws under stickers or labels.
- Snapped clips: If a clip breaks, you can tape the cover in place temporarily but replace it soon.
- Stuck cover: Tap gently with the handle of your screwdriver.
If you can’t open it without force, stop and look up your model number for specific instructions.
What About Smart Models (wi-fi, Myq, Etc.)?
Newer LiftMaster models connect to Wi-Fi and have extra electronics inside.
- Always unplug before opening.
- Some smart features have small antennas—handle with care.
- The logic board is more sensitive to static electricity. Avoid touching with bare hands.
- Check for firmware update instructions if you’re troubleshooting connectivity.
A Closer Look: Light Bulbs And Batteries
Changing the light bulb or battery is the most common reason people open their opener. Here’s how different models compare:
| Model | Light Bulb Type | Battery Location | Change Difficulty |
|---|---|---|---|
| 8550W | Standard 60W | Inside cover | Easy |
| 8500W | LED recommended | Side panel | Very Easy |
| 8365-267 | Incandescent only | No battery | Easy |
Tip: If your opener uses LED bulbs and they flicker or cause remote problems, switch to a bulb recommended by LiftMaster. Some LEDs cause interference.
Reassembling Your Opener
After you’re done with repairs or maintenance, put everything back:
- Check that all wires are connected and nothing is loose.
- Slide or snap the cover back on.
- Insert and tighten all screws.
- Plug the opener back in.
- Test the door using the wall button and remote.
If the opener doesn’t work, double-check your work. Sometimes, a loose cover or missed connection can cause problems.
Maintenance Tips To Keep Your Opener Working
Keeping your opener in good shape means you’ll open it less often. Here’s what you can do:
- Dust the cover and area around the opener every few months.
- Check the light bulb every year.
- Listen for strange noises—these can be early signs of trouble.
- Test the safety sensors and auto-reverse function regularly.
- Lubricate moving parts (chain, rails) with garage door lubricant (not WD-40).
Non-obvious tip: Power surges can damage electronics. Use a surge protector on your garage outlet if possible.
When To Call A Professional
If you see any of these signs, it’s safer to get expert help:
- Burned or melted parts inside the opener.
- The door falls quickly or is hard to lift manually.
- The opener makes loud grinding noises.
- You’re not comfortable working with electrical parts.
A professional can fix problems safely and keep your warranty valid.
Common Mistakes To Avoid
Many first-timers make simple mistakes:
- Forgetting to unplug the opener before opening.
- Losing screws or dropping them inside the unit.
- Forcing the cover and breaking clips.
- Touching the circuit board without care.
- Using the wrong type of replacement bulb or battery.
Take your time and follow each step carefully to avoid these problems.
Frequently Asked Questions
How Do I Find The “learn” Button Inside My Liftmaster Opener?
The learn button is usually on the side or back of the main circuit board, visible once you remove the opener cover. It may be yellow, purple, or red, and is often labeled “Learn” or “Program.” If you can’t find it, check your model’s manual or search for your model number online.
Can I Open My Liftmaster Opener If It’s Installed On The Ceiling And I Can’t Reach It?
Yes, but you’ll need a secure ladder. Make sure the ladder is on a level surface and don’t overreach. If the unit is too high or you feel unsafe, ask for help or call a professional. Safety comes first.
What Should I Do If The Opener Cover Won’t Come Off?
Double-check for hidden screws or clips. Some models have screws under stickers or labels. If it still won’t come off, don’t force it—search for your model’s specific instructions or contact customer support.
Is It Safe To Open The Opener When The Power Is On?
No. Always unplug the opener from the outlet before opening the cover. Even when unplugged, avoid touching the circuit board or wires directly. Some parts can hold a charge.
How Do I Know If My Opener Has A Battery Backup Inside?
Most newer LiftMaster models with battery backup will have a label or icon on the housing. The battery compartment is usually inside the cover or in a side panel. If you’re unsure, check your manual or look up your model number.
Opening your LiftMaster garage door opener gets easier with practice. The key is to stay safe, use the right tools, and know your model. Now you can handle basic maintenance and troubleshooting with confidence. If you ever feel unsure, don’t hesitate to get expert help—keeping your garage door running smoothly is worth it.


