Now Reading: How to Pair Chamberlain Garage Door Opener: Easy Step-by-Step Guide
- 01
How to Pair Chamberlain Garage Door Opener: Easy Step-by-Step Guide
How to Pair Chamberlain Garage Door Opener: Easy Step-by-Step Guide

Pairing your Chamberlain garage door opener is a task many homeowners face, whether you’ve just moved in, bought a new remote, or need to reset your opener for security reasons. A well-paired opener ensures your garage door operates smoothly and safely. However, the process can feel confusing, especially with the many Chamberlain models and remote types available. If you’re not familiar with garage door systems, you might worry about making mistakes or even damaging your equipment. This guide will show you, step by step, how to pair your Chamberlain garage door opener, explain what to do if things go wrong, and help you avoid common pitfalls. With a calm, expert approach, you’ll learn how to get your opener working with confidence—even if this is your first time.
Understanding Chamberlain Garage Door Openers
Before diving into pairing, it helps to know what makes Chamberlain garage door openers unique. Chamberlain is one of the leading brands in North America, known for their reliable openers and advanced features. Most Chamberlain openers use rolling code technology for security. This means the code between your remote and the opener changes each time you press the button, making it hard for thieves to copy.
Chamberlain openers come in various models, like chain drive, belt drive, and smart openers with Wi-Fi connectivity. While the pairing process is similar for most models, newer units may have extra features like MyQ compatibility, allowing you to control your garage door from your smartphone.
Common Chamberlain Models
Some popular Chamberlain models include:
- B550/B970: Belt drive, quiet operation, MyQ-enabled.
- C450/C870: Chain drive, durable, basic remotes.
- RJO20: Wall-mounted, saves ceiling space.
- B4643T: Features built-in camera and advanced security.
Understanding your model helps you locate buttons and features for pairing. You can find your model number on the opener’s housing or in your user manual.
When Should You Pair Or Re-pair Your Chamberlain Opener?
Pairing isn’t just for new installations. You may need to pair (or re-pair):
- After installing a new opener: Setting up the remote for the first time.
- When adding a new remote: For family members, guests, or replacement remotes.
- After replacing batteries: Sometimes, remotes lose their connection.
- For security reasons: If you lose a remote or move into a new home.
- When using MyQ or smart features: Pairing with your phone or Wi-Fi system.
Pairing is also essential if your remote suddenly stops working, or if you want to program vehicle-integrated buttons (like HomeLink in cars).

Tools And Items You’ll Need
Pairing a Chamberlain opener is simple, but having the right items ready helps:
- A ladder: To reach the opener mounted on your ceiling.
- Your Chamberlain remote: Or a keypad if you’re pairing an external pad.
- A small screwdriver: Some remotes require opening for battery replacement.
- Your opener’s manual: For model-specific instructions.
- Wi-Fi password: If you’re using a smart opener with MyQ.
It’s also smart to clear the area—keep children and pets away from the garage door during setup to avoid accidents.
Step-by-step: How To Pair Chamberlain Garage Door Opener
Pairing your opener involves a few clear steps. While models may vary, the core process is similar.
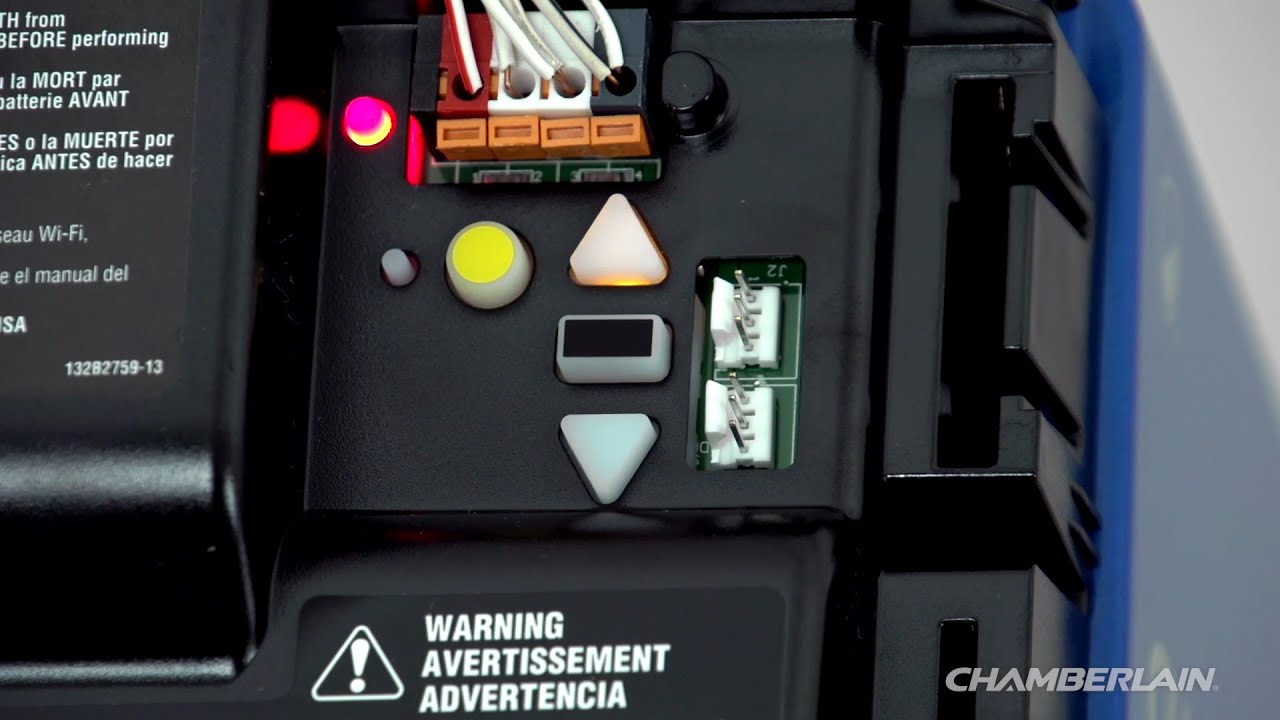
1. Locate The ‘learn’ Button
The Learn button is key to pairing. It’s usually found on the back or side of your opener, near the antenna wire.
- Most Chamberlain openers have a yellow, purple, red, or green Learn button.
- You may need to remove a small light cover to see it.
- The color can indicate compatibility with remotes and keypads.
Example:
- A yellow Learn button is common on newer openers and works with Security+ 2.0 remotes.
- A purple Learn button is found on some older models.
2. Prepare The Remote
Hold the remote you want to pair. If you’re pairing a keypad or car system, have it ready and know which button you want to program.
- Check the battery: Weak batteries can cause pairing to fail.
- Clear previous programming if needed (see troubleshooting below).
3. Enter Pairing Mode
- Climb the ladder safely to reach your opener.
- Press and release the Learn button. A small LED light will glow or blink (depending on model).
- Don’t hold the button down unless you want to erase all codes.
- You have about 30 seconds to complete the pairing.
4. Press The Remote Button
- Within 30 seconds, press the button on your remote (or keypad) you wish to pair.
- The opener’s light will blink or you’ll hear a click, showing the remote is paired.
If pairing a wireless keypad, after pressing the Learn button, enter your chosen PIN on the keypad and press the ‘Enter’ key.
5. Test The System
- Move away from the opener and press the remote button.
- The door should open or close.
- If not, repeat the steps or see troubleshooting.
Non-obvious tip: If your remote has multiple buttons, you can pair each button to a different door or function.
6. Pairing With Smart Devices (myq)
For MyQ-enabled openers:
- Download the MyQ app on your phone.
- Create an account and select ‘Add Device’.
- The app will guide you to press the Learn button.
- Follow on-screen instructions to connect to Wi-Fi.
Pairing with MyQ allows control from anywhere and real-time alerts.

Pairing Multiple Remotes Or Keypads
Chamberlain openers can remember several remotes or keypads—usually up to five or more. Each device must be paired separately.
- Press the Learn button for each new remote.
- Pair within 30 seconds for each device.
- For keypads, enter a new PIN during each pairing.
Insight: If you reach the memory limit, the opener may forget the oldest paired remote. Always keep track of how many remotes you have paired.
Erasing All Paired Devices
Sometimes, you need to erase all codes—for example, if you move into a new house or lose a remote. This resets your opener’s memory.
- Hold down the Learn button for about 6–10 seconds.
- The LED will turn off, showing all remotes and keypads are forgotten.
- Pair your remotes again as needed.
Warning: This action cannot be undone. All remotes, keypads, and vehicle buttons will need to be re-paired.
Pairing With A Vehicle’s Built-in Remote (homelink)
Many cars have built-in garage door controls, like HomeLink. Pairing your Chamberlain opener with a vehicle system takes a few extra steps.
Steps For Homelink Pairing
- Clear the vehicle’s HomeLink button (hold until the indicator blinks rapidly).
- Hold your Chamberlain remote near the car’s HomeLink button.
- Press both buttons together until the indicator changes (usually from slow to fast blinking).
- Go to your garage opener and press the Learn button.
- Within 30 seconds, return to the vehicle and press the HomeLink button three times.
Your garage door should now respond to the car’s built-in button.
Non-obvious insight: Some vehicles require the ignition to be on (but engine off) for programming. Check your car manual.
Pairing Chamberlain Keyless Entry Keypads
Keyless entry keypads are mounted outside your garage and let you open the door using a PIN code.
How To Pair A Keypad
- Press the Learn button on your opener.
- Within 30 seconds, enter your chosen PIN on the keypad.
- Press the ‘Enter’ button.
- The opener’s light will flash, confirming programming.
Tip: For extra security, choose a PIN that isn’t obvious (avoid birthdays or 1234).
Changing The Pin
- Press the Learn button, then enter a new PIN and ‘Enter’ on the keypad.
- Each time you change the PIN, the old one is erased.
Pairing Chamberlain Openers With Smart Home Systems
Chamberlain’s MyQ system works with smart home assistants like Google Assistant and Amazon Alexa. Not all models support voice control, but many do.
How To Connect Myq To Smart Home Systems
- Pair your opener with the MyQ app (see above).
- Link MyQ with Google Assistant or Alexa in your device’s settings.
- Authorize the connection and set up routines if desired.
This lets you open or close your garage with voice commands or from your phone.
Data point: According to Chamberlain Group, over 4 million homes use MyQ technology as of 2023.
Troubleshooting Pairing Problems
Pairing sometimes fails, but most issues are easy to fix.
Common Problems And Fixes
- Remote won’t pair
- Check for dead batteries.
- Make sure you’re pressing the correct Learn button.
- Try erasing all codes, then re-pair.
- Remote works only up close
- Replace the battery.
- Check for interference from LED lights or metal objects.
- Keypad not responding
- Make sure the keypad is within range.
- Re-enter the PIN slowly.
- Vehicle system won’t program
- Some older Chamberlain openers are not compatible with HomeLink without a bridge module.
Pro tip: If your opener is more than 20 years old, check compatibility before buying new remotes.
What To Do If Pairing Fails
If all else fails:
- Unplug the opener for 60 seconds, then try again.
- Reset your remote by removing and reinserting the battery.
- Refer to your Chamberlain manual or contact support.
Unique insight: Sometimes, nearby wireless devices (baby monitors, Wi-Fi routers) can cause interference. Move these away during pairing.
Maintaining Your Chamberlain Opener After Pairing
Once your remote is paired, regular maintenance keeps your opener running smoothly.
- Replace batteries yearly in remotes and keypads.
- Clean the opener’s sensors with a dry cloth.
- Test the safety reversal system monthly (place a roll of paper towels in the door’s path—the door should reverse).
- Update your MyQ app for the latest features and security patches.
Ignoring maintenance can lead to poor remote range, slow response, or even safety risks.
Safety Precautions
Safety is critical when pairing or using your garage door opener.
- Never let children play with remote controls.
- Always stand clear of the garage door during pairing/testing.
- Use a sturdy ladder and have someone spot you if possible.
- If the door moves unexpectedly, stop and review your steps.
Accidents can happen quickly—stay alert throughout the process.
Chamberlain Remote And Keypad Compatibility Table
Understanding which remotes and keypads work with your opener helps avoid frustration. Here’s a quick look:
| Learn Button Color | Remote Type | Keypad Type | Notes |
|---|---|---|---|
| Yellow | Security+ 2.0 (891LM, 893LM) | 877LM | MyQ compatible, most 2011–present models |
| Purple | Security+ (371LM, 373LM) | 377LM | 2005–2011 models |
| Red/Orange | Security+ (971LM, 973LM) | 977LM | 1997–2005 models |
| Green | Billion Code (81LM) | Keypad 66LM | 1993–1997 models |
Always check your opener’s Learn button color before buying a remote or keypad.
Chamberlain Smart Features Vs. Basic Openers
If you’re choosing between a smart opener and a basic model, here’s how they compare:
| Feature | Basic Opener | Smart (MyQ) Opener |
|---|---|---|
| Remote Control | Yes | Yes |
| Keypad | Optional | Optional |
| Smartphone App | No | Yes |
| Wi-Fi Connectivity | No | Yes |
| Voice Assistant Integration | No | Yes (with MyQ) |
| Automatic Updates | No | Yes |
Smart openers offer more convenience, but require Wi-Fi and app setup.
Security Tips When Pairing Your Opener
Garage door security is often overlooked. Here’s how to keep your home safe:
- Erase old codes when you move in or lose a remote.
- Choose strong PINs for keypads.
- Don’t share your MyQ account with people you don’t trust.
- Check for firmware updates in the MyQ app.
- Keep remotes out of sight in your car.
Fact: Burglars sometimes use universal remotes to test for unpaired openers. Regularly updating and re-pairing your system reduces this risk.
Real-world Example: Pairing Success Story
Maria, a new homeowner, moved into a house with a Chamberlain opener but no working remotes. She followed the pairing steps, but her first remote didn’t work. She realized the opener’s Learn button was red, but she’d bought a newer yellow-button remote.
After checking the compatibility table, she bought the right model and was able to pair in minutes. Maria then added her opener to the MyQ app and set up voice control with Alexa, making her garage safer and more convenient.
Lesson: Always check compatibility and follow each step carefully for a smooth experience.
Quick Reference: Pairing Steps For Common Chamberlain Models
Here’s a summary for fast access:
| Model | Learn Button Color | Pairing Steps |
|---|---|---|
| B550/B970 | Yellow | Press Learn button, pair remote, test |
| C450/C870 | Purple | Press Learn button, pair remote, test |
| RJO20 | Yellow | Press Learn button, pair remote, test |
| Older Models | Red/Green | Press Learn button, pair remote, test |
Always consult your manual for model-specific details.
Frequently Asked Questions
How Many Remotes Can I Pair With My Chamberlain Garage Door Opener?
Most Chamberlain openers allow five remotes and one wireless keypad. Some newer models can support more, but older models may have smaller limits. If you try to pair more than the maximum, the oldest remote will be forgotten automatically.
What Should I Do If My Remote Suddenly Stops Working?
First, replace the battery in the remote. If it still doesn’t work, try re-pairing using the Learn button. If issues continue, erase all codes and pair again. Interference from other electronics, like LED bulbs, can sometimes cause problems.
Can I Pair A Chamberlain Opener With My Smartphone?
Yes, if your opener is MyQ compatible. Download the MyQ app, follow the pairing instructions, and connect to your Wi-Fi network. This lets you control your garage door from anywhere, get alerts, and set schedules.
Is It Safe To Pair My Garage Door Opener Myself?
Yes, pairing is safe if you follow instructions and basic safety steps. Use a sturdy ladder, keep clear of the garage door while testing, and don’t let children use remotes unsupervised. If you’re unsure, consult a professional installer or visit the official Chamberlain support page for help.
How Do I Know Which Remote Or Keypad Is Compatible With My Opener?
Check the Learn button color on your opener and consult compatibility charts (like the one above). Match your opener’s year and model with the right remote or keypad. Using the wrong device can prevent successful pairing.
Pairing your Chamberlain garage door opener doesn’t need to be stressful. With the right information and careful steps, you can enjoy secure, reliable access to your garage. Whether you’re using a simple remote, a keypad, or the latest smartphone app, following these guidelines ensures safety and peace of mind for years to come.