Now Reading: How to Reprogram Liftmaster Garage Door Opener Keypad Easily
- 01
How to Reprogram Liftmaster Garage Door Opener Keypad Easily

If your Liftmaster garage door opener keypad stops working, or you move into a new home, reprogramming the keypad can save you time and stress. Many homeowners worry this task is too technical, but with the right steps, anyone can do it. In fact, knowing how to reprogram your keypad not only boosts security but also gives you full control over who can access your garage.
This guide will walk you through the complete process of reprogramming a Liftmaster garage door opener keypad. You’ll learn how to clear old codes, set new ones, troubleshoot common issues, and understand when to seek help. Whether you’re a first-time user or updating your system, this article covers everything you need for a smooth experience.
Let’s unlock your keypad’s full potential together.
Understanding Your Liftmaster Garage Door Opener Keypad
Before you start reprogramming, it’s important to know how your keypad works. The Liftmaster keypad is a wireless entry system that allows you to open and close your garage door using a code you set. This code communicates with the garage door opener through a secure frequency.
Most Liftmaster keypads use rolling code technology, which means the code changes every time you use it. This feature prevents others from copying your signal. The keypad is usually mounted near your garage door for easy access. Some keypads are backlit, making them easier to use at night.
There are different models of Liftmaster keypads, but the programming process is similar for most. The steps may vary slightly depending on your opener’s age and model. If you don’t know your model, look for the Learn button on your garage door opener. Its color can help you identify which programming steps to follow.
Reasons To Reprogram Your Keypad
People reprogram their Liftmaster garage door opener keypad for several reasons:
- Lost or Forgotten Code – If you forget your code, reprogramming is the only way to regain access.
- Moving into a New Home – For security, always set a new code when moving in.
- Security Concerns – If you think someone else knows your code, change it immediately.
- Adding or Removing Users – When a family member or tenant moves out, update the code to control access.
- Malfunctioning Keypad – Sometimes, a keypad stops working and a simple reprogram can fix it.
- Upgrading Garage Door Opener – New openers may require reprogramming existing keypads.
- Battery Replacement – In some cases, you may need to reset the keypad after changing batteries.
Ignoring keypad security leaves your garage—and possibly your home—vulnerable. Regularly updating your code helps protect your property.

Tools And Preparation
You won’t need many tools to reprogram your Liftmaster keypad, but a little preparation makes the process easier.
- A sturdy ladder – Most garage door openers are mounted on the ceiling.
- The keypad manual – Helpful if you have a unique model.
- A flashlight – Useful for dark garages or spotting the Learn button.
- Pen and paper – For writing down your new code (keep it in a safe place).
Make sure your garage is well-lit and that you have a clear path to the opener and keypad. If your keypad is battery-powered, check that the batteries are fresh.
Identifying Your Liftmaster Keypad And Opener Model
Not all Liftmaster openers are programmed in the same way. The main difference comes from the Learn button color on the opener. The most common colors are:
- Yellow
- Purple
- Red/Orange
- Green
You’ll usually find the Learn button near the wire terminals at the back or side of the opener. The color tells you what type of technology your opener uses and which steps to follow.
Here’s a comparison of common Liftmaster opener models and their Learn button colors:
| Opener Model Range | Learn Button Color | Keypad Programming Method |
|---|---|---|
| 1993-1997 | Green | Standard Steps |
| 1997-2005 | Red/Orange | Standard Steps |
| 2006-2011 | Purple | Rolling Code |
| 2011-Present | Yellow | Security+ 2.0 Steps |
If you can’t find the Learn button, check your opener’s manual or look for the model number on the unit.
Step-by-step: How To Reprogram Liftmaster Garage Door Opener Keypad
Follow these steps to reprogram your keypad. The process is safe, and you can do it yourself.
1. Clear The Old Keypad Code
Before adding a new code, it’s best to clear the existing one. This stops old codes from working.
- Locate the Learn button on your garage door opener.
- Press and hold the Learn button for about 6 seconds. The indicator light will turn off.
- This deletes all remote and keypad codes linked to the opener.
Important: Clearing the codes will disconnect all remotes and wireless keypads. You’ll need to reconnect them after.
2. Enter Programming Mode
The next step is to put your opener into programming mode.
- Press and release the Learn button once. The indicator light will turn on (usually for 30 seconds).
- You now have 30 seconds to enter the new code on your keypad.
Tip: If you wait too long, you’ll need to press the Learn button again.
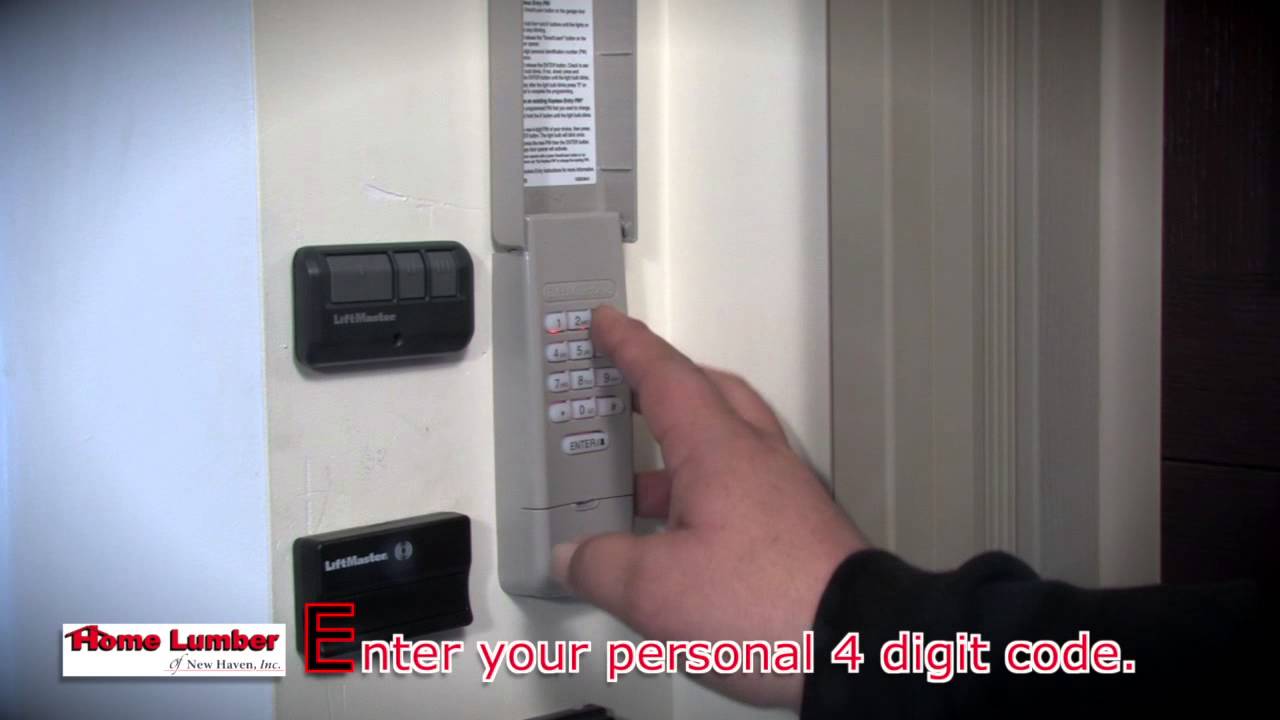
3. Set Your New Keypad Code
Go to your keypad. Enter your desired 4-digit code, then press the Enter button.
- For older keypads: Enter the code, press Enter, and wait for the garage door opener to click or the lights to blink.
- For newer keypads: You may need to enter the code, then press Enter a second time, or follow an extra step (see below).
The light on the opener should blink or you might hear a click. This means the code was accepted.
4. Test The Keypad
After setting the new code, always test it:
- Stand by the keypad and enter your code.
- Press Enter.
- The garage door should open or close.
If it doesn’t work, repeat the programming steps. Make sure you’re entering the code within 30 seconds of pressing the Learn button.
5. Program Keypad For Multiple Doors (if Needed)
Some Liftmaster keypads can control more than one garage door. To do this, you need to set a separate code for each door.
- Repeat the steps above for each opener and assign a different code for each door.
- Usually, you’ll press a different button (like Enter, 0, or #) after entering the code, based on your keypad model.
Check your manual for specific instructions on multi-door programming.
6. Reconnect Remotes (if Cleared Earlier)
If you cleared all codes, your remotes will not work until you reprogram them. Usually, you press the Learn button and then press the remote button you want to program.
Here’s a quick table comparing steps for different Learn button colors:
| Learn Button Color | Programming Steps | Keypad Compatibility |
|---|---|---|
| Yellow | Press Learn, enter code, press Enter twice | Security+ 2.0 Keypads |
| Purple | Press Learn, enter code, press Enter | Security+ Keypads |
| Red/Orange | Press Learn, enter code, press Enter | Standard Keypads |
| Green | Press Learn, enter code, press Enter | Standard Keypads |
Common Mistakes And How To Avoid Them
Even with clear steps, mistakes can happen. Here are issues beginners often face and how to avoid them:
1. Waiting Too Long After Pressing Learn
The Learn button only puts the opener into programming mode for 30 seconds. If you wait longer, the opener exits this mode, and your code won’t be saved.
*Solution:* Move quickly after pressing Learn.
2. Using Weak Or Repeated Codes
Codes like 1234 or 0000 are easy for intruders to guess.
*Solution:* Use a unique 4-digit code that’s not related to your address, birthday, or simple patterns.
3. Not Clearing Old Codes
If you skip clearing old codes, someone with the old code may still access your garage.
*Solution:* Always clear old codes when changing users or after buying a new home.
4. Low Or Dead Keypad Batteries
A keypad may stop working if the battery is low—even after successful programming.
*Solution:* Replace batteries before programming.
5. Misidentifying The Learn Button
On some openers, you might confuse the Learn button with other buttons or lights.
*Solution:* Double-check the manual or look for the label near the wire terminals.
6. Not Testing The Keypad
Some people forget to test the keypad after programming.
*Solution:* Always test the keypad to confirm the new code works.
7. Programming Multiple Keypads Incorrectly
If you have more than one keypad, you may accidentally overwrite the code for the first one.
*Solution:* Program each keypad separately and test them all.
Troubleshooting Keypad Problems
If your keypad isn’t working after reprogramming, here’s how to fix common issues:
Keypad Not Responding
- Check the battery and replace it if needed.
- Clean the keypad. Dirt can prevent buttons from working.
- Make sure you’re pressing the buttons firmly.
Door Doesn’t Move After Entering Code
- Confirm you’re within range (stand close to the keypad).
- Make sure the garage door opener is plugged in and has power.
- Double-check that you entered the code within the 30-second window after pressing Learn.
Keypad Works Intermittently
- Check for signal interference from other wireless devices.
- Move any large metal objects away from the opener and keypad.
- Replace old batteries.
Opener Light Doesn’t Blink
- You may have entered the wrong code or missed a step.
- Start the programming process again from the beginning.
Keypad Buttons Sticking
- Clean the keypad with a soft cloth and gentle cleaner. Avoid harsh chemicals.
- If buttons still stick, you may need to replace the keypad.
Security Tips For Keypad Use
A well-programmed keypad is only as secure as your habits. Here’s how to keep your garage safe:
1. Change Your Code Regularly
Update your code every few months or after any security concern.
2. Choose Strong Codes
Avoid simple codes like your house number or common patterns.
3. Don’t Share Your Code Widely
Only give the code to trusted people. If a code is shared, change it once the person no longer needs access.
4. Cover The Keypad
If possible, install a weatherproof cover to protect the keypad and make it less visible to strangers.
5. Monitor Access
Some newer Liftmaster systems let you track keypad use via a mobile app. Set alerts for unknown entries if your model supports it.
6. Disable Keypad Temporarily
If you’re away for a long period, consider clearing the code and reprogramming it when you return.
When To Call A Professional
Most keypad reprogramming can be done at home. But sometimes, you might need extra help:
- Keypad or opener is physically damaged
- Opener does not enter programming mode
- You have an older or unusual model
- You see error lights or hear warning beeps
- Keypad doesn’t work after battery replacement and reprogramming
In these cases, call a Liftmaster-certified technician. Trying to repair electronic problems without experience can make things worse.
Upgrading Your Keypad: What To Consider
If your keypad is old or unreliable, upgrading can bring better features and more security. Here are factors to consider:
Compatibility
Check if the new keypad is compatible with your opener’s model and Learn button color. Not all keypads work with every opener, especially if your system is over 15 years old.
Features
Modern Liftmaster keypads offer:
- Backlit buttons for night use
- Temporary PINs for guests or deliveries
- Weatherproof design
- Longer wireless range
- Mobile app integration (for certain models)
Cost
Keypads range from $25 to $60. Professional installation may cost extra, but most homeowners can install them alone.
Warranty
New keypads often come with 1-3 year warranties. Check warranty terms before buying.
Comparing Old Vs. New Keypad Features
To help you decide if an upgrade makes sense, here’s a quick comparison:
| Feature | Old Keypads | New Keypads |
|---|---|---|
| Backlit Buttons | No | Yes |
| Temporary PINs | No | Yes |
| Mobile App Integration | No | Yes (select models) |
| Weatherproofing | Basic | Advanced |
| Rolling Code Security | Sometimes | Always |
If you choose to upgrade, always follow the manufacturer’s installation and programming steps.
Safety Reminders
Working with garage door openers is generally safe, but keep these tips in mind:
- Never stand directly under the garage door while programming.
- Keep children and pets away from the area during setup.
- If you use a ladder, make sure it’s stable and on a flat surface.
- Disconnect power to the opener before cleaning or servicing it, but keep it plugged in during programming.
- Do not force any buttons if they’re stuck—clean or replace the keypad instead.
Practical Tips For Everyday Use
Here are some extra tips to make your keypad last longer and work better:
- Write your code down and store it in a safe place, not on your phone or in obvious spots.
- Replace keypad batteries every 12 months, even if it seems to work fine.
- Clean the keypad gently every few months to prevent dust buildup.
- If you’re expecting guests or workers, set a temporary PIN and delete it after use.
- If your keypad acts up during extreme cold or heat, wait for the temperature to normalize before troubleshooting.
Real-world Example
Let’s look at a real scenario. Sarah bought a new house with an existing Liftmaster garage door opener. The previous owner gave her the old keypad code. Sarah followed these steps:
- She climbed a safe ladder and found the yellow Learn button on her opener.
- She pressed and held it for 6 seconds to erase all codes.
- She pressed and released the Learn button again, then quickly entered her new code on the keypad and pressed Enter twice.
- The garage door opener light blinked, confirming the new code.
- She tested the keypad and reconnected her remote controls.
Sarah’s keypad now works only with her new code. She feels safer, knowing no one else can enter.
Frequently Asked Questions
How Do I Find The Learn Button On My Liftmaster Garage Door Opener?
The Learn button is usually located on the back or side of your opener’s motor unit. It’s near the terminal screws where the wires connect. Common colors are yellow, purple, red/orange, or green. Check your opener’s manual if you can’t find it.
How Often Should I Change My Liftmaster Keypad Code?
Change your code at least once every 6-12 months or immediately after moving into a new home, losing a remote, or having security concerns. Regular updates help keep your garage secure.
Why Does My Keypad Stop Working After Changing The Battery?
Sometimes, keypad memory is lost when the battery is removed for too long, or the battery is weak. After replacing the battery, reprogram the keypad following the steps above. If it still doesn’t work, check for corrosion or dirt in the battery compartment.
Can I Set A Temporary Code For Guests Or Deliveries?
Yes, many newer Liftmaster keypads let you set a temporary PIN. This code works for a set time or number of uses, then expires automatically. Check your keypad’s manual for instructions on setting and deleting temporary codes.
Where Can I Get Official Liftmaster Support And Manuals?
You can find official support, manuals, and troubleshooting help at the Liftmaster Customer Support website. They offer detailed guides for every model.
Taking control of your Liftmaster garage door opener keypad is one of the simplest ways to increase home security. With the right steps and a little care, you can program, maintain, and upgrade your system for peace of mind and convenience every day.


