Now Reading: How to Fix Garage Door Cable: Step-by-Step Repair Guide
- 01
How to Fix Garage Door Cable: Step-by-Step Repair Guide
A garage door is one of the most important entry points for any home. It keeps your car safe, protects your tools, and even helps keep your house secure. But when the garage door cable breaks or comes loose, you’re suddenly stuck. The door can be heavy and dangerous to move. You may worry about safety, cost, and how to fix it yourself or if you need a pro.
This guide is your practical advisor for fixing a garage door cable. Whether you’re handy or just starting, you’ll learn how these cables work, why they fail, and exactly how to repair or replace them. You’ll also find real-world tips, safety warnings, and answers to common questions.
With clear steps, examples, and extra insights, you’ll know what to do if your garage door cable acts up.
Understanding Garage Door Cables
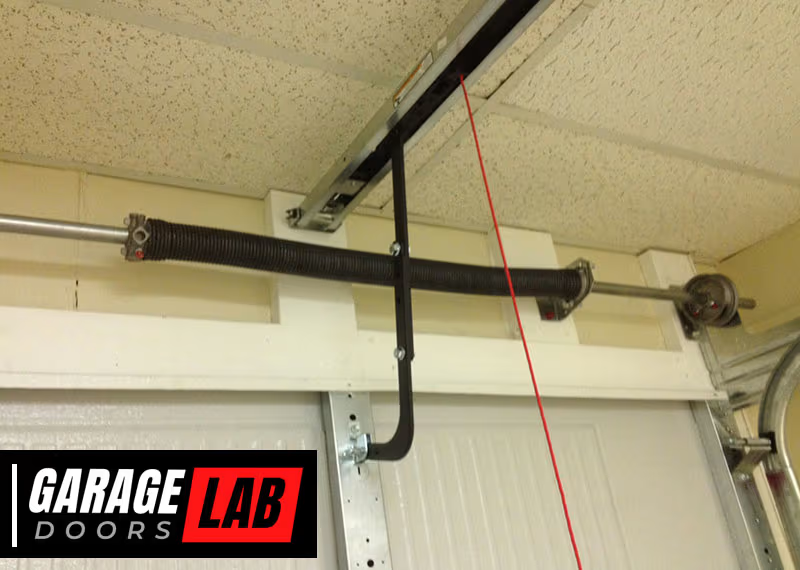
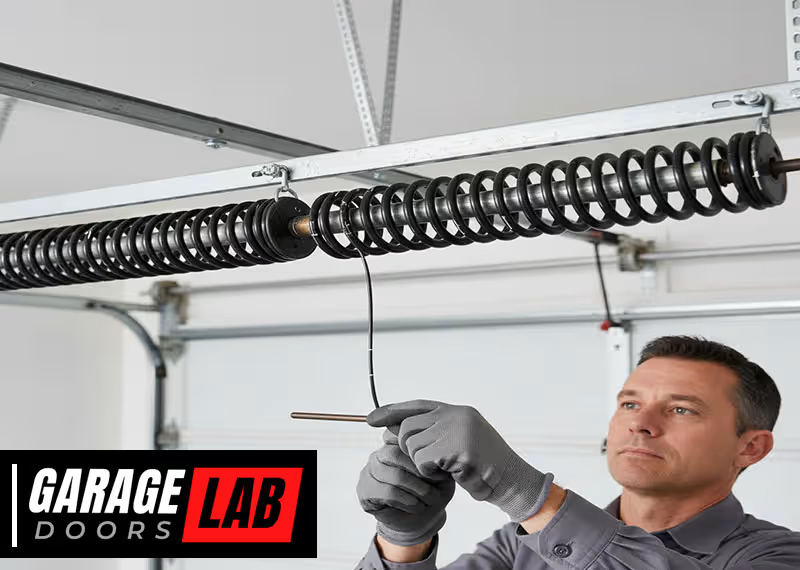
Before fixing anything, it’s important to know what garage door cables do. These cables are made of strong, twisted steel wires. They play a key role in lifting and lowering the door safely. When you open the door, the cables work with the springs to balance the weight. If a cable snaps or slips, the door can become crooked, heavy, or stuck.
There are two main types of garage door cables:
- Lift cables – These attach to the bottom corners of the door and wind up around a drum as the door opens.
- Safety cables – These run inside extension springs and help contain the spring if it breaks.
Most home garage doors use lift cables on each side. If one fails, your door may tilt or jam.
Common signs of cable problems:
- Door lifts unevenly or won’t open all the way
- Visible frayed wires or loose cable ends
- Door slams shut quickly
- Cables are slack or off their drums
Garage door cables are under high tension. Never try to fix them without understanding the risks and following safety steps.
Reasons Garage Door Cables Fail
Knowing why cables fail helps prevent future problems. Here are the top causes:
- Wear and tear: Over years of use, cables wear out. Steel strands fray, rust, or snap.
- Rust and moisture: Humid garages or salty climates can corrode cables quickly.
- Poor alignment: If the tracks or pulleys are not straight, cables can slip off or rub.
- Debris in tracks: Dirt or objects block cables, causing uneven tension.
- Incorrect installation: Cables that are too loose or tight will not last long.
A garage door usually opens and closes 3-5 times a day. That’s over 1,000 cycles per year! Most standard cables last 5-10 years, but can fail sooner if not maintained.
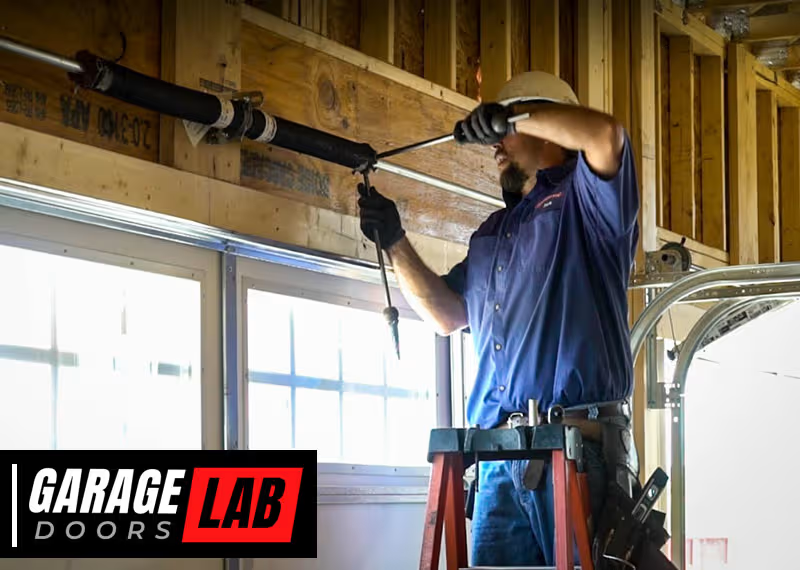
Safety First: Precautions Before You Start
Fixing garage door cables is not a simple DIY for everyone. The springs and cables can store huge amounts of energy. If you do not follow safety steps, you risk serious injury. Here’s what you need to do before starting:
- Disconnect the power to your automatic opener so it doesn’t move by accident.
- Wear safety glasses and gloves to protect your eyes and hands from sharp wires.
- Do not touch the torsion springs unless you know exactly what you’re doing.
- Keep children and pets away from the work area.
- Have a helper if possible to steady the door or pass tools.
If your garage door springs are broken or you’re unsure, call a professional. Never take risks with heavy doors or high-tension parts.
Tools And Materials Needed
Having the right tools makes the job safer and faster. Here’s a list of what you’ll usually need:
- Replacement garage door cable (buy the exact size for your door)
- Set of wrenches (usually 7/16” or 1/2” for most doors)
- Locking pliers or C-clamps (to hold the door in place)
- Socket set
- Screwdriver (flat and Phillips)
- Stepladder
- Tape measure
- Safety glasses and gloves
- Lubricant (for moving parts)
Extra tip: If your door is older, take a picture of the cable routing before removing anything. This helps you reinstall the new cable correctly.
How To Fix A Garage Door Cable: Step-by-step
Let’s break the process into easy-to-follow steps. Most repairs involve replacing a broken or frayed lift cable.
1. Open The Garage Door Fully
Start by lifting the garage door all the way open. If the cable is broken and the door is stuck, you may need help to lift it. Opening the door takes tension off the cables and springs, making it safer to work.
Use locking pliers or a C-clamp to hold the door open. Attach the clamp just below the bottom roller on both sides, so the door can’t fall.
2. Disconnect The Garage Door Opener
Unplug your automatic opener or disconnect it from the door. This prevents accidental movement while you work.
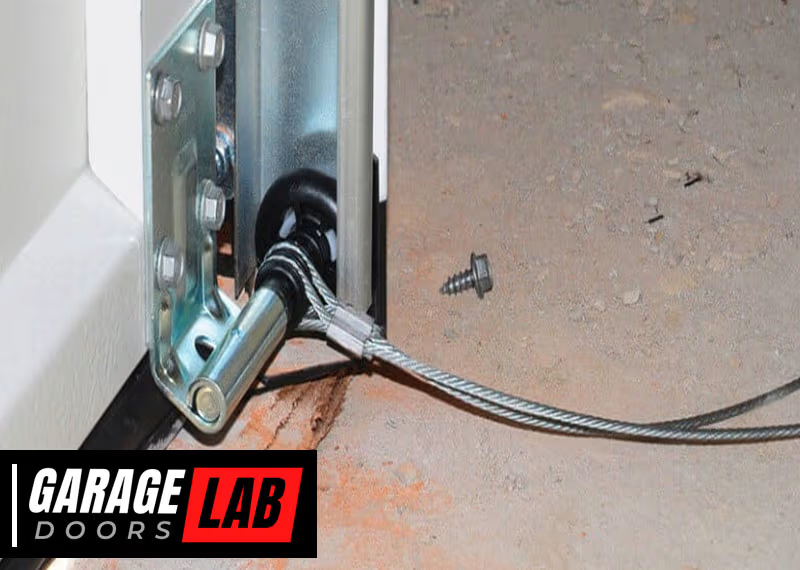
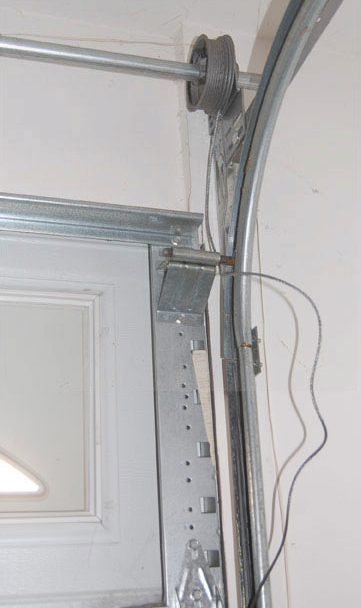
3. Remove The Damaged Cable
Find the cable that’s broken or frayed. Most lift cables attach to the bottom bracket on the door and loop up to the drum at the top.
- Use a wrench to loosen the set screw on the drum.
- Carefully pull the cable out of the drum slot.
- Remove the cable from the bottom bracket.
If your cable is wrapped around a pulley (on extension spring systems), remove it from the pulley too.
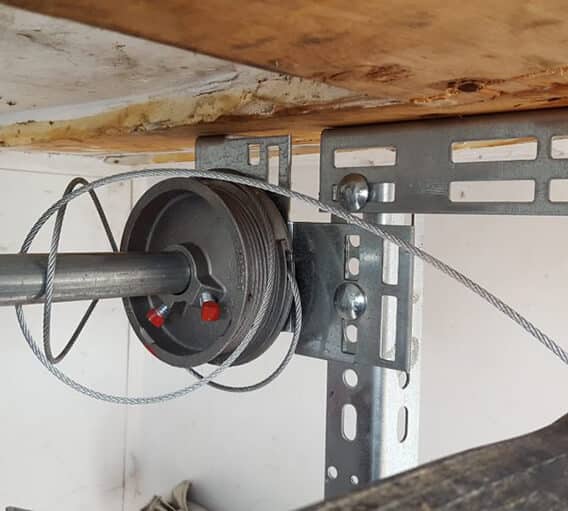
4. Install The New Cable
- Thread the new cable through the same path as the old one.
- Attach one end to the bottom bracket.
- Run the cable up to the drum and insert it into the slot.
- Wind the cable around the drum in the same direction as the old cable.
Make sure there are no twists or kinks in the cable.
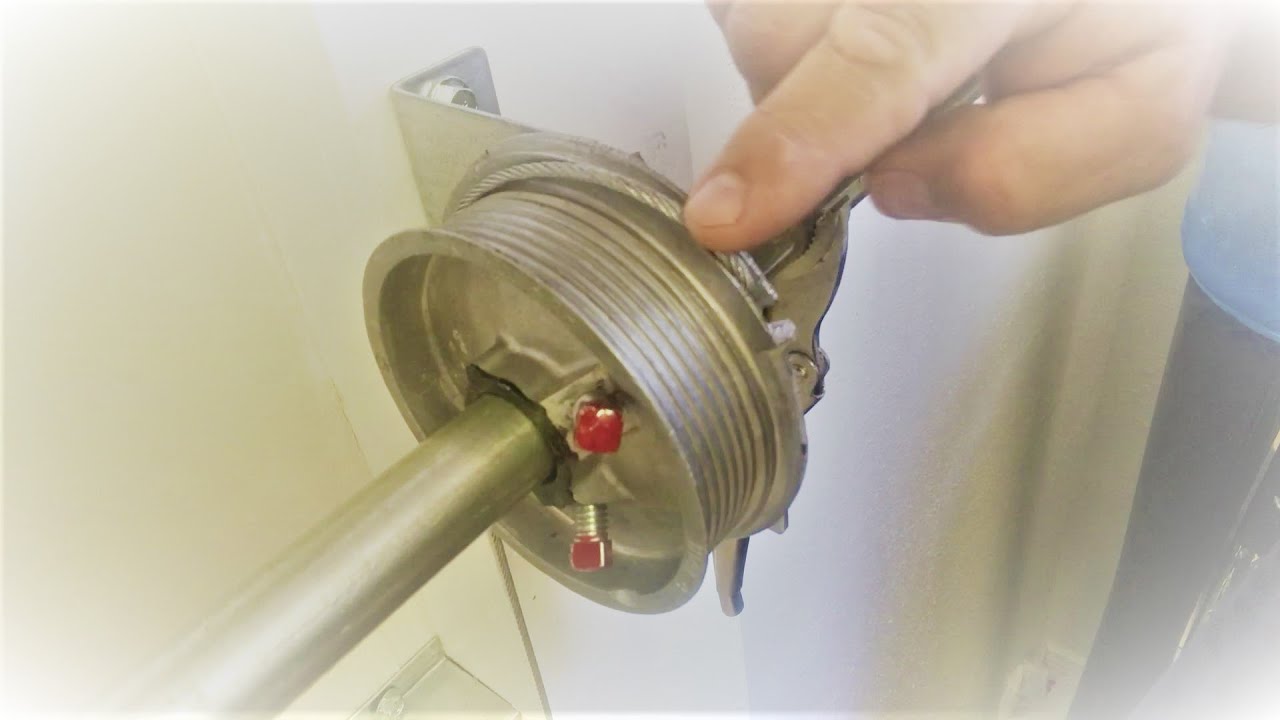
5. Tighten And Adjust
- With the cable in place, tighten the drum’s set screw to hold the cable securely.
- Repeat the process on the other side if you’re replacing both cables.
- Check that both cables have equal tension. The door should be level when closed.
6. Test The Door
- Remove the locking pliers or clamps.
- Slowly lower the door by hand and check for smooth movement.
- Plug in or reconnect your opener and test the door several times.
If the door binds, hangs crooked, or the cables slip off, stop and check your work. Sometimes, a slight adjustment to the drum or cable routing is needed.
When To Replace Both Cables
Even if only one cable is damaged, it’s smart to replace both at the same time. Here’s why:
- Cables usually wear out at the same rate.
- Installing a new cable with an old one can create uneven tension.
- You save time and avoid another repair soon.
A pair of replacement cables is affordable, and you only need a little extra time to install both.
Comparing Garage Door Cable Types
Not all cables are the same. Here’s a simple comparison to help you choose the right one:
| Type | Material | Lifespan | Best For |
|---|---|---|---|
| Standard Lift Cable | Galvanized Steel | 5-7 years | Most home garage doors |
| High-Lift Cable | Stainless Steel | 8-12 years | Tall or custom doors |
| Safety Cable | Flexible Steel Wire | 7-10 years | Extension spring doors |
Pro Tip: Stainless steel cables cost more but resist rust much better, making them great for damp or coastal areas.
Common Mistakes When Fixing Garage Door Cables
Even experienced DIYers make mistakes. Watch out for these:
- Not securing the door: If the door slips, it can slam down and cause injury.
- Forgetting to unplug the opener: This is a common cause of accidents.
- Using the wrong cable size: Cables that are too short or too long won’t work right.
- Not checking the drum direction: Cables must wind the same way on both sides.
- Ignoring frayed or rusty parts nearby: Replace any worn hardware you see during the job.
Many beginners miss that cables must be exactly the right length and tensioned evenly. Even a small difference can cause the door to go off track or bind.
How Much Does It Cost To Fix A Garage Door Cable?
Let’s look at typical costs so you can plan ahead. Prices depend on whether you do it yourself or hire a pro.
| Repair Type | DIY Cost | Professional Cost | Time Needed |
|---|---|---|---|
| Replace One Cable | $15 – $30 | $90 – $160 | 30-60 min |
| Replace Both Cables | $25 – $50 | $120 – $200 | 60-90 min |
| Emergency Repair | – | $200 – $300 | 30-60 min |
Tip: If your door is heavy or you’re not sure about springs, hiring a pro is safer. The extra cost is worth peace of mind.
Preventing Future Cable Problems
Fixing a cable is good, but preventing the next problem is even better. Here’s how:
- Inspect cables every 6 months for fraying, rust, or wear.
- Lubricate moving parts with a light spray (never grease) to reduce friction.
- Keep tracks clear of debris and check for bent sections.
- Balance the door by lifting it halfway. If it moves up or down, springs or cables may need adjustment.
- Replace both cables together every 5-7 years, even if only one looks worn.
Extra insight: Many people forget to check the bottom bracket, which is often where rust starts. Keeping this area clean and dry extends cable life.
Should You Call A Professional?
Some garage door cable repairs are perfect for handy homeowners. But if you notice any of these warning signs, call a licensed garage door technician:
- Broken or stretched torsion springs
- Multiple cables off the drums
- Large or commercial doors
- Difficulty lifting the door even with new cables
- Any part of the system looks unsafe
Professional repair techs have special tools and training. They can fix cable issues in less than an hour and check for hidden problems. For more details, you can check the guide at Family Handyman.
Real-life Example: Fixing A Crooked Garage Door
Let’s say your garage door only lifts on one side and you see a loose cable hanging near the floor. Here’s what you would do:
- Open the door fully (with help if needed).
- Clamp the tracks below the rollers.
- Unwind the loose cable from the drum.
- Inspect both cables. If one is frayed, replace both.
- Install new cables on both sides, making sure they’re routed the same way.
- Tighten drums and check for even tension.
- Test the door by opening and closing it several times.
This simple fix can be done in under an hour if you have the right tools. But if the door feels very heavy or springs look damaged, stop and call a pro.
How To Choose The Right Replacement Cable
Buying the correct cable is critical. Here’s what to check:
- Door height: Standard residential doors are 7 or 8 feet tall. Measure yours before buying.
- Cable thickness: Most use 1/8” or 3/32” thick steel cables.
- End type: Some cables have loops, others have crimped ends. Match your old cable.
- Material: Galvanized steel is standard. Choose stainless for wet or salty climates.
Many stores sell “universal” cables, but it’s best to buy the exact match for your door brand and size.
Troubleshooting: If Your Cable Keeps Coming Off
Sometimes, even after replacing the cable, it slips off the drum again. Why does this happen? Here are some causes:
- Door is not balanced – Springs may be weak or stretched.
- Drum is worn or damaged – Grooves can get sharp or bent.
- Cable path is blocked – Check for dirt, spider webs, or bent track sections.
- Improper winding – Cables must wrap around the drum evenly without overlap.
To fix this, check each part closely and adjust as needed. Sometimes, replacing the drum or re-aligning the track is needed.
Diy Or Professional Repair: A Quick Decision Guide
Here’s a summary to help you decide:
| Situation | DIY | Professional |
|---|---|---|
| Only one cable snapped | ✔️ | |
| Both cables off, springs okay | ✔️ | |
| Broken or stretched springs | ✔️ | |
| Very heavy or commercial door | ✔️ | |
| Unsure about process | ✔️ |
When in doubt, safety comes first. Many pros offer free estimates.
Frequently Asked Questions
What Causes A Garage Door Cable To Break?
The most common reasons are wear and tear, rust, and poor maintenance. Cables may also break if the door is out of alignment, or if springs are not balanced properly. Overloading the door or using the wrong size cable can also lead to failure.
Can I Fix A Garage Door Cable Without Special Tools?
Yes, for most standard home doors you only need basic hand tools like wrenches, pliers, and a screwdriver. However, for torsion spring systems or heavy doors, special winding bars and safety tools are needed. If you’re not sure, call a pro.
How Do I Know If My Garage Door Cable Needs Replacing?
Look for frayed wires, rust, or a cable that hangs loose. If the door lifts unevenly or makes scraping noises, inspect the cables. A cable that has slipped off the drum, or looks stretched, should be replaced right away.
Is It Dangerous To Fix Garage Door Cables Myself?
Fixing cables can be safe if you follow proper steps, but there is a risk. Garage door springs are under high tension and can cause injury if handled wrong. Always disconnect power, secure the door, and wear safety gear. For spring repairs, call a professional.
How Long Do Garage Door Cables Last?
Most standard garage door cables last 5-10 years with regular use and maintenance. In coastal or damp areas, they may rust and fail sooner. Inspect them twice a year for signs of wear to avoid sudden failure.
Getting your garage door working again brings peace of mind. With the right tools, steps, and safety, you can fix a garage door cable on your own. If you ever feel unsure, there’s no shame in calling a professional. A well-maintained garage door is safer and lasts longer, saving you time and money in the long run.