Now Reading: How to Reset a Chamberlain Garage Door Remote Quickly and Easily
- 01
How to Reset a Chamberlain Garage Door Remote Quickly and Easily
How to Reset a Chamberlain Garage Door Remote Quickly and Easily
If your Chamberlain garage door remote stops working, it can feel stressful—especially if you’re rushing out or coming home late at night. Many people think they need to call a technician right away. But in most cases, you can reset the remote on your own and save both time and money. This guide will walk you through everything you need to know about how to reset a Chamberlain garage door remote, from understanding how the system works, to fixing common problems, to step-by-step instructions for different Chamberlain models. Even if you’re not a technical person, you’ll find clear steps and practical tips here.
Why Reset A Chamberlain Garage Door Remote?
Before jumping to the steps, it’s important to know why you might need to reset your remote. Sometimes, the remote gets out of sync with the opener. Other times, it’s a security issue—maybe you lost a remote or moved into a new house. Resetting your remote can:
- Fix problems with unresponsive remotes
- Remove old remotes from your opener for security
- Add new remotes or keypads to your system
If your remote is not opening or closing the garage, don’t panic. Resetting is a common first step before buying a new remote or calling for service.
Understanding How Chamberlain Garage Door Remotes Work
Chamberlain is one of the most popular garage door opener brands in the US. Their remotes use radio frequencies (RF) to communicate with the garage door opener. Each remote has a unique code, which “pairs” with the opener. When you press the button, the remote sends a signal to the opener to activate the motor and move the door.
Chamberlain remotes use something called rolling code technology for security. This means every time you use the remote, it creates a new code—making it very hard for anyone to copy or hack. But sometimes, the remote and opener can lose their connection, especially after a power outage, battery change, or interference.
Understanding this basic process makes it easier to follow the reset steps and troubleshoot problems.
Signs You Need To Reset Your Remote
How do you know if you need a reset? Watch out for these signs:
- Remote not working: The door doesn’t move, but the wall button still works.
- Remote only works up close: Short range, even with fresh batteries.
- You bought a new remote: Adding it to your system.
- Lost or stolen remote: For security, you want to erase all remotes.
- After a battery change: Sometimes, the remote needs to be re-paired.
- New home: It’s smart to clear old remotes when you move in.
If you notice any of these, a reset is a good first step.
What To Do Before Resetting
Before you start, take a few simple steps to avoid mistakes or wasted effort:
- Check the batteries: Weak batteries are a common cause of remote problems.
- Look for obstructions: Metal objects or walls can block the signal.
- Try the wall button: If the wall button works, the problem is likely with the remote.
- Confirm your model number: Find your opener’s model on the motor unit (usually on the ceiling of your garage).
- Gather all remotes: If you want to clear all remotes, have them ready to reprogram.
Taking these steps helps you avoid resetting when it’s not needed.

Types Of Chamberlain Remotes And Openers
Chamberlain has made many opener models and remotes over the years. Most work in similar ways, but there are some differences. The main types are:
- Standard single-button remotes: These have one button and control one door.
- Multi-button remotes: These can control multiple doors or lights.
- Keypad remotes: Mounted outside, you enter a code to open the door.
- Mini remotes: Small versions for keychains.
Older models use DIP switches to set the code. Newer models have a Learn button for easy pairing.
Here’s a simple comparison of remote types and their main features:
| Remote Type | Main Feature | Programming Method |
|---|---|---|
| Single-button | One door control | Learn button or DIP switches |
| Multi-button | Controls 2-3 doors/lights | Learn button |
| Keypad | Code entry outside | Learn button |
| Mini remote | Portable, keychain | Learn button |
Knowing your remote type will help you follow the correct reset process.
Tools And Supplies You Might Need
Resetting a Chamberlain remote usually doesn’t require special tools. But these items can help:
- Step ladder: To reach the garage door opener’s motor unit on the ceiling.
- Small flashlight: For dark garages or hard-to-see Learn buttons.
- Pen and paper: To note down settings or codes if needed.
- Fresh batteries: For your remote, just in case.
If your opener is hard to reach, ask for help or be careful using a ladder.
How To Reset A Chamberlain Garage Door Remote: Step-by-step Guide
Now let’s get to the main steps. The process will depend on whether you want to:
- Reset a single remote
- Reset all remotes (clear the memory)
- Reprogram a keypad
Resetting A Single Chamberlain Remote
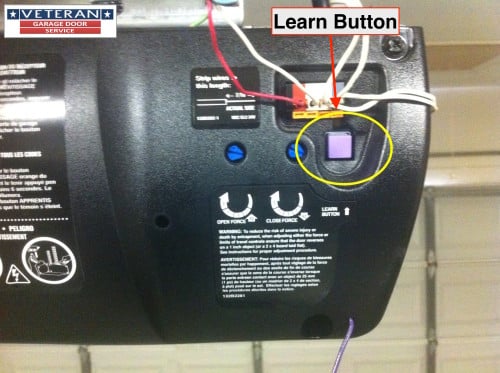
- Locate the Learn button: This is on the garage door opener’s motor unit, which is usually mounted on the ceiling. The button is often near a small LED light. It may be yellow, orange, red, or purple, depending on the model.
- Press the Learn button: Use a ladder if needed. Press and release the Learn button. The LED light will turn on and stay lit for 30 seconds.
- Press the remote button: While the LED is lit, press the button on your remote that you want to program. Hold for a second, then release.
- Wait for confirmation: The opener’s light will blink, or you’ll hear a click. This means the remote is now paired.
- Test the remote: Step back and press the remote button. The door should open or close.
Important note: This process adds or re-syncs the remote. It does not erase all remotes from the system—only adds or resets the one you just programmed.
Clearing All Remotes (erasing The Opener’s Memory)
If you lost a remote, moved into a new home, or want to remove all remotes for security, you need to erase the opener’s memory.
- Find the Learn button: On the garage door opener unit.
- Press and hold: Hold the Learn button for about 6-10 seconds. The LED light will turn off.
- Release the button: All remote controls and keypads have now been erased from memory.
- Reprogram remotes: To use remotes again, follow the steps above for each remote.
This is a powerful security step. It’s like resetting your password—nobody with an old remote can open your garage anymore.
Reprogramming A Chamberlain Keypad
If you have a wireless keypad, you can reset its code without affecting your handheld remotes.
- Press the Learn button: On the opener motor unit, press and release.
- Enter new code: Within 30 seconds, go to your keypad and enter your desired 4-digit code.
- Press Enter: The opener light will blink, confirming the new code.
- Test: Enter your code and press Enter again. The door should open or close.
Most keypads can be reprogrammed this way. If it doesn’t work, check your manual—some very old models use different steps.
Resetting Older Chamberlain Remotes (dip Switch Type)
If you have a remote with tiny switches inside (DIP switches), you’ll need to match the switch positions on both the remote and the opener.
- Open the remote’s battery compartment: Find the row of DIP switches.
- Check the opener’s DIP switches: These are usually inside the motor unit.
- Match the switches: Use a small screwdriver to set the switches in the remote to the same pattern as the opener.
- Close the remote: Test it with the door.
This type is less common today, but you may see them in older homes.
Troubleshooting Common Problems
Even after a reset, sometimes things don’t work right away. Here are some common issues and how to fix them:
Remote Still Not Working
- Check the battery: Replace with a new one, even if the old battery seems fine.
- Signal interference: Electronic devices or LED light bulbs near the opener can cause problems.
- Distance: Try standing closer to the opener.
- Obstructions: Metal doors or walls can block the signal.
Remote Works Up Close But Not Far Away
- Weak battery: Replace.
- Antenna issue: Make sure the opener’s antenna wire is hanging down and not damaged.
Opener Light Blinks But Door Doesn’t Move
- Safety sensors: Check the sensors at the bottom of the door. Clean them and make sure they’re aligned.
- Lock feature: Some wall buttons have a “lock” mode that disables remotes. Hold the lock button for 3 seconds to turn it off.
Keypad Not Responding After Reset
- Battery: Replace keypad battery.
- Wrong code entry: Try reprogramming with the steps above.
Can’t Find The Learn Button
- Consult the manual: Chamberlain’s website has manuals for all models.
- Look for a color: The Learn button is often a bright color—yellow, red, purple, or orange.
How Long Does Resetting Take?
For most people, resetting a Chamberlain remote or keypad takes about 5-10 minutes. Clearing all remotes and reprogramming each one may take a bit longer if you have several devices.
If you follow the steps above, you should be able to complete the process with no special tools or experience.
Safety And Security Tips
Resetting your Chamberlain remote is not just about fixing a problem—it’s also about keeping your home safe.
- Erase old remotes when you move: You never know who has a remote from the previous owner.
- Reset after loss or theft: If a remote is lost or stolen, erase all codes and reprogram the remotes you still have.
- Use strong keypad codes: Don’t use simple codes like 1234 or your address.
- Check for updates: Some newer Chamberlain openers support smartphone controls. Update firmware for better security.
How Chamberlain Compares To Other Brands
You might wonder how Chamberlain’s reset process compares to other brands like LiftMaster or Genie. In fact, Chamberlain and LiftMaster are made by the same parent company, so their reset steps are almost identical. Genie uses a similar “Learn” button process, but the buttons may be labeled differently.
Here’s a quick comparison:
| Brand | Reset Method | Unique Feature |
|---|---|---|
| Chamberlain | Learn button, keypad, DIP switches | Rolling code security |
| LiftMaster | Learn button, keypad | MyQ smart features |
| Genie | Learn button, keypad | Intellicode system |
Knowing the similarities can help if you ever switch brands or help a neighbor.
Two Insights Many Beginners Miss
- The lock button on the wall control can disable all remotes. Many people think their remote is broken or needs resetting, but if the wall control’s lock feature is on, remotes won’t work. Always check the wall button before resetting.
- Resetting the opener erases ALL remotes and keypads. If you erase the opener’s memory, you must reprogram every remote and keypad you want to use again. Don’t skip this step, or you’ll find yourself locked out later.
These are simple steps, but missing them can lead to confusion and wasted time.
When To Call A Professional
Resetting a Chamberlain remote is a good DIY project. But there are times when you might need help:
- The opener doesn’t respond at all, even after resetting.
- Wiring looks damaged or old.
- The door moves unevenly or makes loud noises.
- You can’t reach the opener safely.
In these cases, contact a licensed garage door technician. They can check for electrical problems, worn parts, or other issues you can’t fix with a reset.
Where To Find Chamberlain Manuals And Support
If you need more details, Chamberlain offers manuals and video guides for every model. Visit the official Chamberlain Support page for instructions and troubleshooting help.
You can also find the model number on the back or side of your opener. Search for “Chamberlain [model number] manual” to get the exact steps for your device.
Real-world Examples
Here are a few examples to show how resetting helped real people:
- “We bought a house and didn’t get the remotes from the old owner. I climbed up, held the Learn button to erase all codes, then reprogrammed the remotes we had. Now I know only my family can open the garage.”
- “After a power outage, my remote stopped working. I followed the Learn button steps, and it worked again in two minutes.”
- “My keypad wouldn’t open the door. Replacing the battery and reprogramming the code fixed it.”
These examples show that most problems are easy to fix with the right steps.
Preventing Future Remote Problems
To avoid having to reset your Chamberlain remote too often, try these tips:
- Change batteries once a year
- Keep remotes dry and clean
- Test remotes monthly to catch problems early
- Don’t drop or crush the remote (they are tough, but not indestructible)
- Label your remotes if you have several, so you know which controls which door
A little prevention goes a long way.

Frequently Asked Questions
How Do I Find The Learn Button On My Chamberlain Opener?
The Learn button is usually on the back or side of the opener’s motor unit, mounted on your garage ceiling. It’s often a colored button (yellow, orange, red, or purple) next to a small LED light. You may need a ladder and a flashlight to see it clearly.
Can I Reset My Chamberlain Remote Without Erasing All Remotes?
Yes. If you follow the single remote programming steps (press and release the Learn button, then press the remote button), you only add or reset that remote. To erase all remotes, you must press and hold the Learn button for 6-10 seconds.
Why Does My Remote Only Work When I’m Close To The Garage Door?
This usually means a weak battery or signal interference. Try replacing the battery first. If the problem continues, check for metal objects or electronic devices near the opener that might block the signal.
My Keypad Stopped Working After I Reset My Opener. What Should I Do?
When you erase the opener’s memory, you need to reprogram the keypad using the Learn button steps. Enter your new code within 30 seconds of pressing the Learn button. Make sure the keypad battery is fresh.
Is It Safe To Reset My Chamberlain Garage Door Remote Myself?
Yes. For most people, resetting a Chamberlain remote is safe and simple. Just use a steady ladder, don’t rush, and keep children and pets away while you work. If you feel unsafe or have electrical concerns, call a professional.
Resetting your Chamberlain garage door remote is a simple way to solve many problems and keep your home secure. With the steps in this guide, you’ll be ready to fix most issues in just a few minutes—no special skills needed. And if you ever get stuck, Chamberlain’s support team and manuals are just a click away.


