Now Reading: How to Adjust Garage Door Chain for Smooth, Quiet Operation
- 01
How to Adjust Garage Door Chain for Smooth, Quiet Operation
A garage door is one of the largest moving parts in most homes. For many people, it’s the main way in and out of the house. When everything works smoothly, you barely notice it. But when your garage door gets noisy, jerky, or stuck, it’s hard to ignore. One of the most common reasons for these problems is a loose or too-tight garage door chain. Knowing how to adjust a garage door chain is a skill every homeowner should have. It saves you money, keeps your door running smoothly, and can even extend the life of your garage door opener.
Many people think adjusting a garage door chain is a job for professionals. The truth is, with the right knowledge and tools, most people can do it safely. This guide explains, step by step, how to adjust your garage door chain, why it matters, and what to watch out for.
You’ll learn not just the “how,” but also the “why” behind each step. Let’s help you get your garage door running quietly and reliably again.
Understanding The Garage Door Chain System
Before you pick up a wrench, it helps to know what you’re working with. Most chain-driven garage door openers use a metal chain that pulls a trolley attached to the door. When you press your remote, the motor drives the chain, moving the door up or down. Over time, the chain can stretch or loosen, causing problems.
Key Parts Of A Chain-driven Garage Door Opener
- Chain: The main part that moves the door.
- Trolley: Connects the chain to the door arm.
- Rail: The bar the trolley moves along.
- Motor unit: Powers the chain, usually mounted on the ceiling.
- Sprocket: Gear that moves the chain.
- Tension adjustment bolt: Lets you tighten or loosen the chain.
Each part works together. If the chain is too loose, it can slap against the rail, make noise, or skip. If it’s too tight, it strains the motor and parts, possibly causing early failure.
Why Chain Tension Matters
A chain that’s too loose makes the door jerky, noisy, and may not open all the way. If the chain sags more than about half an inch above the rail, it’s time for an adjustment. A chain that’s too tight puts stress on the opener and can even cause the chain or sprocket to break.
Signs Your Garage Door Chain Needs Adjustment
How do you know if the chain needs attention? Here are the most common signs:
- Loud noises: Banging, rattling, or slapping sounds as the door moves.
- Chain sag: The chain hangs down from the rail, more than a half-inch.
- Door movement issues: Door jerks, hesitates, or does not open smoothly.
- Opener shakes: The motor unit vibrates or moves when opening/closing.
- Delayed response: The door starts moving slowly after you press the button.
If you see or hear these problems, don’t ignore them. Fixing chain tension early can prevent bigger repairs later.
Safety Precautions Before Adjusting The Chain
Working with garage doors can be dangerous if you’re not careful. Here are important safety steps:
- Disconnect power: Unplug the garage door opener before starting.
- Manual release: Pull the emergency release cord to disconnect the door from the opener. This prevents the door from moving unexpectedly.
- Use a stable ladder: Make sure your ladder is on firm ground.
- Wear gloves and safety glasses: Protect your hands and eyes from dirt or metal burrs.
- Check the springs: If your garage door springs are broken or look damaged, do not continue. Call a professional immediately. Springs can be deadly if they snap.
Many beginners forget to unplug the opener, risking electrical shock or unexpected movement. Also, never adjust the chain while the opener is running.
Tools And Materials Needed
Most garage door chain adjustments require basic tools you may already have:
- Wrench set (usually 7/16” or 10mm fits most openers)
- Stepladder
- Protective gloves
- Cloth/rag (for cleaning parts)
- Screwdriver (some models)
- Garage door lubricant (optional)
Make sure you have everything ready before you start. This avoids running up and down the ladder.
Step-by-step Guide: How To Adjust Garage Door Chain
Follow these steps closely for a safe and effective adjustment. If your garage door opener model is different, check your manual for details.
1. Cut The Power
First, unplug the garage door opener from the power outlet. If it’s hardwired, switch off the breaker. This is for your safety.
2. Engage Manual Release
Pull the red emergency release cord. This separates the door from the opener’s trolley. Now, the door can be moved by hand. Check that the door is closed before doing this, so it doesn’t crash down.
3. Inspect The Chain
Look along the chain’s length. Is there more than a half-inch of sag in the middle of the rail? Does the chain look dry, dirty, or rusty? Take note, as you may need to clean or lubricate it after adjusting.
4. Locate The Adjustment Bolt
Find the chain tension adjustment bolt. On most openers, it’s on the trolley assembly, near where the chain meets the rail and trolley.
There are usually two nuts:
- Locknut: Holds the adjustment in place.
- Adjustment nut: Tightens or loosens the chain.
5. Loosen The Locknut
Use your wrench to loosen (but not remove) the locknut. This lets you turn the adjustment nut freely.
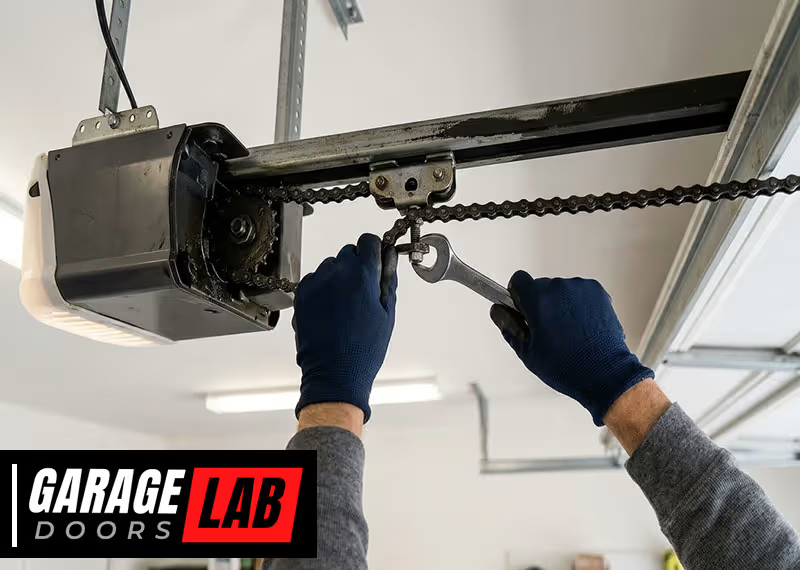
6. Adjust The Chain
Now, turn the adjustment nut:
- Clockwise: Tightens the chain (reduces sag).
- Counter-clockwise: Loosens the chain (increases sag).
Aim for about 1/4 inch to 1/2 inch of sag in the chain at the midpoint between the motor and the door. The chain should be snug but not tight like a guitar string.
Non-obvious tip: If you overtighten, the chain can pull the trolley off the rail or damage the drive gear. Move in small increments, checking the sag each time.
7. Tighten The Locknut
Once the chain tension looks correct, hold the adjustment nut steady and tighten the locknut against it. This keeps the setting from slipping.
8. Lubricate The Chain (optional But Recommended)
A little garage door lubricant on the chain helps reduce noise and wear. Wipe off old grease or dirt first.
9. Reconnect And Test
Plug the opener back in. Re-engage the trolley by moving the door until it clicks back into place or by running the opener once. Use the wall button (not the remote) to test the door. Watch and listen for smooth, quiet movement.
10. Make Fine Adjustments
If the chain still sags or is too tight, repeat the above steps. Sometimes, after the first adjustment, the chain may settle and need a small tweak.
Common Chain Adjustment Problems (and How To Fix Them)
Even after adjusting, you might run into issues. Here’s how to handle them:
Chain Is Still Noisy
- Lubricate the chain and rail.
- Check for worn sprocket or gear.
- Make sure the chain isn’t rubbing against the rail or cover.
Chain Keeps Getting Loose
- The chain might be stretched and need replacement.
- Check the adjustment nuts. If they’re stripped, they won’t hold.
- Examine the sprocket for wear.
Door Won’t Move After Adjustment
- Check if the trolley is properly engaged.
- Make sure the opener is plugged in.
- Test the wall button and remote.
Opener Motor Runs But Chain Doesn’t Move
- The trolley might be disengaged.
- The drive gear or sprocket could be broken.
Chain Binds Or Jumps
- Chain may be too tight.
- Sprocket or rail could be misaligned.
How To Tell If The Chain Is Too Tight Or Loose
Many homeowners make mistakes with chain tension. Here’s a quick guide:
| Chain Condition | What You See | What to Do |
|---|---|---|
| Too Loose | Sags more than 1/2 inch, slaps rail | Tighten chain slightly |
| Just Right | About 1/4 to 1/2 inch sag, moves smoothly | No action needed |
| Too Tight | Chain is straight, feels hard, noisy motor | Loosen chain slightly |
A properly adjusted chain reduces wear on the opener, keeps your door quiet, and helps prevent breakdowns.
When To Replace The Chain Instead Of Adjusting
Chains don’t last forever. If you notice the following, it’s time to replace, not adjust:
- Visible rust or corrosion
- Broken or missing chain links
- Chain keeps stretching or slipping
- Opener makes grinding or skipping noises even after adjustment
Replacement requires detaching the old chain and installing a new one. If you’re unsure, contact a professional.
Adjusting Garage Door Chains Vs. Belts: Key Differences
Some modern openers use rubber belts instead of chains. The steps are similar, but there are differences:
| Feature | Chain Drive | Belt Drive |
|---|---|---|
| Durability | Lasts long, can stretch | Quieter, less stretch |
| Noise Level | Noisy when loose | Very quiet |
| Adjustment Needed | Yearly or when noisy | Rarely needed |
| Replacement Cost | Lower | Higher |
Most chain and belt drives have similar adjustment bolts, but always use the instructions for your specific model.
How Often Should You Adjust The Garage Door Chain?
For most homes, checking the chain tension once a year is enough. If you use your garage door many times a day, check every six months. After very cold or hot weather, check again, as temperature changes can affect chain tension.
Non-obvious insight: If you notice the chain getting loose faster than once a year, the drive gear or sprocket may be wearing out.

Mistakes To Avoid When Adjusting Garage Door Chains
- Forgetting to unplug the opener before starting.
- Overtightening the chain, which strains the motor and gears.
- Not checking the trolley engagement after adjustment.
- Using the wrong size wrench, which can strip nuts.
- Ignoring worn sprockets or rails—chain adjustment won’t fix these problems.
- Skipping lubrication after adjustment.
- Forgetting to tighten the locknut, causing the chain to loosen quickly.
Many beginners focus only on the chain, forgetting that opener health depends on the whole system: springs, rails, trolley, and motor.
Maintenance Tips For A Longer-lasting Garage Door Opener
- Inspect chain and parts yearly for wear and proper tension.
- Clean and lubricate the chain and rail every 6-12 months.
- Check alignment of the rail and opener.
- Test the door balance: Lift the door halfway by hand. If it moves up or down on its own, the springs may need adjustment.
- Listen for changes: Any new noise or jerky movement is a sign to check the chain.
Regular checks and quick adjustments can add years to your garage door opener’s life.
When To Call A Professional
Some problems are too dangerous or complex for DIY. Call a professional if:
- The springs are broken or out of place.
- The motor runs but the chain and door don’t move.
- The chain adjustment doesn’t fix the problem.
- You see worn or broken gears, or hear grinding noises.
- You feel unsafe or unsure about any step.
Spring repair is never a DIY job—it can cause serious injury or death if handled wrong.
Garage Door Chain Adjustment: Cost And Time Estimates
Adjusting a garage door chain is one of the most affordable repairs you can do yourself.
- Time required: 20 to 45 minutes for most people.
- Cost: Usually free if you have basic tools. If parts are needed, a new chain costs $20–$40.
Professional adjustment services typically cost $75 to $150, depending on your location.
Real-world Examples: Garage Door Chain Problems And Fixes
Example 1: Noisy Chain After Winter
A homeowner in Minnesota noticed their garage door was much noisier after a cold winter. The chain sagged more than an inch. They unplugged the opener, adjusted the chain to a 1/4-inch sag, lubricated it, and the noise disappeared.
Example 2: Door Stopped Halfway
In Texas, a homeowner found their garage door stopped halfway when closing. The chain was too tight, so the motor struggled. Loosening the chain slightly fixed the issue and prevented opener damage.
Example 3: Chain Slips Off Sprocket
A family in California had the chain come off the sprocket. The chain had stretched and the adjustment nut was stripped. They replaced the chain and adjustment assembly, solving the problem.
Practical tip: If you need a reference, the Garage Door Openers article at Wikipedia explains opener types and parts in detail.
Comparing Chain Drive And Belt Drive Openers After Adjustment
After adjusting, you might wonder how chain and belt drives compare in real-world use. Here’s a summary:
| Feature | Adjusted Chain Drive | Belt Drive |
|---|---|---|
| Noise | Much quieter, but not silent | Very quiet |
| Maintenance | Needs yearly adjustment | Rarely needs adjustment |
| Strength | Handles heavy doors well | Best for lighter doors |
| Cost | Lower | Higher |
Chain drives are reliable and strong, but need more attention. Belt drives are quieter but cost more.
Frequently Asked Questions
How Tight Should The Garage Door Chain Be?
The chain should have a small amount of sag—about 1/4 inch to 1/2 inch at the midpoint between the motor and the door. If it’s too tight, it can strain the motor. Too loose, and it will slap the rail and make noise.
How Often Do I Need To Adjust My Garage Door Chain?
Most chains need checking and possible adjusting once a year. If you use your garage door very often, check every six months. After big temperature changes, check again.
Is It Dangerous To Adjust The Garage Door Chain Myself?
Adjusting the chain is safe if you unplug the opener and follow instructions. Never work on the springs or high-tension parts yourself—those can be dangerous and should be left to professionals.
What Tools Do I Need For Adjusting The Garage Door Chain?
You’ll need a wrench set (usually 7/16” or 10mm), a stepladder, and possibly a screwdriver. Gloves and eye protection are also recommended.
Can Adjusting The Chain Fix All Garage Door Opener Problems?
No. If the opener has broken gears, damaged sprockets, or broken springs, chain adjustment won’t solve these issues. If the chain keeps getting loose or the door still doesn’t work after adjusting, call a professional.
A well-adjusted garage door chain makes daily life easier and quieter. With simple tools, careful steps, and regular checks, you can keep your opener running smoothly for years. If you ever feel unsure, remember: safety first, and professionals are always there to help.