Now Reading: How to Make a Garage Door: Step-by-Step DIY Guide
- 01
How to Make a Garage Door: Step-by-Step DIY Guide
Building your own garage door may sound complex, but with the right guidance, tools, and patience, it can be a rewarding project. Whether you want to replace an old door, save money, or customize the look of your garage, understanding every step is essential.
In this article, you’ll learn how to make a garage door from start to finish, including planning, material selection, construction, installation, and finishing touches. This guide is designed for beginners and motivated DIYers who want clarity and confidence as they work.
Planning Your Garage Door Project
Before picking up any tools, careful planning is necessary. A garage door is a large, moving part of your home, so safety, fit, and durability are critical.
Measuring The Opening
Begin by measuring your garage door opening. Use a tape measure for these steps:
- Width: Measure from one side of the opening to the other at the widest part.
- Height: Measure from the floor to the top of the opening.
- Sideroom: Check the space on both sides of the opening (minimum 3.5 inches is ideal).
- Headroom: Measure from the top of the opening to the ceiling. You need at least 10-12 inches for a standard track.
- Backroom: This is the distance from the opening to the back wall. The door length plus 18 inches is a safe minimum.
Write down these numbers and double-check them. Many beginners only measure once, but small mistakes can cause big problems later.
Choosing The Door Type
There are a few common types of garage doors:
- Sectional doors: Made from panels, open overhead by sliding on tracks.
- One-piece tilt-up doors: A single solid piece that tilts out and up.
- Sliding barn-style doors: Move sideways on a rail; need extra wall space.
- Side-hinged doors: Open like regular doors; good for small garages.
Most homeowners choose sectional or tilt-up doors for convenience and space-saving. Sectional doors are the most popular and easiest for DIY building.
Deciding On Insulation And Security
Think about your climate and security needs. If your garage is attached or you store valuable items, consider adding insulation and a strong locking system.
Sketching Your Design
Draw a simple sketch of your door. Mark the size, number of panels, window placement (if any), and how it will open. This sketch will guide your material choices and construction steps.
Selecting Materials And Tools
The right materials and tools will make your project smoother and the door longer-lasting.
Common Materials
- Wood: Offers a classic look, easy to work with, but needs regular maintenance.
- Steel: Very durable, secure, and low-maintenance. Heavier and harder to cut.
- Aluminum: Lightweight, resists rust, but can dent more easily.
- Composite/PVC: Resists rot and insects, but can be expensive.
For first-time builders, wood is often the best choice for its flexibility and appearance.
Example Material List For A Standard 8’ X 7’ Wooden Sectional Door
- 2×4 or 2×6 lumber (frames)
- Plywood or tongue-and-groove boards (panels)
- Wood glue and exterior screws
- Hinges and rollers (garage door hardware kit)
- Garage door track and torsion spring system
- Weatherstripping
- Exterior paint or wood stain
- Handles and locks
Tools Needed
- Circular saw or table saw
- Power drill with bits
- Measuring tape
- Carpenter’s square
- Level
- Screwdriver set
- Hammer
- Wrenches (for hardware installation)
- Safety goggles and gloves
Many beginners forget to buy a quality level. This tool is critical for ensuring the door sits and moves correctly.
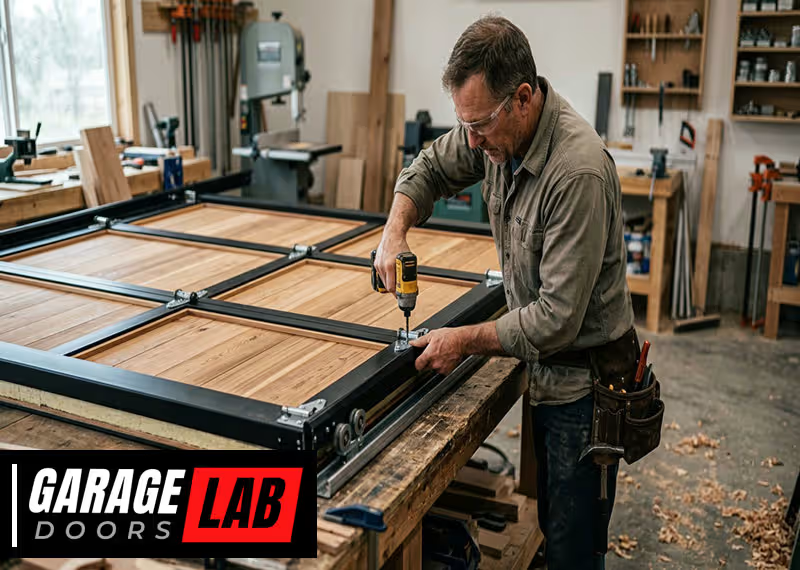
Building The Garage Door Panels
Most sectional doors are made up of three or four horizontal panels. Each panel must be strong and straight.
Cutting The Frame Pieces
Cut your 2×4 or 2×6 lumber to the width of your door. You’ll need two long pieces (top and bottom) and two shorter pieces (sides) for each panel.
Lay the pieces out on a flat surface. Use a carpenter’s square to make sure corners are at 90 degrees.
Assembling The Panel Frames
Use wood glue at each joint, then screw the pieces together. Check for squareness again. Repeat for each panel.
Some builders add a diagonal brace inside each frame for added strength. This is especially helpful for larger doors.
Attaching The Panels
Cut plywood or tongue-and-groove boards to size. Attach them to the frames using exterior screws. Ensure each panel is flat and there are no gaps.
Sand edges and surfaces to remove splinters and rough spots.
Adding Window Openings (optional)
If you want windows, cut openings in the upper panel before attaching the plywood. Frame the window openings with small strips of wood for support.
Install acrylic or glass panes with weatherproof caulk and trim for a finished look.
Joining Panels And Installing Hardware
Once your panels are built, you need to connect them and prepare for mounting.
Attaching Hinges
Lay the panels face-down, in order. Attach hinges between each panel, following hardware instructions. Use at least three hinges per connection (one at each end, one in the center).
Hinges must be strong enough to support the weight. Use only hardware rated for garage doors.
Installing Rollers And Tracks
Insert rollers into the side hinges. Lay out your garage door tracks along the sides of the opening. Mark and pre-drill mounting holes.
Secure the tracks with heavy-duty screws. Tracks must be completely vertical and parallel to each other. Use a level to check.
Comparing Door Materials
Choosing the right material affects cost, durability, and maintenance. Here’s a comparison:
| Material | Durability | Maintenance | Cost | Appearance |
|---|---|---|---|---|
| Wood | Medium | High | $$ | Classic, customizable |
| Steel | High | Low | $$$ | Modern, plain |
| Aluminum | Medium | Low | $$ | Sleek, modern |
| PVC/Composite | High | Very Low | $$$$ | Varies |
Beginners often overlook the total long-term maintenance costs—wood doors require repainting or staining every 2-3 years.

Installing The Garage Door
This is the step where safety matters most. Garage doors are heavy, so always have at least one helper.
Mounting The Panels
Start by lifting the bottom panel into the tracks. Make sure it sits level on the floor. Secure it to the track with temporary nails or clamps.
Add the next panel above, connecting the hinges. Insert the rollers into the track. Continue until all panels are stacked and connected.
Attaching The Tracks
With all panels in place, attach the vertical tracks to the garage wall. Use lag bolts and ensure each side is level and secure.
Install the curved and horizontal tracks, following the instructions from your hardware kit. These tracks guide the door as it moves overhead.
Installing The Spring System
Most garage doors use a torsion spring or extension spring system to counterbalance the weight. This is the most dangerous part of installation. If you are not experienced, consult a professional for this step.
If you choose to install it yourself:
- Carefully read all instructions.
- Wear eye protection.
- Never wind or unwind springs without the proper tools.
- Always keep your face and body away from the path of the spring.
A spring breaking under tension can cause severe injury.
Comparing Spring Types
Here’s a side-by-side look at common spring systems:
| Spring Type | Location | Pros | Cons |
|---|---|---|---|
| Torsion Spring | Above door | Smoother, longer life | Harder to install |
| Extension Spring | Alongside tracks | Easier for DIY | Less durable, more parts |
Many beginners don’t realize that choosing the wrong spring type can lead to a door that’s too heavy or unbalanced.
Adding Finishing Touches
The final steps protect your door and improve its appearance.
Installing Weatherstripping
Apply weatherstripping around the door frame and between panels if needed. This keeps out wind, water, and insects.
Use a rubber or vinyl sweep at the bottom. Attach it with screws or adhesive for a tight seal.
Painting Or Staining
Choose an exterior-grade paint or stain. Paint adds a protective layer; stain lets the wood’s beauty show. Apply two coats, letting each dry fully.
Sand lightly between coats for a smooth finish. Don’t forget to paint all edges and the bottom, which often get missed.
Adding Handles And Locks
Install sturdy handles inside and out for easy lifting. Add a secure lock or deadbolt, especially if your garage stores valuables.
Some DIYers also add decorative hardware (like faux hinges) for a custom look.
Testing And Adjusting The Door
Before using your door daily, check these points:
- Balance: Open the door halfway. It should stay in place. If not, the spring tension needs adjusting.
- Smooth Operation: Raise and lower the door several times. It should move smoothly without sticking.
- Noise: Listen for grinding or scraping. Lubricate hinges, rollers, and tracks with garage door lubricant.
- Alignment: Check that the door sits flush against the floor and frame. Adjust tracks if there are gaps.
If you find problems, don’t force the door. Go back and make small adjustments.
Adding An Automatic Opener (optional)
An automatic opener is a huge convenience, but not required. If you want to add one, buy a kit designed for your door’s weight and size.
Steps To Install
- Attach the opener bracket to the top panel.
- Mount the opener motor to the ceiling, using lag bolts in ceiling joists.
- Connect the opener arm to the bracket and motor.
- Plug in the opener and program remotes according to the manual.
Test the opener’s safety reversal system. Place a block under the door; the opener should reverse if it touches the object.

Maintenance Tips For Long Life
A garage door is an investment. With proper maintenance, it can last 15-30 years.
- Lubricate all moving parts (rollers, tracks, hinges) every 6 months.
- Inspect springs and cables for wear or rust.
- Check alignment if the door becomes noisy or hard to move.
- Repaint or reseal wood doors every few years.
- Test the balance twice a year.
Many people forget regular checks, leading to expensive repairs later.
Common Mistakes And How To Avoid Them
Even careful builders make errors. Here are some to watch for:
- Measuring only once: Always measure at least twice before cutting.
- Skipping safety steps: Springs and heavy panels are dangerous. Use safety gear and get help.
- Using weak hardware: Don’t use regular door hinges—garage door hardware is much stronger.
- Ignoring weatherstripping: Small gaps waste energy and invite pests.
- Forgetting finishing: Unpainted wood absorbs water and warps.
A less obvious mistake is not checking local building codes. Some areas have rules about garage door wind resistance or fire ratings. Always check before building.
Sample Project Timeline And Cost Breakdown
Here’s a sample timeline for a DIY wooden sectional door (8’ x 7’ size):
| Task | Time (hrs) | Cost (USD) |
|---|---|---|
| Measuring & Planning | 2 | 0 |
| Buying Materials | 2 | 600 |
| Cutting & Assembling Panels | 6 | 0 |
| Hardware & Installation | 4 | 300 |
| Painting/Staining | 3 | 50 |
| Finishing Touches | 2 | 50 |
| Total | 19 | 1000 |
Costs can vary based on material prices and hardware choices.
Two Non-obvious Insights For Successful Diy Garage Doors
- Panel Weight Matters: Many first-timers build panels too heavy, making the door hard to lift and placing stress on hardware. Use lighter wood, and avoid thick panels. If the total weight exceeds 150 lbs for a single-width door, consider reducing thickness or switching materials.
- Panel Sealing: Water often seeps into unsealed panel edges, causing rot and swelling. After cutting panels, seal every edge with paint or wood sealer before assembly for long-term durability.

When To Call A Professional
While most of the project is DIY-friendly, two steps are best left to professionals:
- Spring installation: If you lack experience, hire a garage door technician.
- Garage door opener wiring: If you are not comfortable with electrical work, get help.
This saves time, money, and reduces risk.
Additional Resources
For extra safety tips and advanced installation details, the official Family Handyman guide is a trustworthy resource.
Frequently Asked Questions
How Long Does It Take To Build A Garage Door?
Building a garage door usually takes 2-3 days for first-timers, including measuring, construction, installation, and finishing. This can vary based on your skill level and whether you have helpers.
Can I Use Recycled Materials For My Garage Door?
Yes, you can reuse lumber or panels if they are straight, strong, and free from rot. However, make sure all hardware (hinges, springs, tracks) is new and rated for garage door use for safety.
What Is The Safest Way To Install Garage Door Springs?
The safest way is to hire a professional. If you do it yourself, use manufacturer instructions, wear safety gear, and never stand in the path of a loaded spring. Always use the right winding bars and tools.
How Much Weight Can A Typical Garage Door Opener Lift?
Most residential openers are rated for 150-350 lbs. Always check your opener’s manual, and do not exceed its weight rating. If your door is heavier, upgrade the opener or lighten the panels.
Do I Need A Permit To Build A Garage Door?
In many areas, yes. Check with your local building authority. Some regions require permits for new doors, especially for fire safety, wind resistance, or structural changes.
Building your own garage door is a big challenge, but with careful planning and attention to detail, you can achieve a door that’s safe, reliable, and adds value to your home. Take your time, measure carefully, and don’t hesitate to ask for help when needed.
Your garage door will open smoothly for years to come.


