Now Reading: How to Re Engage Garage Door: Quick Fixes for Smooth Operation
- 01
How to Re Engage Garage Door: Quick Fixes for Smooth Operation
Re-engaging your garage door can feel confusing, especially after an unexpected power outage or when the automatic opener fails. Many homeowners face this situation but are unsure where to start. A garage door that’s stuck in manual mode is not only inconvenient—it can also be a security risk.
Learning how to re-engage your garage door safely and correctly saves you time, money, and stress. This guide will walk you through everything you need to know, from understanding how your garage door opener works to step-by-step instructions, safety tips, and troubleshooting advice.
You’ll also get insights that most beginners miss, so you can handle your garage door with confidence.
What Does “re-engage Garage Door” Mean?
When people talk about “re-engaging” a garage door, they mean reconnecting the door to its automatic opener system. Most garage doors have a manual release mechanism—usually a red cord or handle—that disconnects the door from the opener. This is useful during power failures or emergencies, allowing you to open and close the door by hand. But after the power returns or the issue is fixed, you want the door to work automatically again. That’s where re-engagement comes in.
Many people believe re-engaging is complicated. In reality, the process is simple once you understand the mechanism. However, each type of opener has slightly different steps, and missing a detail can cause problems.
Why Would You Need To Re-engage Your Garage Door?
Several situations require you to re-engage your garage door opener:
- After a Power Outage: When electricity goes out, you often use the manual release to open or close the door.
- Opener Malfunction: If the automatic system fails, you might need to switch to manual mode temporarily.
- Routine Maintenance: Technicians sometimes disconnect the door to check balance or repair parts.
- Emergency Situations: In case of fire or if someone is trapped, you may need to operate the door manually.
- Testing or Inspection: Homeowners sometimes test the manual release to ensure it’s working.
After any of these events, you’ll need to reconnect the door so the opener can take over again.
Understanding The Garage Door Opener System
Before you start, it helps to understand how your system works. Most residential garage doors use one of these opener types:
- Chain-drive openers
- Belt-drive openers
- Screw-drive openers
All modern systems have a trolley—a moving part attached to the opener’s rail. The trolley connects or disconnects from the door’s arm using a spring-loaded mechanism and the manual release cord.
Here’s a quick breakdown:
| Opener Type | Manual Release Location | Typical Re-Engage Method |
|---|---|---|
| Chain-Drive | Red cord near opener rail | Pull cord, move door, run opener |
| Belt-Drive | Red cord near opener rail | Same as chain-drive |
| Screw-Drive | Red cord or lever on trolley | Usually requires moving door to re-connect |
Pro Tip: Always check your garage door’s manual. Some high-end or older systems may have unique designs. If you can’t find your manual, most are available online by searching your opener’s brand and model.
Safety Precautions Before Re-engagement
Working with garage doors can be risky if you’re not careful. A typical residential garage door weighs between 130 and 400 pounds. Mishandling the door or opener can lead to injuries or property damage.
Follow these safety steps:
- Disconnect Power: Turn off the opener at the wall switch or unplug it. This prevents accidental activation while you work.
- Clear the Area: Make sure children, pets, and obstacles are away from the door’s path.
- Inspect the Springs: Look for broken or stretched torsion or extension springs. If you see damage, stop and call a professional.
- Check the Door Balance: In manual mode, lift the door halfway. If it stays in place, it’s balanced. If it falls or rises, the springs may need adjustment.
- Wear Gloves and Safety Glasses: This protects your hands and eyes from sharp edges or debris.
Bonus Insight: Many injuries happen because people stand directly under the door or don’t secure the opener power. Always stay to the side and double-check the plug.

Step-by-step: How To Re-engage Your Garage Door
The exact method depends on your opener, but most residential doors follow these general steps.
Step 1: Ensure The Door Is In The Closed Position
Start with the door fully closed. This is the safest position, as a partially open door can drop suddenly when reconnected.
If the door is not closed:
- Carefully lower it by hand, keeping your back straight and using both hands.
- If it’s heavy or difficult to move, stop and call for help.
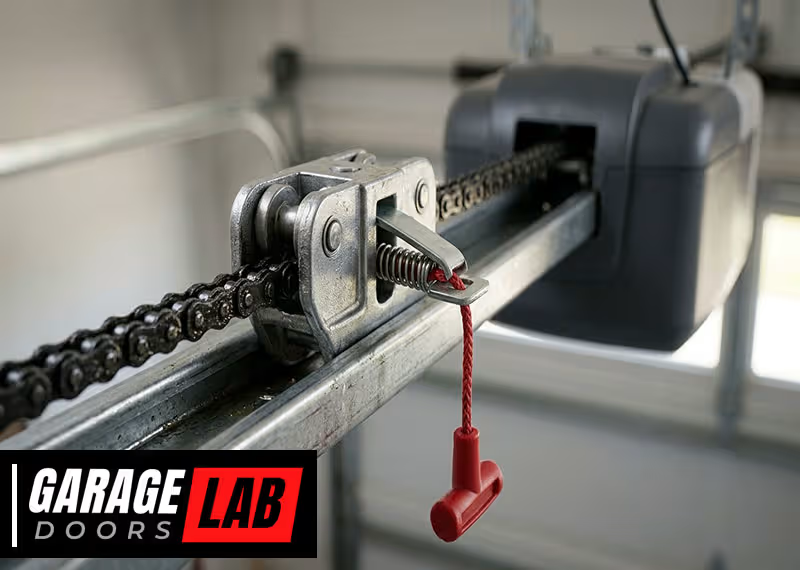
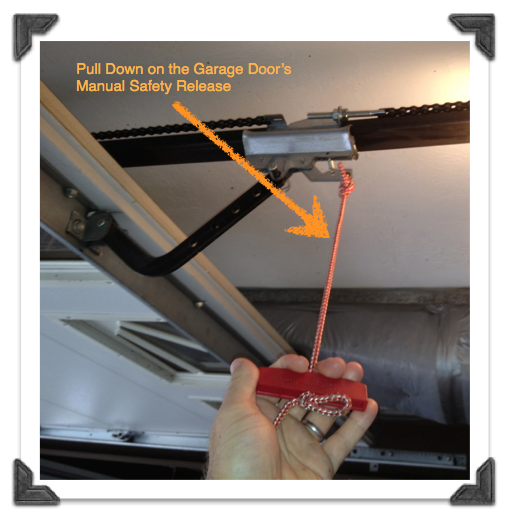
Step 2: Locate The Manual Release Cord
Find the red cord hanging from the opener rail. This is usually near the center of the garage ceiling, just above the door.
- The cord may have a plastic handle for better grip.
- If you can’t see it, use a flashlight.
Step 3: Move The Door Or Trolley To The Correct Position
For most openers, you need the trolley to line up with the opener carriage.
- Some systems require you to push the door toward the opener until you hear a “click.”
- Others need you to use the remote control to run the opener, which will automatically reconnect the trolley.
Common beginner mistake: Forcing the trolley when it’s not aligned. This can break the mechanism.
Step 4: Re-engage The Opener
There are two main methods:
- Manual Reconnection: Pull the red cord toward the opener (not straight down) until you hear a snap or click. The trolley should lock into place.
- Automatic Reconnection: With the opener plugged in, press the remote or wall button. The opener will move, and the trolley will automatically reconnect when it reaches the carriage.
If you’re unsure which method to use, try the manual method first. If it doesn’t click in, run the opener once.
Step 5: Test The Door
Run the opener using your remote or wall switch. The door should move smoothly and stop at the correct open and closed positions.
- Listen for grinding, scraping, or unusual noises.
- Watch the door’s movement—if it jerks or hesitates, stop and check for obstructions.
Step 6: Reset Keypads Or Remotes (if Needed)
Sometimes, after a power outage, remotes or keypads may lose their programming. Follow your opener’s manual to reprogram if needed.
Practical example: On most LiftMaster openers, you press the “Learn” button on the unit, then press the desired remote button within 30 seconds.
Troubleshooting Common Problems
Even with careful steps, you might run into issues. Here’s how to handle the most common ones:
The Door Won’t Re-engage
- Possible Causes: Trolley not aligned, damaged release mechanism, opener power off.
- Solution: Make sure the door is fully closed and the trolley is under the carriage. Try both manual and automatic reconnection.
The Door Moves, But Makes Loud Noises
- Possible Causes: Misaligned tracks, lack of lubrication, loose hardware.
- Solution: Inspect tracks and rollers, tighten loose bolts, apply silicone-based lubricant to moving parts.
Opener Runs, But Door Doesn’t Move
- Possible Causes: Trolley not engaged, broken chain/belt, stripped gears.
- Solution: Check if the trolley is locked in. Inspect the chain or belt for breaks. If gears are stripped, call a professional.
Door Falls Or Rises On Its Own
- Possible Causes: Spring tension incorrect, door not balanced.
- Solution: Test door balance in manual mode. If the door won’t stay halfway, springs may need adjustment by a pro.
Remotes Or Keypads Not Working
- Possible Causes: Power surge, lost programming.
- Solution: Reprogram remotes/keypads according to the opener’s manual.
When To Call A Professional
Not all garage door problems are DIY-friendly. Here’s when you should stop and call an expert:
- Broken springs or cables
- Bent or damaged door panels
- Persistent opener malfunctions
- Repeated safety sensor errors
- Unusual burning smells or sparks
Many homeowners underestimate the force in garage door springs. Trying to adjust or replace them without training can cause serious injury.
Insider tip: If your door is older than 10 years, or if you notice rust on springs or cables, get a professional inspection at least once a year.
Preventing Garage Door Disengagement Problems
A little maintenance goes a long way. Here are some tips to keep your garage door running smoothly:
- Lubricate Moving Parts: Every 6 months, apply silicone-based lubricant to rollers, hinges, and tracks.
- Test the Manual Release: Practice disengaging and re-engaging the door once a year so you’re confident in an emergency.
- Inspect Springs and Cables: Look for signs of wear—fraying, rust, or separation—and call a pro if needed.
- Clear Obstructions: Keep the tracks and area around the opener free from dust, debris, and insects.
- Check Safety Sensors: Wipe the photo-eye sensors clean and make sure they’re aligned.
These steps not only prevent sudden failures but also extend the life of your opener system.
Special Considerations For Different Garage Door Types
While the basic steps apply to most doors, certain types require extra care.
Sectional Garage Doors
These are the most common in the US. They use horizontal panels and roll up along tracks. The release and re-engage process is usually straightforward, as described above.
One-piece Tilt-up Doors
Some older homes have single-panel doors that swing up and out. These often have heavier springs and a different release mechanism.
- Always check the manufacturer’s instructions.
- Never try to re-engage if the door feels unstable.
Insulated Or Heavy Custom Doors
Doors with added insulation or custom materials may weigh more than standard models. You may need a helper to move the door safely.
Pro Insight: If your door feels much heavier than before, a spring may have failed. Do not try to re-engage until it’s fixed.
Comparing Manual Vs. Automatic Operation
Understanding the pros and cons of each mode can help you decide when to use manual release and when to re-engage.
| Mode | Pros | Cons |
|---|---|---|
| Manual | No power needed, works in emergencies, simple to operate | Physically demanding, less secure, can be unsafe if springs fail |
| Automatic | Convenient, secure, safer with built-in sensors | Won’t work in power outage, depends on electronics, may need maintenance |
Extra insight: Many people think leaving a garage door in manual mode is safer during storms. In reality, automatic mode with working sensors offers better security and protection.
Garage Door Re-engagement: Avoiding Common Mistakes
Mistakes can damage your door or opener, or even cause injuries. Here’s what to watch out for:
- Forcing the Mechanism: If something feels stuck, stop. Forcing the trolley or release cord can break internal parts.
- Ignoring Strange Noises: Grinding or scraping sounds mean something is wrong. Investigate before using the door again.
- Skipping the Balance Test: Always check the door balance in manual mode before re-engaging. An unbalanced door strains the opener and can fail suddenly.
- Standing Under the Door: Always work from the side—never stand directly underneath, especially when testing.
- Not Restoring Power Safely: Make sure your hands and tools are clear before plugging the opener back in.
Advanced Tips For Long-term Reliability
Most guides stop at basic instructions. Here are a few advanced steps to keep your garage door reliable for years:
- Record Serial Numbers and Manuals: Keep a list of your opener’s model and serial number. This speeds up repairs or part orders.
- Install a Surge Protector: Power surges can damage openers. A simple surge protector can prevent costly repairs.
- Upgrade to Battery Backup: Many new openers include backup batteries, so you can use automatic mode even during outages.
- Regularly Test Safety Sensors: Place a small object in the door’s path when closing. The door should reverse instantly. If not, clean and realign the sensors.
Non-obvious insight: Some insurance companies ask about garage door opener safety features when quoting rates. Well-maintained doors can lower your premiums.

Signs Your Opener Needs Replacement
Sometimes, repeated re-engagement problems point to a failing opener. Look for these signs:
- Frequent manual release use: If you need to switch to manual often, your opener may be unreliable.
- Slow or jerky movement: Consistent hesitation or slowness can mean the motor or gears are worn.
- Unusual smells or smoke: Electrical burning smells are a sign to replace the unit immediately.
- Remote or keypad issues: If remotes stop working even after battery changes and reprogramming, the receiver may be failing.
Modern openers offer advanced safety and smart features. If your unit is over 10–15 years old, consider upgrading for peace of mind.
Garage Door Opener Brands And Re-engagement Differences
Most brands use similar mechanisms, but a few have unique steps or features.
| Brand | Unique Re-Engage Feature | Common Issue |
|---|---|---|
| Chamberlain | Automatic re-engage with opener run | Release cord may fray over time |
| LiftMaster | Manual or automatic re-engage options | Sensor misalignment common after power loss |
| Genie | Some use a release lever instead of a cord | Older models can stick in manual mode |
Always check your specific opener’s manual or website for brand-specific instructions.
Final Checklist For Re-engaging Your Garage Door
Before you finish, make sure you’ve:
- Closed the door fully before starting
- Cleared the area for safety
- Checked for spring or cable damage
- Located and operated the manual release
- Moved the door or trolley as needed
- Listened and watched for smooth operation on test run
- Reprogrammed remotes/keypads if necessary
- Restored all safety features
Following these steps ensures your door is safe, secure, and ready for daily use.
Frequently Asked Questions
What If My Garage Door Won’t Re-engage After Following All The Steps?
If your door won’t reconnect, first check that the trolley is lined up with the opener carriage, and that the opener is plugged in. Make sure the release cord or lever isn’t damaged. If the problem continues, the mechanism may be worn or broken, and it’s best to call a professional technician.
Is It Safe To Re-engage My Garage Door Myself?
Yes, as long as you follow safety precautions: disconnect power, check for damaged springs, and keep the area clear. If the door feels unusually heavy or you notice broken parts, stop and seek professional help. Never try to adjust springs or cables yourself.
How Often Should I Test The Manual Release Function?
It’s a good idea to test your garage door’s manual release at least once a year. This ensures it works properly in an emergency, and helps you stay familiar with the process. Always perform the test with the door closed for maximum safety.
What Should I Do If The Release Cord Breaks?
If the release cord breaks or frays, many home improvement stores sell replacement kits. Make sure to buy one compatible with your opener brand. If you’re unsure how to install it, or if the mechanism inside the trolley is damaged, call a garage door repair expert.
Where Can I Find More Detailed Instructions For My Opener Model?
Most manufacturers have downloadable manuals and troubleshooting guides on their websites. For example, you can find resources for many brands on the official Garage Door Opener Wikipedia page.
A properly re-engaged garage door is vital for safety, convenience, and security. By understanding the system, following detailed steps, and maintaining your opener, you’ll keep your garage running smoothly for years. If ever in doubt, don’t hesitate to reach out to a professional—your safety is always worth it.


