Now Reading: How to Change Garage Door Code on Keypad: Easy Step-by-Step Guide
- 01
How to Change Garage Door Code on Keypad: Easy Step-by-Step Guide
How to Change Garage Door Code on Keypad: Easy Step-by-Step Guide
Changing the code on your garage door keypad is more than just a security task—it’s a way to keep your home and family safer. Many homeowners forget about their garage door opener code, but it’s a common target for intruders.
If you move into a new house, lose your remote, or simply want to refresh your home security, updating the code is a smart choice.
You don’t need to be a tech expert or call a professional every time you want to change your keypad code. With a bit of patience and clear instructions, most people can do it themselves. This guide walks you through the process, from understanding your keypad type to resetting and choosing a new code.
You’ll also learn how to avoid common mistakes and maintain your system for long-term security.
Understanding how your garage door keypad works gives you more control over your home’s access. You’ll also pick up some tips that many first-timers miss, like testing your new code before closing the unit and checking for hidden “learn” buttons.
Let’s dive in and make sure your garage is as secure as it should be.
Why Change Your Garage Door Keypad Code?
Many homeowners rarely think about their garage door code after installation. However, there are several good reasons to update it:
- Improved Security: Old codes can be guessed or known by previous owners, neighbors, or contractors. Changing the code keeps your home safe from unauthorized entry.
- Lost or Stolen Remotes: If you lose a remote or suspect someone else has access, updating the keypad code and clearing old remotes can prevent break-ins.
- Moving to a New Home: Always reset the code when you move in. You never know who still remembers or has access to the old code.
- Routine Maintenance: Changing codes regularly (every 6-12 months) is a simple way to stay ahead of potential security risks.
- Multiple Users: If you have house guests, cleaners, or short-term visitors, a new code lets you control who can enter and when.
Non-obvious insight: Many modern garage door openers store several codes and remote signals, so simply changing the keypad is not always enough. You may need to clear old remotes from the opener’s memory for full security.
Types Of Garage Door Keypads And Openers
Not all keypads are the same. Understanding your system’s brand and model helps you find the right instructions and avoid mistakes.
Common Brands And Systems
Some popular brands include:
- LiftMaster (also branded as Chamberlain or Craftsman)
- Genie
- Overhead Door
- Wayne Dalton
Each brand may use a different method for changing codes, especially older models.
Wired Vs Wireless Keypads
Wired keypads connect directly to your garage door opener. They’re less common in newer homes.
Wireless keypads are battery-operated and communicate with the opener using radio signals. Most homes built after 2000 use wireless keypads.
Rolling Code Technology
Many modern openers use rolling code technology. This means the code changes automatically every time you use it, making it harder for intruders to “capture” your code with a scanner. However, the main keypad code is still set by the homeowner and should be changed if compromised.
Tip: If your opener was made after 1993, it likely uses rolling code technology. Check your manual for details.
How To Identify Your System
Look for a model number on the back or side of your opener unit, or inside the battery cover of the keypad. If the brand or model is missing, search for a sticker or label. You can also look up the color of the “learn” button (usually yellow, red, green, or purple) to find compatible keypads and remotes.

Tools And Preparation
Changing your garage door keypad code is usually a quick job, but a little preparation makes the process smoother.
What You’ll Need
- A sturdy ladder: For reaching the garage door opener unit if needed.
- A flashlight: To see inside darker garage spaces.
- Small screwdriver: (if your keypad’s battery cover or unit needs to be opened).
- The garage door manual: (optional, but helpful for specific models).
- New code: Choose a code that’s easy to remember but not obvious (avoid birthdays or house numbers).
Safety Tips
- Make sure the garage area is well-lit.
- Keep children and pets away while you work.
- Do not stand directly under the opener unit.
- Avoid using easily guessed codes like “1234” or “0000.”
Step-by-step Guide: How To Change Garage Door Code On Keypad
The exact process can vary between brands, but most garage door keypads follow a similar pattern. Here’s a step-by-step guide that covers the most common systems.
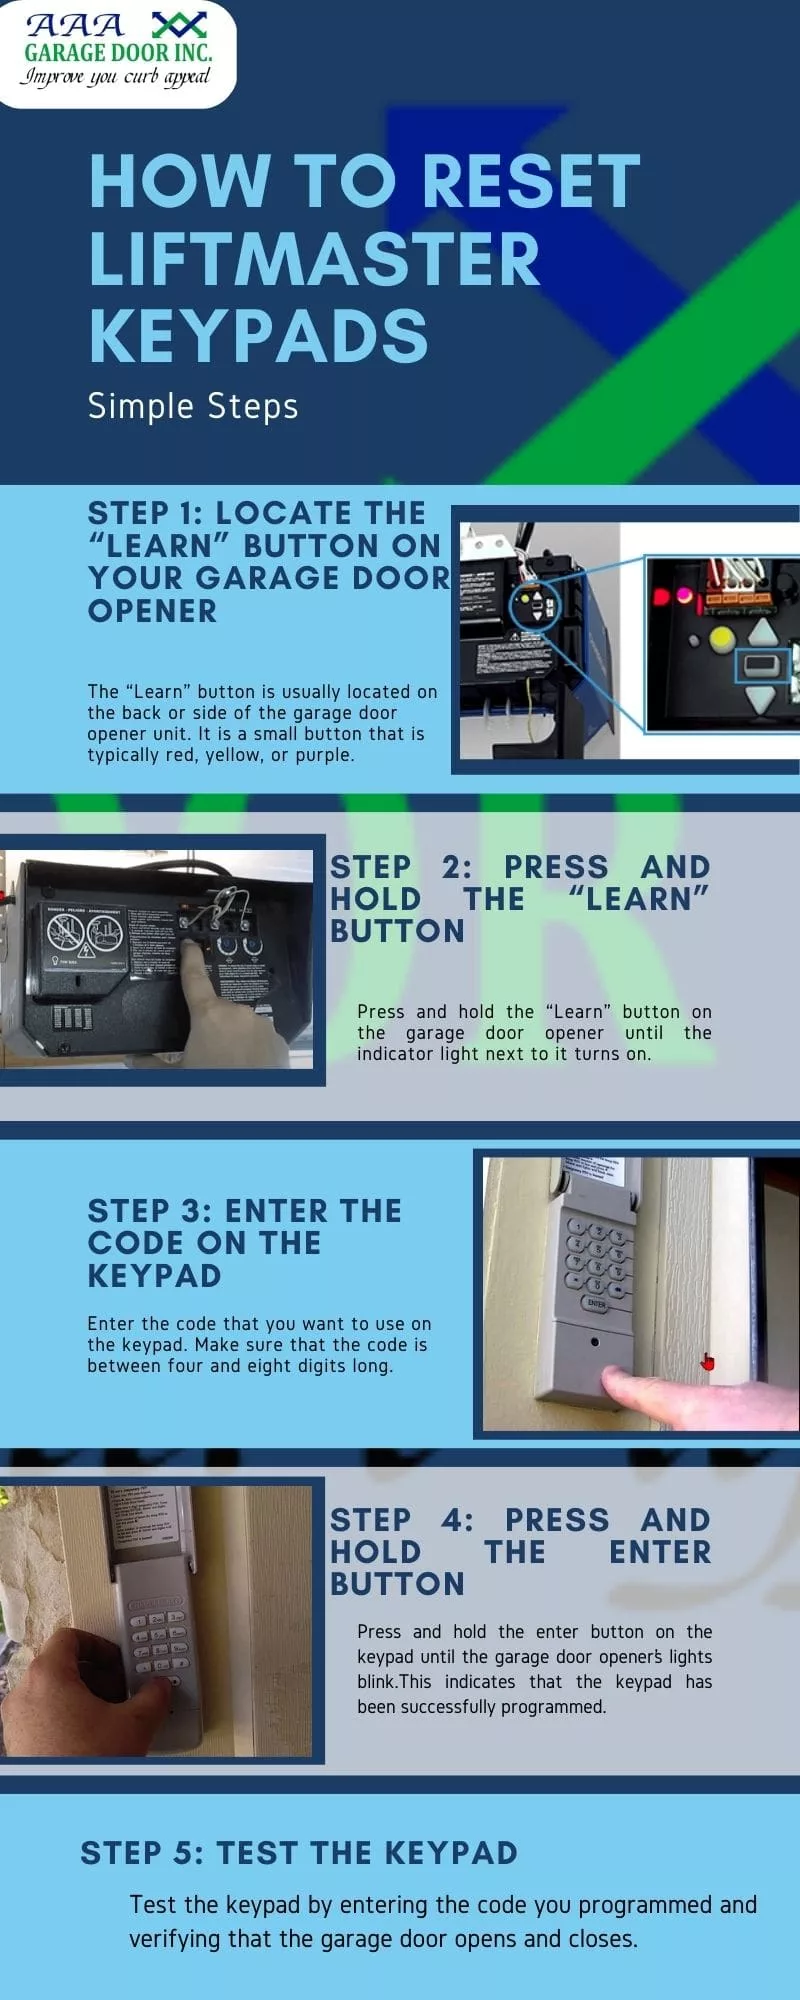
1. Locate The “learn” Or “program” Button
Most modern openers have a “learn” button on the main unit inside your garage. It’s often located near the antenna wire or under a light cover.
- LiftMaster/Chamberlain/Craftsman: The button is usually yellow, red, purple, or green.
- Genie: May have a “learn” or “program” button, often labeled.
- Older models: Some have a reset button on the keypad itself.
Non-obvious insight: On some openers, the “learn” button is hidden behind a light cover. Gently open or slide the cover to access it.
2. Clear Old Codes (optional But Recommended)
If you’ve lost a remote or are moving into a new home, clear all old codes:
- Press and hold the “learn” button until the indicator light turns off (usually 6-10 seconds).
- This action erases all remotes and keypad codes from the opener’s memory.
Warning: You’ll need to reprogram all remotes after doing this step.
3. Enter Programming Mode
- Go to your keypad (usually mounted outside the garage door).
- Enter the existing code (if you know it), then press the “Enter” or “Program” button.
- Some keypads require you to press and hold the button until the keypad blinks.
If you don’t know the old code: You’ll need to reset the keypad by using the “learn” button on the opener unit.
4. Set A New Code
- After entering programming mode, key in your new 4-digit (or sometimes 6-digit) code.
- Press the “Enter” button again.
- The opener unit’s light should blink, or you’ll hear a click—this means the code was accepted.
Example: On a LiftMaster keypad, you might enter: [old code] + “#”, then [new code], then “Enter.”
5. Test Your New Code
Stand clear of the door. Enter your new code on the keypad and press “Enter. ” The garage door should open or close.
- If it works, you’re done.
- If not, repeat the steps carefully. Some keypads require you to complete all steps within 30 seconds.
6. Re-program Remote Controls (if Needed)
If you cleared all codes from the opener unit, you’ll need to reprogram each remote. Follow the manufacturer’s instructions (usually involves pressing the “learn” button and then the remote’s button).
7. Secure The Keypad
Replace the keypad cover and make sure it’s firmly attached to the wall. If the keypad is battery-operated, check the battery level and replace if needed.
Troubleshooting Common Problems
Even with clear instructions, things can sometimes go wrong. Here are some of the most common issues and how to fix them.
Keypad Not Responding
- Check batteries: Weak or dead batteries are a common cause.
- Check for stuck keys: Dirt or debris can prevent buttons from working.
- Reset the keypad: Most keypads have a way to reset to factory settings (check your manual).
Code Not Accepted
- Wrong sequence: Some keypads have unique programming steps.
- Timing: Most keypads give you 30 seconds to complete programming. Move quickly.
- Distance: Make sure you’re within range of the opener (usually 10-20 feet).
Keypad Works, Remotes Don’t (or Vice Versa)
- Memory not cleared: If you didn’t hold the “learn” button long enough, old codes may still be stored.
- Remote battery: Try a new battery in your remote.
Garage Door Opens Randomly
- Interference: Wireless signals from nearby devices can sometimes cause problems.
- Shared code: If you use a common code like “1234,” a neighbor’s remote could trigger your door.
Brand-specific Instructions
While the general process is similar, each major brand has some unique steps. Here’s how to change the code on the most common systems.
Liftmaster, Chamberlain, And Craftsman
These brands share similar technology.
- Find the “learn” button (yellow, red, green, or purple) on the opener.
- Press and release the “learn” button.
- Within 30 seconds, enter your new code on the keypad and press “Enter.”
- The opener light will blink or you’ll hear a click.
Tip: If your keypad is very old, you may need to hold “Enter” for a few seconds.
Genie
- Press and hold the “Program” button until the indicator light blinks.
- Enter your desired code, then press “Enter.”
- The light will blink again to confirm.
Overhead Door
- Press the “Learn Code” button on the opener.
- Enter your new code, then press “Enter.”
- The opener light will blink to confirm.
Wayne Dalton
Some Wayne Dalton keypads have a “reset” hole—press with a paperclip to reset.
- Press the reset button for several seconds.
- Enter your new code and press “Enter.”
- Test the keypad.
Non-obvious insight: Many newer keypads let you program multiple codes for different users. Check your manual if you want to add a temporary code for guests.
Data Table: Common Garage Door Opener Brands And Learn Button Colors
Understanding the color of your opener’s “learn” button can help identify programming steps and compatible accessories.
| Brand | Common Learn Button Color | Typical Location | Rolling Code? |
|---|---|---|---|
| LiftMaster | Yellow, Purple, Red, Green | Back or side of main unit | Yes (since 1993) |
| Chamberlain | Yellow, Purple, Red, Green | Back or side of main unit | Yes (since 1993) |
| Genie | Black, Red, Purple | On the motor head | Yes (since mid-1990s) |
| Overhead Door | Red, Purple | On the motor head | Yes |
| Wayne Dalton | Red | On the unit or keypad | Yes |
How To Choose A Secure Garage Door Code
A secure code is your first defense against unauthorized access. Here’s how to pick a strong, memorable code.
Do’s And Don’ts
- Do: Use a code with a mix of numbers (avoid patterns like “1111” or “1234”).
- Do: Change your code every 6-12 months.
- Do: Write it down in a safe place until you memorize it.
- Don’t: Use birthdays, house numbers, or other easy-to-guess numbers.
- Don’t: Share your code unless necessary.
Example Of Good Vs Bad Codes
| Code Example | Strength | Why? |
|---|---|---|
| 2580 | Weak | Straight line on keypad |
| 4729 | Strong | Random numbers |
| 2023 | Weak | Common year |
| 3907 | Strong | No obvious pattern |
Tip: Some keypads allow 6-digit codes for added security. If possible, use a longer code.
Maintaining And Testing Your Keypad System
A well-maintained keypad is less likely to fail when you need it.
Regular Maintenance
- Clean the keypad: Wipe with a dry or slightly damp cloth to keep buttons working smoothly.
- Check batteries: Most wireless keypads need new batteries every 1-2 years.
- Inspect for damage: Cracked or worn buttons can lead to code entry errors.
Testing Your System
- Test monthly: Enter your code and make sure the door responds.
- Check range: Make sure the keypad works from its mounted location.
- Try all remotes: After any code change, test all remotes and keypads to ensure they’re still connected.
Non-obvious insight: Some keypads have a backlight. If the light is dim, replace the battery soon—even if the keypad still works.
Advanced Tips: Temporary And Multi-user Codes
Many modern garage door openers let you set temporary codes for guests, cleaners, or service workers.
How Temporary Codes Work
- Set a separate code: Most keypads let you program a guest code that expires after a set time or number of uses.
- Delete after use: Always remove guest codes after they’re no longer needed.
Multi-user Codes
Some systems allow up to 4 or 5 different codes at once. This is handy for families or small businesses. Check your manual or the manufacturer’s website for instructions.

Data Table: Key Features Comparison
Here’s a quick comparison of key features among popular garage door keypad brands.
| Brand | Temporary Codes | Battery Type | Backlight | Max User Codes |
|---|---|---|---|---|
| LiftMaster | Yes | 9V | Yes | Up to 4 |
| Genie | Yes | AAA | Yes | Up to 3 |
| Overhead Door | Yes | 9V | No | Up to 3 |
| Wayne Dalton | No | 9V | No | 1 |
When To Call A Professional
Most homeowners can change their garage door keypad code without help. However, some situations call for an expert:
- Wiring issues: If the keypad or opener doesn’t respond at all, there may be a wiring problem.
- Lost manual/model info: If you can’t find the brand or model, a technician can identify it.
- Physical damage: Broken keypads or opener units may need replacement.
- Complex systems: Multi-door garages or smart home integrations can be tricky to reset.
Tip: If you’re unsure, contact the manufacturer’s customer service or a trusted garage door service.
Keeping Your Garage Secure
Changing your keypad code is a big step, but there’s more you can do:
- Install security cameras: Many smart garage openers include camera options.
- Check the door seal: Make sure no one can pry open the door.
- Use a shield: For older openers, add a shield to block radio “sniffing.”
- Don’t leave the remote in your car: Especially if you park outside.
For more on home security, check resources like the Security.org website.
Frequently Asked Questions
Can I Change My Garage Door Code Without The Old Code?
Yes, most systems allow you to reset the keypad using the “learn” button on the opener unit. This clears all old codes and lets you set a new one, even if you forgot the old code. You’ll need access to the opener unit in your garage.
How Often Should I Change My Garage Door Code?
Change your code at least once a year, or anytime you think it’s been shared or compromised. It’s also smart to update the code after moving into a new home or if you lose a remote.
Why Does My Keypad Stop Working After Changing The Code?
This often happens due to low batteries, incorrect programming steps, or being out of range. Try replacing the battery, checking the programming instructions, and making sure the keypad is within 20 feet of the opener.
Can Someone Hack My Garage Door Keypad?
Modern openers with rolling code technology are harder to hack, but not impossible. To stay safe, use a unique code, change it regularly, and keep your system updated. Avoid sharing your code with anyone you don’t trust.
How Do I Set A Temporary Code For Guests?
Most modern keypads let you add a temporary code. Check your manual for steps—usually, you press “Program,” enter a guest code, and specify how many uses or hours it’s active. Always delete guest codes after use.
Changing your garage door keypad code may seem simple, but it’s one of the most effective ways to boost your home’s security. By understanding your system, following the right steps, and maintaining your keypad, you ensure reliable protection for years to come.
Take a few minutes today to check your code, and you’ll gain peace of mind knowing your garage is secure.


