Now Reading: How to Change Garage Door Remote Battery in Minutes
- 01
How to Change Garage Door Remote Battery in Minutes
When your garage door remote stops working, it often feels like a small crisis. You press the button, expecting the familiar whir of the motor, but nothing happens. In most cases, the solution is simple: the battery needs to be replaced. While this task may seem a bit technical, it’s actually quick and easy with the right guidance. Learning how to change a garage door remote battery not only saves time and money but also helps you avoid unnecessary frustration. In this detailed guide, you’ll find clear instructions, practical examples, and expert tips to make the process smooth—even if you’ve never opened a remote before.
Understanding Your Garage Door Remote
Before you start, it’s important to know what you’re working with. Garage door remotes come in different shapes and sizes, but most are designed to be user-friendly. The main parts include:
- Battery compartment – where the battery sits
- Plastic casing – protects the inside components
- Button(s) – used to open or close the garage door
- LED light – flashes when the button is pressed
Most remotes use small coin-cell batteries, but some may use AAA or AA batteries. It’s essential to check the type before buying a replacement. The coin-cell batteries are often flat and round, while AAA or AA batteries are longer and cylindrical, similar to those found in TV remotes or small toys.
Some remotes have labels inside the battery compartment, but others may not. If you’re unsure, you can compare the size and shape of the battery with images online or take the old battery with you to the store as a reference.
This small extra step helps avoid buying the wrong battery, which is a common beginner mistake.
Why Do Batteries In Remotes Die?
Over time, batteries lose their charge. Frequent use, extreme temperatures, and even storing the remote in your car can speed up this process. On average, a garage door remote battery lasts 1 to 2 years.
Leaving the remote in a hot car during summer or a freezing car during winter can shorten battery life even more. Many people don’t realize that batteries drain faster in extreme conditions, so if you live in a place with very hot or cold weather, check your remote’s battery more often.
Signs Your Battery Needs Replacing
- The remote works only when very close to the garage door
- The LED light is dim or doesn’t light up
- The remote stops working completely
If you notice these signs, it’s time for a new battery. Sometimes, you may find the remote works one day and stops the next. This sudden failure is usually a clear sign the battery is at the end of its life.
Another signal is inconsistent performance—sometimes the door opens, sometimes it doesn’t. This is easy to confuse with a problem in the garage door opener, but the battery is often the cause.
What You Need Before Changing The Battery
Preparation is key to avoid mistakes. Here’s what you’ll need:
- Correct replacement battery (check your remote or owner’s manual)
- Small flathead screwdriver or coin (for prying open the casing)
- Clean, dry hands (to avoid damaging electronic parts)
- A clean workspace (so you don’t lose small parts)
If you’re unsure about the battery type, look inside the remote or search the model number online. Most remotes use common types like CR2032, CR2016, or CR2025.
Having clean, dry hands is more important than it seems. Any moisture or oil can transfer to the remote’s internal parts, which may cause corrosion over time. If you don’t have a screwdriver, many people use a coin, such as a penny or a dime, to carefully open the casing.
A well-lit area also helps, especially if you have poor eyesight. The parts inside are usually small, and good lighting prevents mistakes.
Table: Common Garage Door Remote Battery Types
| Remote Brand | Common Battery | Battery Shape |
|---|---|---|
| Chamberlain/LiftMaster | CR2032 | Coin cell |
| Genie | CR2032, CR2016 | Coin cell |
| Craftsman | CR2032 | Coin cell |
| Overhead Door | CR2025 | Coin cell |
| Linear | 9V, CR2032 | 9V block/Coin cell |
Always double-check your remote’s model before buying a battery. Some brands use different batteries for different models, so don’t assume they’re all the same.
Step-by-step Guide: How To Change Garage Door Remote Battery
Changing a remote battery is not complicated, but following the right steps ensures you don’t damage the remote.
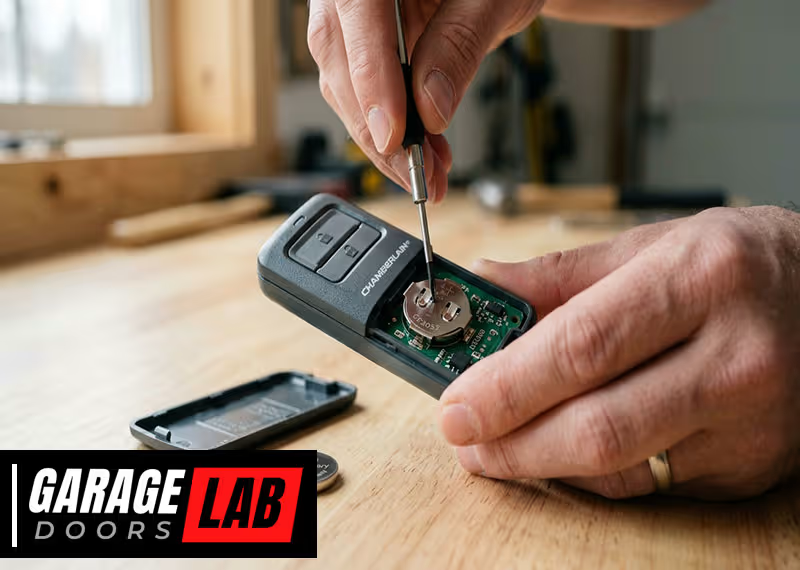
1. Open The Remote’s Casing
Most garage door remotes have a small notch or seam where you can gently pry them open. Here’s how:
- Look for a notch on the side or back of the remote.
- Insert a small flathead screwdriver or a sturdy coin into the notch.
- Carefully twist to pop open the casing. Do this gently—too much force can crack the plastic.
Some remotes have a small screw holding the two halves together. If so, remove it with a mini Phillips screwdriver first.
If you feel resistance, don’t force it. Look carefully for additional fasteners, or check the manual if you have it. Some older remotes have hidden latches inside, requiring careful wiggling to open.
Pro Tip:
Lay a soft cloth on your workspace. This prevents scratches on the remote’s surface and helps keep small parts from rolling away. If you drop a screw or a spring, the cloth makes it easier to find. Also, if your remote has a rubber gasket to keep out dust, keep track of it for reassembly.
2. Identify And Remove The Old Battery
Once the casing is open, you’ll see the battery. Take note of:
- Battery type and orientation (which side faces up)
- Small metal clips or contacts holding the battery
Gently slide or lift the battery out. If it’s stuck, use your tool to lightly push it free. Do not bend the contacts.
Take a quick photo with your phone before removing the battery. This helps you remember the correct position and can save time if you forget the orientation. Some remotes have small springs or tabs that hold the battery snugly—be gentle to avoid bending or breaking them.
3. Insert The New Battery
Take your new battery and insert it in the same orientation as the old one. Most coin batteries have a “+” side that should face up, but always check the markings inside the compartment.
- Press the battery in until it clicks or fits snugly under the clips.
- Make sure the battery is secure and not loose.
Be careful not to touch both sides of the battery at the same time, as this can briefly short the cell and reduce its life. Handle it by the edges, and avoid touching the flat surfaces.
4. Reassemble The Remote
Snap the casing back together, aligning any notches or buttons. If you removed a screw, replace it.
Test the buttons to make sure they move freely and the casing is closed properly. If the buttons feel stuck, reopen and double-check alignment. Press each button to confirm they click as before.
5. Test The Remote
Stand a few feet away from your garage door opener. Press the button and watch for the door to move or the LED to flash brightly.
If it doesn’t work:
- Open the remote again and recheck the battery orientation
- Try a different, new battery
- Clean the contacts gently with a dry cotton swab
If there’s still no response, the problem may be with the remote or the opener itself.
Testing the remote at different distances can help you spot weak signal problems. If the range is short, check the battery seating and contact points again.
Dealing With Different Remote Types
Not all remotes are built the same. Some have single buttons, others have three or more. Here’s what you might see:
Remotes With A Sliding Battery Cover
Some newer remotes have a sliding or pop-off battery cover. In this case:
- Slide the cover off with your thumb or fingernail
- Replace the battery as above
- Slide the cover back on
These are often easier to open and close.
A quick tip: If you’re struggling to slide the cover, double-check for a locking tab or a small screw that needs removal first.
Visor Clip Remotes
Many remotes come with a metal clip for attaching to your car visor. You may need to remove the clip to open the casing. This usually involves sliding or unscrewing the clip before accessing the battery compartment.
Sometimes the clip is attached with a small screw, while other times it simply slides off. Removing the clip often gives you better access to the battery compartment and reduces the risk of snapping the plastic.
Remotes With Small Screws
Some brands use tiny screws for extra security. Use a precision screwdriver set (often found in eyeglass repair kits) to remove these.
A magnetic screwdriver tip can help keep track of small screws. Place them in a small dish or on a magnet to avoid losing them.
Multi-button Remotes
If your remote controls more than one door, the process is the same. Just be careful not to press the circuit board or damage the buttons when opening the casing.
Circuit boards are fragile—avoid touching them directly with tools or fingers. Static electricity from your body can damage the board, so touch a metal object first to discharge any static before handling inside parts.
Safety Tips And Mistakes To Avoid
Handling small electronics can be tricky. Here are common mistakes and how to avoid them:
- Forgetting battery orientation – Always look at which way the old battery is installed before removing it.
- Touching the battery contacts – Oils from your fingers can cause corrosion. Handle the new battery by the edges.
- Losing small parts – Work over a tray or cloth to catch any screws or clips.
- Using the wrong battery type – Double-check model numbers to avoid electrical problems.
- Forcing the casing – If it doesn’t open easily, look for hidden screws or clips.
A non-obvious tip: If the remote still doesn’t work, try reprogramming it to your opener. Some remotes lose their code when the battery is removed for a long time.
Another insight: If your remote works intermittently after battery change, try cleaning the battery contacts with a small amount of rubbing alcohol and a cotton swab to remove invisible corrosion.
How To Tell Which Battery Your Remote Uses
If your remote doesn’t have the battery type printed inside, check these:
- Owner’s manual – Usually lists battery type and replacement steps
- Manufacturer’s website – Search your remote’s model number
- Physical size – Coin cells are small and round; AAA/AA are cylindrical
You can also take the old battery to a hardware or electronics store. Staff can match it for you if you’re unsure.
Table: Battery Size Comparison
| Battery Type | Diameter | Thickness | Typical Voltage |
|---|---|---|---|
| CR2032 | 20 mm | 3.2 mm | 3V |
| CR2016 | 20 mm | 1.6 mm | 3V |
| AAA | 10.5 mm | 44.5 mm (length) | 1.5V |
This helps you match the battery by size if the label is missing.
What To Do If The Remote Still Doesn’t Work
Sometimes, replacing the battery isn’t enough. Try these steps:
- Clean battery contacts – Use a dry cotton swab to remove dust or corrosion.
- Check for visible damage – Cracks in the circuit board or broken buttons may need repair.
- Reprogram the remote – Instructions are usually on the opener’s manual or the manufacturer’s website.
- Try a different battery – A rare dead-on-arrival battery can happen.
If all else fails, test the remote with another garage door opener (if available) to see if it’s the remote or the opener at fault.
Another advanced tip: If your garage has a wall-mounted control pad, test the door with it. If the wall pad works, but the remote does not (after battery change), the issue is with the remote. If both fail, the opener may need service or a new receiver.
How Often Should You Change The Battery?
Most garage door remote batteries last 12 to 24 months with regular use. Some high-quality brands claim up to 3 years, but this depends on:
- Frequency of use – More clicks mean faster battery drain
- Temperature extremes – Heat and cold reduce battery life
- Battery quality – Cheap batteries die sooner
A smart tip: Change the battery once a year as part of regular home maintenance, especially before winter.
Some people mark the battery change date on the inside of the remote with a marker or a small sticker. This helps you remember and avoid surprise failures.
Recycling Old Batteries
Don’t throw used batteries in the trash. Most contain chemicals that shouldn’t go in landfills. Instead:
- Collect old batteries in a jar or bag
- Drop them at local recycling centers or stores that accept batteries
Some electronics stores, supermarkets, and libraries have drop boxes for small batteries. Recycling helps protect the environment and keeps toxic materials out of water and soil.
You can learn more about battery recycling from the US Environmental Protection Agency.
Troubleshooting: Common Problems After Battery Change
A fresh battery should restore your remote, but sometimes new problems appear. Here’s how to troubleshoot them:
The Remote Works Only Sometimes
- Make sure the battery is seated correctly.
- Check for weak contact points—bend the metal clips gently for better connection.
- Interference from other wireless devices can cause issues. Try using the remote away from other electronics.
Sometimes, power lines, Wi-Fi routers, or new LED light bulbs in your garage can cause interference. If the remote worked before and now struggles after a battery change, try testing it at different times of day or after turning off nearby electronics.
The Remote Doesn’t Work At All
- Double-check battery orientation (“+” side up).
- Try a different new battery.
- Clean the battery contacts with a pencil eraser (gently).
- Reprogram the remote to the garage door opener.
If you have more than one remote, test the others too. If none work, the issue is likely with the opener, not the remotes.
The Led Light Flashes But The Door Doesn’t Move
- The issue may be with the garage door opener’s receiver.
- Check if other remotes work with the same opener.
- Inspect for a locked control panel or blown fuse in the opener.
If you cannot solve the issue, contact the manufacturer or a qualified technician.

Advanced Tips: Extending Remote Battery Life
To make your battery last longer:
- Keep the remote out of extreme heat or cold—store it in your house, not your car, if possible.
- Use quality batteries from trusted brands.
- Do not press the button repeatedly—each press drains power.
- Clean the remote regularly—dust and grime can cause battery drain.
A little-known insight: If your garage door opener has an optional wall-mounted button, use it more often and save the remote for when you’re in the car. This extends battery life.
Another tip: Avoid dropping the remote. Impacts can damage the battery connection or loosen internal parts, causing poor battery performance.
When To Replace The Remote Instead Of The Battery
Sometimes, remotes become unreliable even with a new battery. Replace your remote if:
- It stops working even after troubleshooting
- The casing is cracked or buttons are worn out
- The remote is more than 10 years old
New remotes are affordable and often have better range and features. Always program the new remote according to your opener’s instructions.
Table: Battery Vs. Remote Replacement
| Problem | Replace Battery | Replace Remote |
|---|---|---|
| Remote not working, LED off | Yes | No |
| Remote not working, LED flashes | No | Maybe |
| Buttons physically broken | No | Yes |
| Remote lost or very old | No | Yes |
Don’t spend too much time on an old, unreliable remote. Modern replacements are easy to pair with your garage door opener and usually come with clearer instructions.

Maintaining Your Garage Door Remote
Regular maintenance ensures your remote works when you need it:
- Clean the remote with a dry cloth every few months.
- Inspect for cracks or loose parts—fix them early.
- Replace the battery yearly or at the first sign of weakness.
- Store a spare battery in your glove box, especially for emergencies.
If you have more than one remote, change all batteries at the same time to avoid surprise failures.
Another practical habit: Check your remote’s battery before long trips. That way, you won’t return home to a non-working opener after a vacation.
Frequently Asked Questions
How Do I Know Which Battery My Garage Door Remote Needs?
Check inside the battery compartment for a label, look in your owner’s manual, or search your remote’s model number online. Most use coin batteries like CR2032 or CR2016.
If you’re still unsure, take the remote or battery to a store and ask for help. Staff at hardware or electronics stores can often identify the correct battery for you.
Can I Use A Different Type Of Battery If I Don’t Have The Exact One?
No, always use the battery type recommended by the manufacturer. Using the wrong voltage or size can damage the remote or make it stop working.
Some batteries look similar but have different thickness or voltage. Using the wrong one might fit physically but will not power the remote correctly.
Do I Need To Reprogram My Remote After Changing The Battery?
Usually not. But some remotes lose their programming if the battery is out for a long time. If the remote doesn’t work after a battery change, follow the instructions to reprogram it to your garage opener.
If you lose your manual, most manufacturers have instructions online.
How Long Does A Typical Garage Door Remote Battery Last?
Most last 1 to 2 years with normal use. If you use the remote daily or store it in extreme temperatures, it may drain faster.
What Should I Do If My Remote Still Doesn’t Work After Changing The Battery?
Clean the contacts, check the battery orientation, try another new battery, and reprogram the remote if needed. If these steps don’t help, the remote may be broken and need replacement.
Changing a garage door remote battery is a simple task that gives you back the control and convenience you rely on every day. With these tips, you can solve the problem quickly and keep your garage secure and accessible. No need to call a professional for something you can do yourself—with just a few minutes and a new battery, your remote will be working like new.